



Docker
Prerequisites
- Docker and Docker Compose: Must be installed on the host machine. Prefer the
docker composeplugin (Compose v2). Ifdocker composeis not available, use the legacydocker-composebinary. - Hostname: For a production-ready installation, you need a machine with an IP or hostname that can be used to contact Authentication Service.
- Firewall requirements: Ensure that the port on which the Authentication Service is hosted is open. For example, 9443.
- TLS certificate and associated keys: For securing HTTPS traffic.
- Realm Public Key: For validating access token issued by SAE.
Deployment
Note
For Linux-based deployments, switch to the root user before starting the setup to avoid permission or access-related failures.
sudo su
The deployment consists of the following steps:
- Access the AuthenticationService Package
- Extract the Package
- Load the Container Image
- Place the Required Files
- Set File Permissions
- Configure the Compose File
- Configure appsettings.json
- Start the Container
- Verify the Deployment
Access the AuthenticationService Package
Download the AuthenticationService package to your Linux machine. It is provided as a separate zip file and contains the container image, compose.yaml, and configuration files.
Extract the Package
-
Extract the
AuthenticationService.zippackage:unzip AuthenticationService.zip -
Navigate to the AuthenticationService folder, and run the following command to unzip the
AuthenticationService.tar.gzfile:gunzip <FileName>.tar.gz
Load the Container Image
Load the image using your container runtime:
docker load -i <FileName>.tar
Verify that the image was loaded successfully:
docker images
Note
Save the Image ID of the loaded AuthenticationService image. You will need it in Configure the Compose File.
Place the Required Files
In the AuthenticationService folder inside the installation package:
1. Navigate to the certs/ directory and place your valid certificate and key:
- Replace
certs/cert.pemwith the certificate you use to secure the HTTPS traffic for AuthenticationService. - Replace
certs/privateKey.pemwith the corresponding key of the certificate.
2. Navigate to the jwtPublic/ directory and replace publicKey.pem with your realm public key file.
Note
The certificate and private key file names should match those specified in the Configure AppSettings section.
For example,
"Path": "/thales/authenticationservice/API/certs/cert.pem",
"KeyPath": "/thales/authenticationservice/API/certs/privateKey.pem"
To obtain the Realm Public Key:
a. Open the SAE console, navigate to your realm, and select Realm settings > Keys.
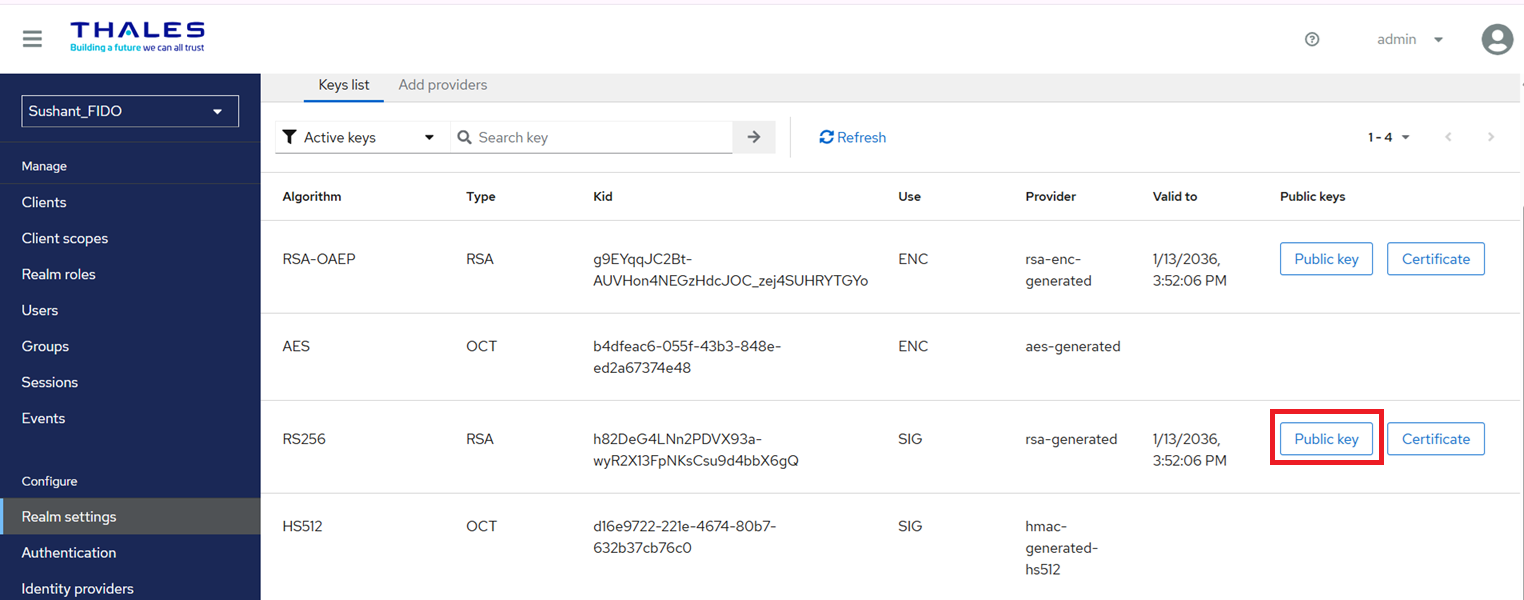
b. Select the RS256 active key and click Public key.
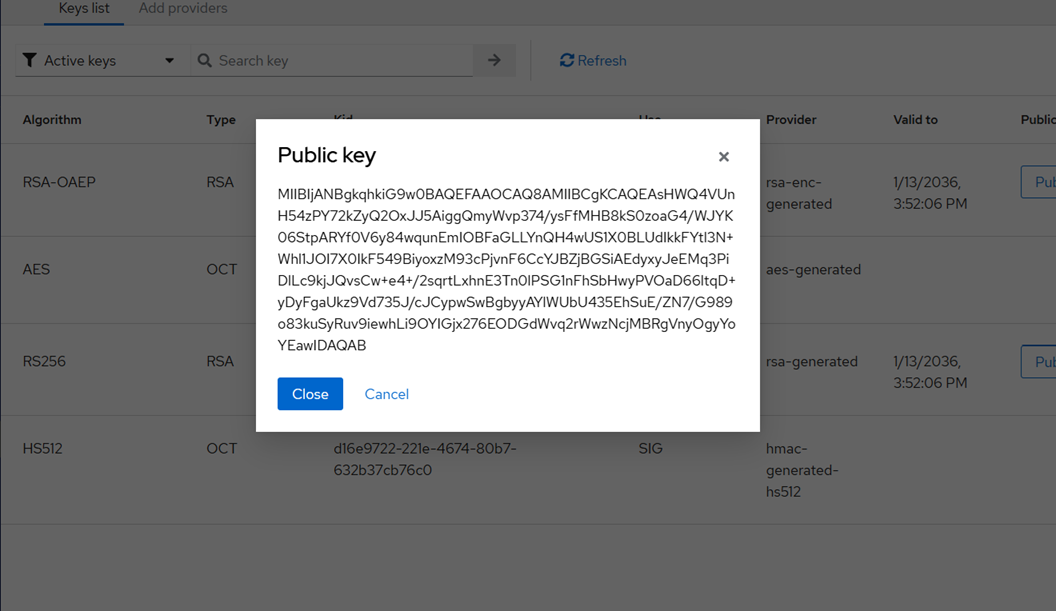
c. Copy the public key and save it as a .pem file using the standard -----BEGIN PUBLIC KEY----- / -----END PUBLIC KEY----- headers.
Note
All file paths must be relative to the compose.yaml file location.
Set File Permissions
Ensure the configuration files and directories are readable by the AuthenticationService container. Run the following commands from the AuthenticationService folder:
chmod 755 certs
chmod 755 config
chmod 755 jwtPublic

chmod 644 certs/cert.pem
chmod 644 certs/privateKey.pem
chmod 644 config/appsettings.json
chmod 644 jwtPublic/publicKey.pem
Configure the Compose File
Open the compose.yaml and make the following changes:
6.1 Update the Compose Version
Replace the placeholder <version> with the version of docker-compose installed on your system. To check the installed version, run:
docker compose version
Note
If docker compose is not recognized on your system, use the legacy standalone command instead: docker-compose --version.
6.2 Update the Host Port
Update only the host port under the ports section to the port on which you want to host AuthenticationService. Ensure that this port is open in your firewall.
<host-port>:9443
6.3 Update the Image Reference
Replace the image ID in the compose.yaml with the actual image ID of the SafeNet Access Exchange image that you just loaded. You can find the image ID by running the following command:
docker images
6.4 Update the extra hosts
In the extra_hosts section of compose.yaml, replace the placeholder values with the SAS hostname and its corresponding IP address:
"<hostname>:<ip-address>"
Configure appsettings.json
Update appsettings.json, located in the config/ folder of the AuthenticationService directory, with values specific to your environment. Update only the certificate and private key file names — do not modify the directory path.
HTTPS
Configure the certificate path and key path in appsettings.json as follows:
{
  "Kestrel": {
    "Endpoints": {
      "Http": {
        "Url": "http://*:9000"
      },
      "Https": {
        "Url": "https://*:9443",
        "Certificate": {
          "Path": "/thales/authenticationservice/API/certs/<certificate.pem>",
          "KeyPath": "/thales/authenticationservice/API/certs/<privateKey.pem>"
        }
      }
    }
  }
}
| Setting | Required | Description |
|---|---|---|
| Kestrel.Endpoints.Https.Certificate.Path | Yes | Path to the TLS certificate file inside the container. <certificate.pem> is the name of the certificate file placed in the certs/ folder used for HTTPS communication. |
| Kestrel.Endpoints.Https.Certificate.KeyPath | Yes | Path to the TLS private key file inside the container. <privateKey.pem> is the private key file placed in the certs/ folder used for HTTPS communication. |
Replace only:
<certificate.pem><privateKey.pem>
Keep the rest of the path unchanged.
JWT Authentication
{
  "JwtAuthentication": {
    "Issuer": "<SAE-realm-issuer-URL>"
  }
}
| Setting | Required | Description |
|---|---|---|
| JwtAuthentication.Issuer | Yes | Comma-separated list of valid token issuer URLs. These are the SAE realm issuer URLs for all realms whose tokens the service should accept (for example, https://sae.stademo.com/realms/Sushant_FIDO). |
To find the Issuer URL:
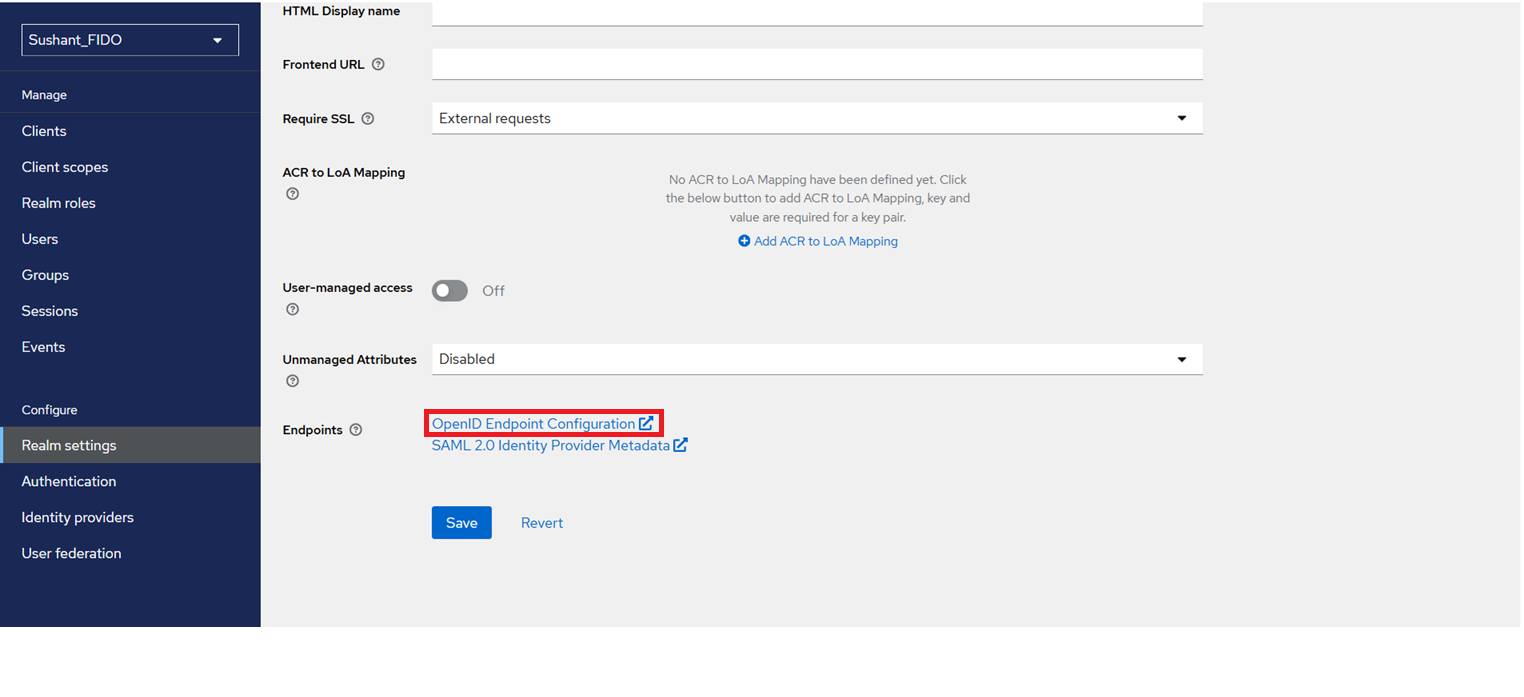
1. Open the SAE console, navigate to your realm, and select Realm settings > General.
2. Under Endpoints, click OpenID Endpoint Configuration.
3. The line marked in red provides the issuer URL information.
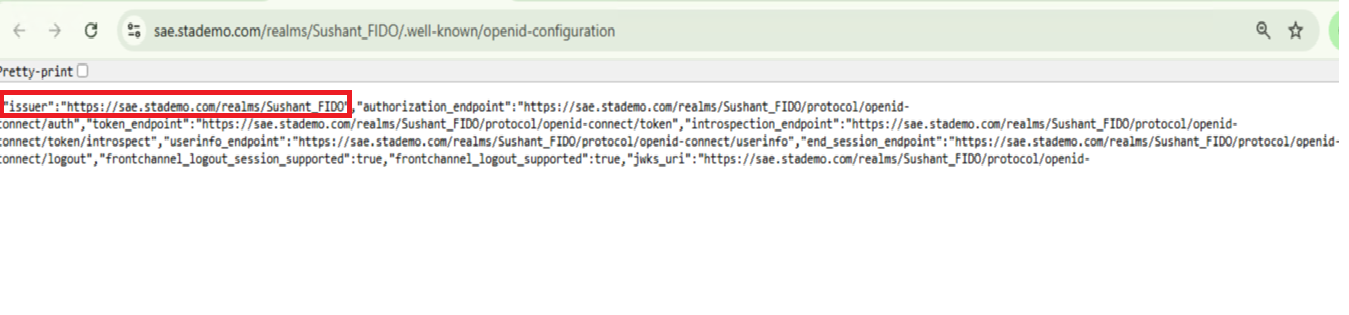
4. Copy the issuer URL and add it in the configuration.
FIDO Server Connection
{
  "FidoServerConnection": {
    "BaseUrl": "http://<Internal-Ip>:9080"
  }
}
| Setting | Required | Description |
|---|---|---|
| FidoServerConnection.BaseUrl | Yes | Base URL of the FIDO server (for example, https://<Internal-Ip>:9080), where <Internal-Ip> is the IP of the machine on which the FIDO server is hosted. |
SAS Core API Connection
{
  "SasCoreApiBaseUrl": "<sas-core-api-base-url>",
  "SasCoreApiConnection": {
    "AccessToken": "<access-token>"
  }
}
| Setting | Required | Description |
|---|---|---|
| SasCoreApiBaseUrl | Yes | Base URL of the SAS Core API (for example, https://<sas-core-api-host>:<port>), where <sas-core-api-host> is the domain or host name of the machine where SAS PCE is hosted. |
| SasCoreApiConnection.AccessToken | Yes | Access token for the SAS Core API. |
To retrieve the Access Token:
1. In SAS PCE, go to System > Setup > Agent Communication with JWT token.
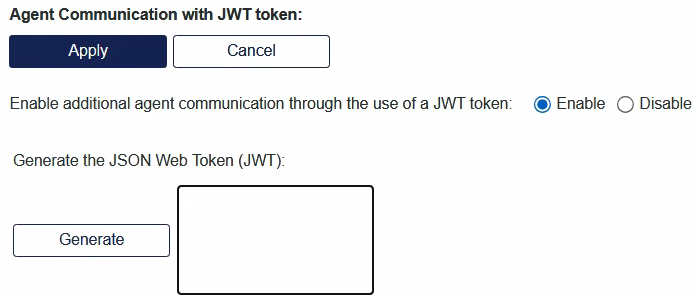
2. Under Generate the JSON Web Token (JWT), click Generate.
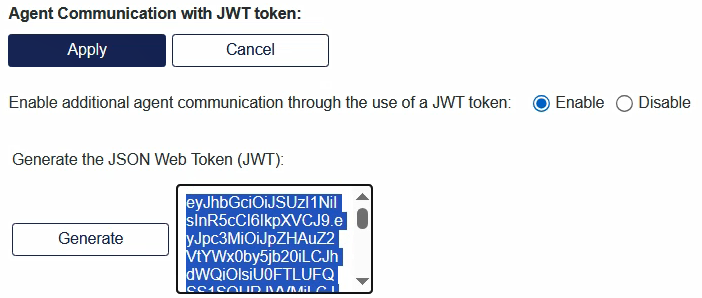
3. Copy the entire generated JWT, paste it in a text editor, and update it in the accessToken key.
Note
If a new JWT token is generated from the SAS PCE, the same JWT token must also be updated on the SAE to ensure successful authentication.
Tip
For better security, instead of storing the access token as a hardcoded value in appsettings.json, it is recommended to use Vault for secure storage. Refer to the Configure Vault section for details.
Start the Container
From the directory containing the compose.yaml file, start the container in detached mode:
docker compose up -d
Note
If docker compose is not recognized on your system, use the legacy standalone command instead: docker-compose up -d.
Verify the Deployment
Verify that the container is running and has a status of Up:
docker ps -a
To inspect the container logs:
docker logs <containerID>
Replace <containerID> with the container ID shown in the output of the status command above.
Configure Vault (Optional)
This section applies only if you are using Vault to securely store the SAS Core API access token.
The configuration consists of the following steps:
- Install Vault
- Start Vault
- Create the Secret
- Create the Vault Token File
- Set File Permissions
- Uncomment the Vault Token Volume Mount
- Configure vaultappsettings.json
Install Vault
RHEL/CentOS/Fedora:
sudo yum install -y yum-utils
sudo yum-config-manager --add-repo https://rpm.releases.hashicorp.com/RHEL/hashicorp.repo
sudo yum -y install vault
Ubuntu/Debian:
wget -O- https://apt.releases.hashicorp.com/gpg | sudo gpg --dearmor -o /usr/share/keyrings/hashicorp-archive-keyring.gpg
echo "deb [signed-by=/usr/share/keyrings/hashicorp-archive-keyring.gpg] https://apt.releases.hashicorp.com $(lsb_release -cs) main" | sudo tee /etc/apt/sources.list.d/hashicorp.list
sudo apt update && sudo apt install vault
Start Vault
Choose one of the following options, depending on how you want to run Vault.
Option A: Development Mode (Testing Only)
Development mode runs Vault in memory and does not require any configuration. Use it for quick testing:
vault server -dev -dev-listen-address="0.0.0.0:8200"
The terminal prints output similar to:
Root Token: hvs.XXXXXXXXXXXXXXXXXXXXXXXX
Note
Keep this terminal open. Open a second terminal for the remaining steps.
Dev mode stores all data in memory only. Anything you store is lost as soon as the Vault process stops, so use this option only for short-lived testing.
Option B: Persistent Mode (Recommended)
Unlike Development Mode, this option saves Vault's data to disk so it survives a restart. These steps assume no prior Vault experience.
1. Edit the /etc/vault.d/vault.hcl configuration file. If you installed Vault using the package manager commands in Step 1, this file already exists with a default configuration — replace its contents with the following, and create the /opt/vault/data folder if it does not already exist:
storage "file" {
  path = "/opt/vault/data"
}

#HTTP listener
listener "tcp" {
  address     = "0.0.0.0:8200"
  tls_disable = true
}

api_addr = "http://127.0.0.1:8200"
Note
The api_addr entry is not available in the configuration file by default. You must add it manually as shown above.
- The
storageblock configures Vault to persist its encrypted data on disk at/opt/vault/data. This allows the data to survive a Vault restart, unlike the Development Mode, which stores data in memory. - The
listenerblock specifies the network port on which Vault accepts connections. Settingtls_disable = truecauses Vault to use plain HTTP, as in the Development Mode, since Vault and AuthenticationService run on the same trusted host.
Note
If the file already contains an HTTPS listener block (tls_cert_file/tls_key_file), comment it out and use the HTTP listener shown above. Only one listener block should be active. After you save the configuration, restart Vault.
2. Start the Vault server using this configuration file:
vault server -config=/etc/vault.d/vault.hcl
This starts Vault as a real (non-development) server that keeps running and persists its data.
3. In a second terminal, initialize Vault. You only need to initialize Vault once, when you start a new Vault server for the first time. First, set the Vault address, then initialize Vault:
export VAULT_ADDR='http://127.0.0.1:8200'
vault operator init
Vault prints five unseal keys and one initial root token.
Note
These keys and the root token are shown only once. Copy and store them in a secure location immediately.
4. Unseal Vault. Vault always starts in a sealed state (encrypted and unusable) and must be unsealed before it can serve requests. Use any three of the five unseal keys generated in the previous step. Run the following command three times, using a different unseal key each time:
vault operator unseal <unseal-key>
5. Point the vault CLI at your running server and log in using the initial root token from step 3:
export VAULT_ADDR='http://127.0.0.1:8200'
vault login <initial-root-token>
6. Enable the key-value secrets engine at the secret/ path used later in this guide. Development Mode turns this on automatically, but a persistent server does not, so this is a one-time manual step:
vault secrets enable -path=secret kv-v2
Note
This option uses tls_disable = true. Use it only when Vault and the services that connect to it, such as AuthenticationService, are on the same trusted host or network. If Vault and AuthenticationService run on different hosts, configure TLS on the Vault listener instead. TLS configuration for this scenario is not covered in this guide.
Create the Secret
export VAULT_ADDR='http://127.0.0.1:8200'
export VAULT_TOKEN='hvs.XXXXXXXX'   # root token from Step 2 (Option A) or the initial root token from Step 2 (Option B)

# Store the access token
vault kv put secret/authenticationservice \
  sasCoreApiAccessToken=<actual-access-token>

# Verify
vault kv get secret/authenticationservice
Note
Replace <actual-access-token> with the JWT token available on SAE.
Create the Vault Token File
Create a vault-token file containing the root token generated in Step 2, and place it under the vault/ directory within the AuthenticationService folder. Run the following command from the vault directory located inside the AuthenticationService directory:
echo -n '<root-token-from-step-2>' > ./vault/vault-token
Set File Permissions
Set the correct permissions for the Vault token file:
chmod 755 ./vault/vault-token
Uncomment the Vault Token Volume Mount
In compose.yaml, uncomment the vault-token volume mount and update the host-side path to point to your vault-token file.
Configure vaultappsettings.json
Update vaultappsettings.json, located in the config/ folder of the AuthenticationService directory, with the following configuration:
{
  "vaultUrl": "<vault-url>",
  "vaultAuthMethod": "<vault-auth-method>",
  "vaultTokenFile": "/thales/authenticationservice/vault-token",
  "vaultRole": "<vault-role>",
  "SasCoreApiConnection:AccessToken": "$V_secret/data/authenticationservice/sasCoreApiAccessToken"
}
| Setting | Description |
|---|---|
| vaultUrl | Full URL of your Vault server (for example, http://<vault-host>:8200), where <vault-host> is the IP or hostname of the machine on which the Vault service is running. The port used is 8200, as configured in the previous steps. |
| vaultAuthMethod | Set the vaultAuthMethod to "token" to use token-based authentication. |
| vaultTokenFile | No changes required. Path to the Vault token file inside the container. Required if vaultAuthMethod is set to "token". |
| vaultRole | (Optional) The Vault role assigned to this service. |
| SasCoreApiConnection:AccessToken | No changes required. Vault secret path for the SAS Core API access token. The path secret/data/authenticationservice/sasCoreApiAccessToken is recommended, as it explicitly retrieves the sasCoreApiAccessToken key and is valid when multiple keys are stored under the same secret. |

