



Configuration
Note
Always work in Run as administrator mode when installing, configuring, upgrading or uninstalling the SafeNet Agent for Microsoft RDWeb.
Configuring SafeNet Agent For Microsoft RDWeb
The SafeNet RDWeb Agent Manager enables the modification of various features available within the SafeNet Agent for Microsoft RDWeb. To open the SafeNet RDWeb Agent Manager, navigate to installed apps and search for RDWeb Agent Manager. After completing configuration of the required settings, click Apply.
Configuring Policy Settings
To configure policy settings:
-
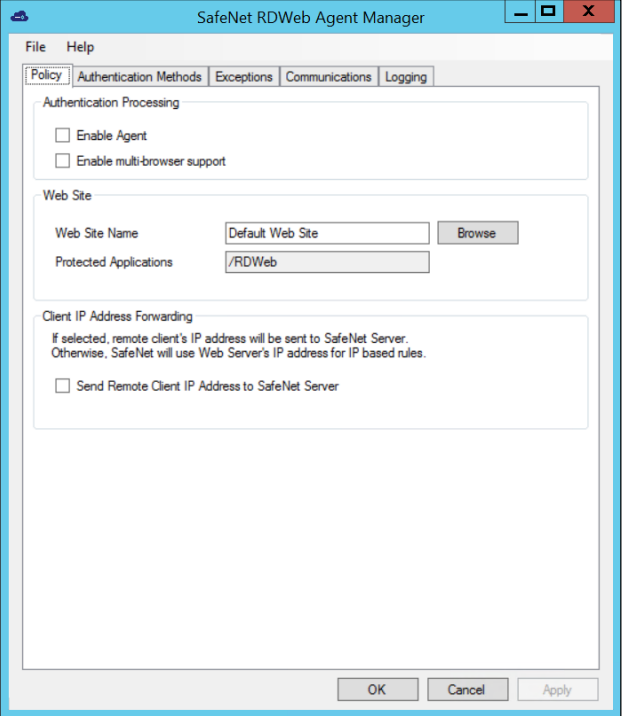
Select Policy tab.
-
To activate SafeNet Agent for Microsoft RDWeb, select Enable Agent.
-
To make it compatible with all the browsers, select Enable multi-browser support.
Note
This feature does not work with RD Gateway agent. Therefore, to use RD Gateway agent together with RDWeb, this checkbox must be unchecked.
-
In the Web Site Name field, enter Default Web Site, or any other website.
-
The Protected Applications field displays
/RDWeb(This is for information only and cannot be changed). -
To send the remote client IP address to the SafeNet server, select Send Remote Client IP Address to SafeNet Server. If not selected, the agent's IP address is used.
Configuring Authentication Methods
To select the required authentication method:
-
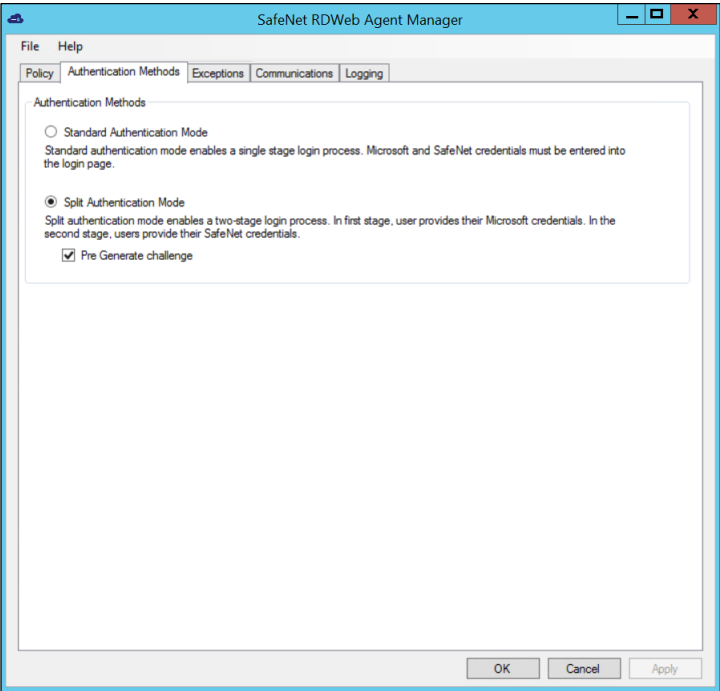
Select Authentication Methods tab.
-
Select one of the following authentication methods:
Authentication Method Description Standard Authentication Mode Enables a single step login process. Default value: Disabled. Microsoft and SafeNet credentials must be entered in a single login page. Split Authentication Mode Enables a two-stage login process. Default value: Enabled. In the first stage, users provide their Microsoft credentials. In the second stage, users provide their SafeNet credentials. -
Pre Generate challenge (available with Split Authentication Mode): Select to activate pre generate challenge. If selected, the challenge-response token receives a challenge in the second login screen.
Configuring Authentication Exceptions
To configure Microsoft groups or network traffic to bypass SafeNet Authentication:
-
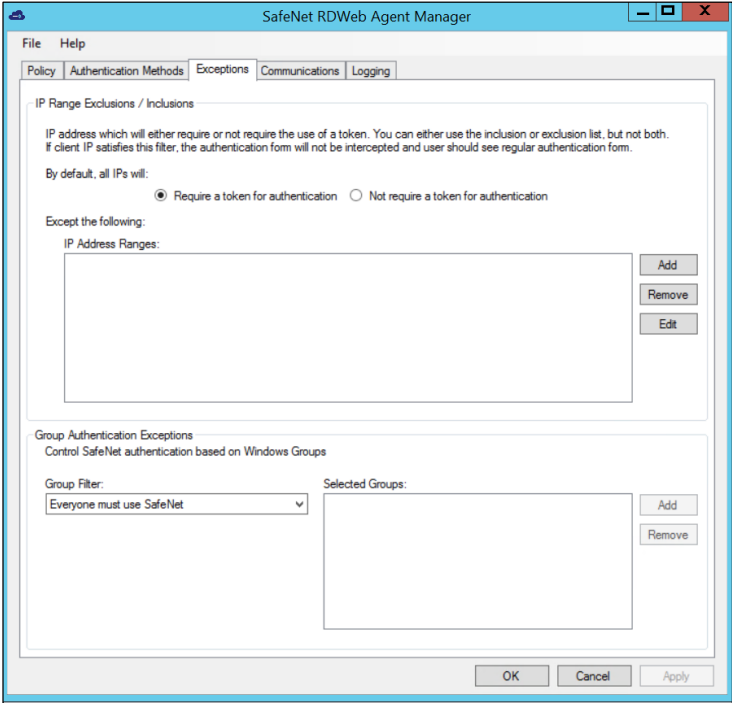
Select Exceptions tab.
-
Under By default, all IPs will field, select one of the following:
- Require a token for authentication (default)
- Not require a token for authentication
-
In the IP Address Ranges box, click Add to add the IP addresses to be exempt from using SafeNet Authentication.
Note
If the IP Address Ranges box is left empty, all networks are required to perform SafeNet authentication.
-
To set group authentication exceptions, under Group Authentication Exceptions, in the Group Filter list, select one of the following:
Everyone must use SafeNet All users must perform SafeNet Authentication (default). Only selected groups will bypass SafeNet All users are required to perform SafeNet Authentication except the defined Microsoft Groups. Only selected groups must use SafeNet Not all users are required to perform SafeNet Authentication; only the defined Microsoft groups. Note
- Nested Groups are not supported.
- Group authentication exceptions omit single and/or multiple domain groups from performing SafeNet Authentication. Only one group filter option is valid at any given time, and it cannot overlap with another group authentication exception.
-
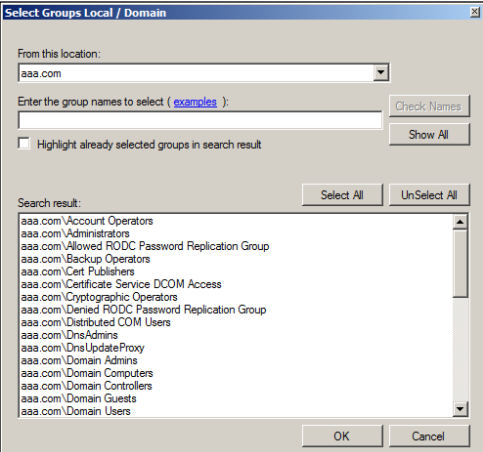
To select groups to include as authentication exceptions, next to the Selected Groups box, click Add. The Select Groups Local / Domain window is displayed.
-
Complete fields as follows:
From this location Select the location from which the results are searched. Enter the group name to select Used in conjunction with Check Names or Show all. Allows searches for Microsoft groups. Highlight already selected groups in search results If a Microsoft group has already been configured in the exception, it appears as a highlighted result.
Configuring Connection Options
Authentication Server Settings
To configure connection options for SafeNet:
-
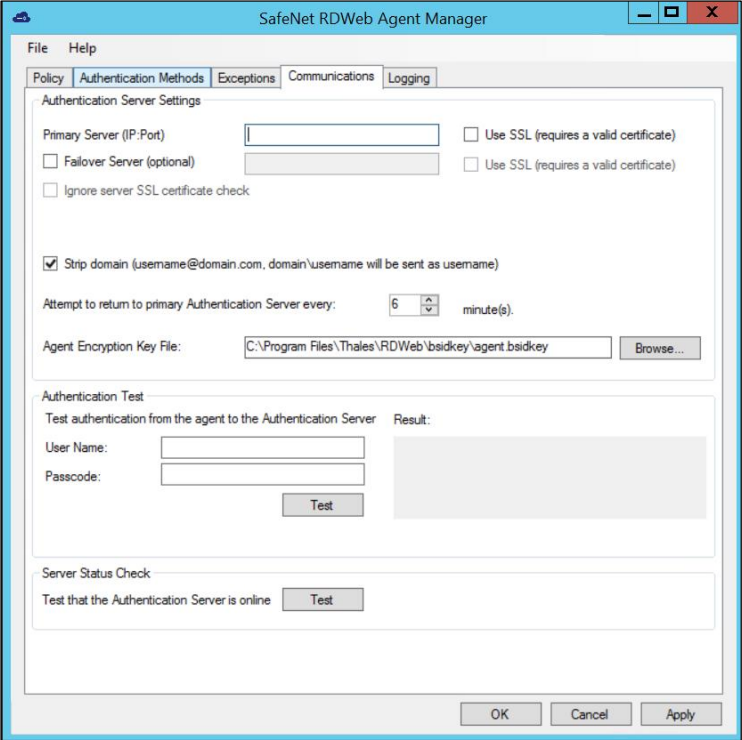
Select Communications tab.
-
Under Authentication Server Settings, enter values for the following fields:
Field Description Primary Server (IP:Port) Enter the IP address or hostname of the primary SafeNet server. Default: Port 80. Select Use SSL if required. The default TCP port for SSL requests is 443. Ignore server SSL certificate check Select the checkbox to disable the SSL server certificate error check on the agent. It is unchecked by default. If customers are using the on-premise deployment of SafeNet server within a well-controlled network (where self-signed certificates are used and cannot be properly validated by the RDWeb Agent), this checkbox needs to be selected. Note: We strongly recommend the use of SSL certificates. Failover Server (optional) Enter the IP address or hostname of the failover SafeNet server. Default: Port 80. Select Use SSL if required. The default TCP port for SSL requests is 443. Strip Domain (username@domain.com, domain\username) Select if the SafeNet username is required without the suffix @domain or prefix domain. Note: The realm-stripping feature applies to SafeNet usernames only. Active Directory usernames are not affected. Once stripping is activated or deactivated for an RD Remote Access site, the agent stores these values and uses them as default for each new site protected by the agent. Attempt to return to primary Authentication Server every Enter the Primary Authentication server retry interval in minutes. This sets the interval between attempts to return to the primary server. Agent Encryption Key File Enter the location of the SafeNet server key file.
Authentication Test
To test authentication between the SafeNet Agent for Microsoft RDWeb and the SafeNet server:
-
Under Authentication Test, enter Username and Passcode.
-
Click Test.
The result is displayed in the Result box.
Note
The behavior of the test is in accordance with the realm-stripping configuration. For example, if realm stripping has been activated and the user name is entered in the format username@domain, then @domain is removed.
To verify the connection between the SafeNet Agent for Microsoft RDWeb and the SafeNet server, click Server Status Check. A message is displayed confirming the connection.
Configuring Logging Settings
Adjusting Logging Level
To adjust the Logging Level:
-
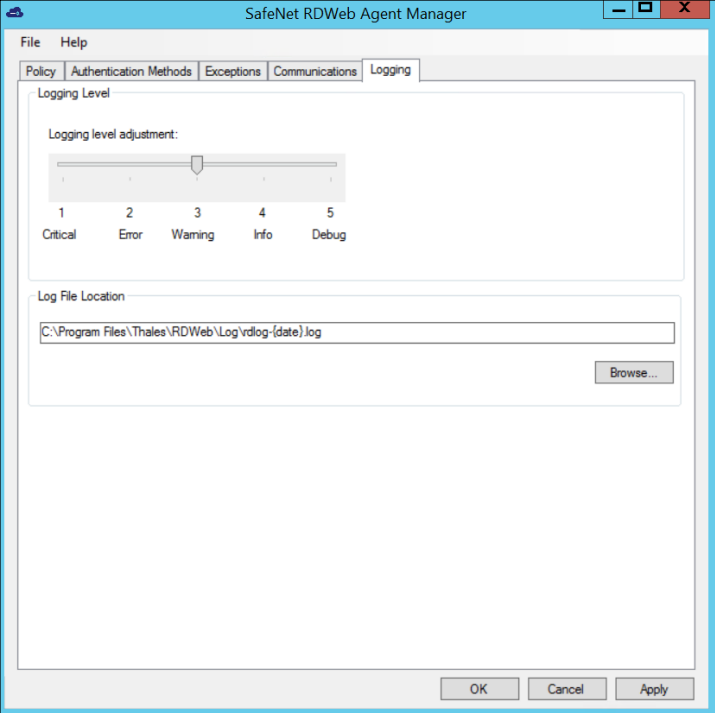
Select Logging tab.
-
Drag the pointer on the Logging level adjustment scale to the required level.
Field Description Logging Level Set the required logging level (default value 3):
1 Critical - only critical
2 Error - critical and errors
3 Warning - critical, errors, and warnings
4 Info - critical, errors, warnings, and information messages
5 Debug - all available informationLog File Location Specifies the location of the log files.
The log file is rotated on a daily basis.
The default log file location is:C:\Program Files\Thales\RDWeb\Log
If you change the default log file location, the folder must be accessible to all users. -
Click Apply.

