Deploying the agent via Group Policy Object
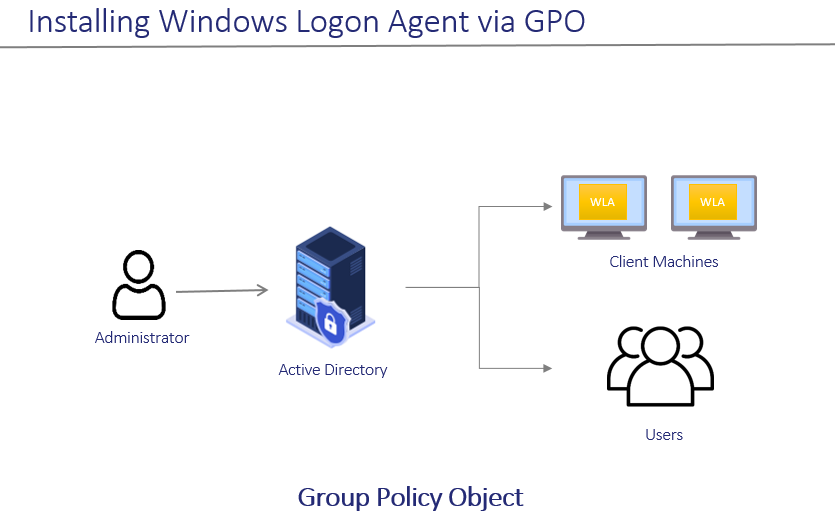
The use of Microsoft Group Policy or Group Policy Objects (GPO) enables the SafeNet administrator to centrally manage the agent configuration for users and computers in an Active Directory environment. It allows to configure many important policy settings to provide flexibility and support extensive configuration information.
For more details about the Group Policy and Group Policy Objects, see Group Policy Overview.
Configuring the ADMX and ADML settings
The SafeNet Agent for Windows Logon policy settings are stored in a Windows Administrative Template (ADMX) file. The settings can be edited using the Windows tools. It can be propagated to the entire domain, or be applied to the local computer and domain controllers only.
Open the administrative template and perform the following steps to configure the settings:
-
From the Windows taskbar, select Start > All Programs > Accessories > Run.
-
Enter
gpmc.mscand click OK. The Group Policy Management window is displayed.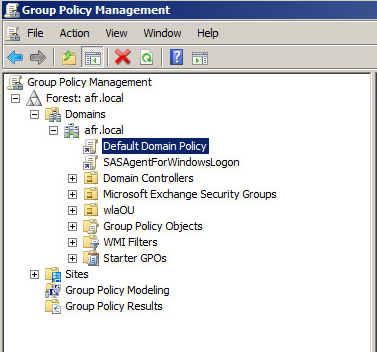
-
Perform one of the following actions:
- To propagate the settings to all clients in the domain, right-click Default Domain Policy or newly created GPO under the domain node.
- To apply the settings to the local machine and any other domain controllers in this domain, go to the Domain Controllers node and right-click Default Domain Controllers Policy.
From the drop down menu, select Edit. The Group Policy Management Editor window is displayed.
-
In the left pane, navigate to Computer Configuration > Policies > Administrative Templates > WLA Policies > AuthGINA. The settings are displayed in the right pane.
-
Enable all the setting as per your requirement, if not already enabled, with default value or user-defined value.
Click here to see the description of the registry settings available with the agent.
Deploying the agent
Deploying SafeNet Agent for Windows Logon via GPO requires:
- Creating a Distribution Point
- Creating a Group Policy Object
- Adding ADMX and ADML File to Group Policy Object Editor
- Deploying the MSI
Creating a distribution point
To deploy an MSI through GPO, perform the following steps to create a distribution point on the Publishing Server:
-
Log in to the server as an administrator.
-
Create a shared network folder.
Note
The shared network folder contains the MSI package and Agent file.
-
Set permissions on this folder to allow access to the distribution package.
-
Copy and paste the SafeNet Agent for Windows Logon MSI file (SafeNet Authentication Service Agent for Win 8-10-2012-2016 x64.msi) and Agent file in the previously created shared network folder.
Creating a Group Policy Object
An MSI package is deployed/distributed through GPO. To create and enforce a new GPO, perform the following steps:
-
From the Windows taskbar, select Start > All Programs > Accessories > Run.
-
Enter
gpmc.mscand click OK. The Group Policy Management window is displayed. -
Expand Forest (your forest) > Domains (your domain).
-
Right-click the Group Policy Objects and select New.
-
Enter a name for your policy and leave Source Starter GPO as none.
-
Right-click the domain name and select Link an Existing GPO.
-
In Select GPO pop-up window, select newly created GPO and click OK.
-
Click the newly created GPO. In the right pane, right-click the linked domain name and select enforce. The GPO will be linked with the domain.
Adding ADMX and ADML File to Group Policy Object Editor
To add the ADMX and ADML file to the GPO Editor, perform the following steps:
-
Copy the Local Group Policy definition (
C:\Windows\PolicyDefinitions) to Domain Group Policy (C:\Windows\SYSVOL\sysvol\<domain_name>\Policies). -
Copy the ADMX file (SafeNetAgentForWindowsLogon.admx) from the package and paste it to the following location:
C:\Windows\SYSVOL\sysvol\<domain_name>\Policies\PolicyDefinitions -
Copy the appropriate ADML language file (SafeNetAgentForWindowsLogon.adml) to a language folder under the \PolicyDefinitions.
For example, in Windows Server 2019, the English language file provided should be written to:
C:\Windows\SYSVOL\sysvol\<domain_name>\Policies\PolicyDefinitions\en-US
Deploying the MSI
To deploy the WLA MSI to the client machines, perform the following steps:
-
Open and right-click the GPO and select Edit.
-
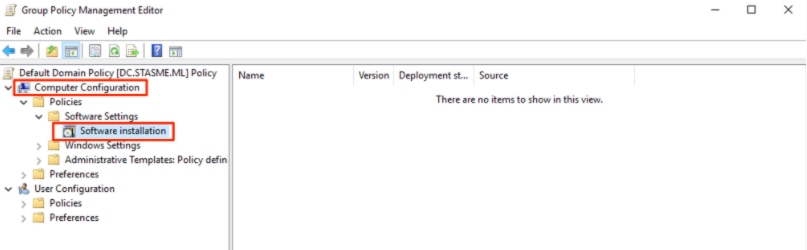
In the Group Policy Management Editor, navigate to Computer Configuration > Policies > Software Settings > Software Installation.
-
Right-click the Software Installation, and select New > Package.
-
Select the SafeNet Agent for Windows Logon MSI file (SafeNet Authentication Service Agent for Win 8-10-2012-2016 x64.msi) from the previously created shared folder.
-
Select the deployment Method – Assigned and click OK.
-
Double-click MSI and under Deployment tab, click Advanced. Select Ignore language checkbox.
-
On Security tab, select the client machine, give the required permission and click OK.
-
Now, the GPO will have the MSI Installation package. Next time, if the GPO is updated on the client computer, it will silently install the MSI. To apply the changes instantly, use the following command
gpupdate /force.
Note
Restart might be required after executing the above command.
-
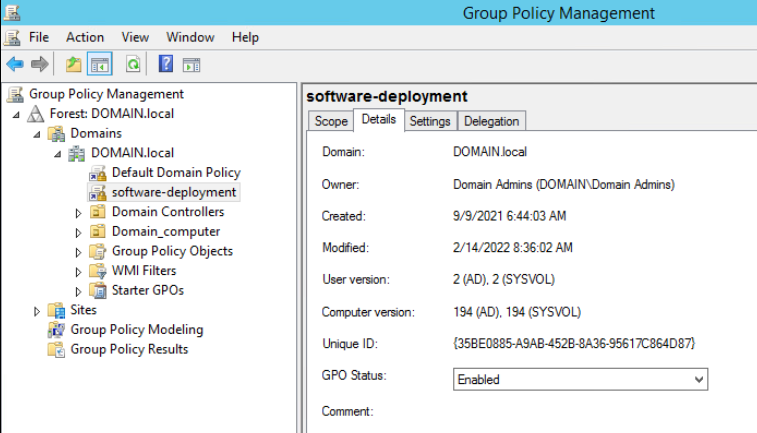
Under Details tab, Enabled status displays for the created GPO.
Upgrading the agent
Perform the following steps to upgrade the existing WLA package with a new package:
-
Perform Step 1 to Step 4 in Deploying the MSI section.
-
In the Deploy Software pop-up window, select Advanced and click OK.
-
Go to the Upgrades tab and click Add.
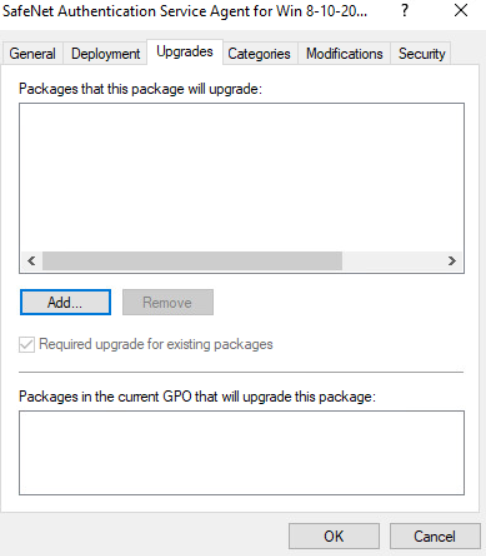
The Add Upgrade Package window is displayed.
-
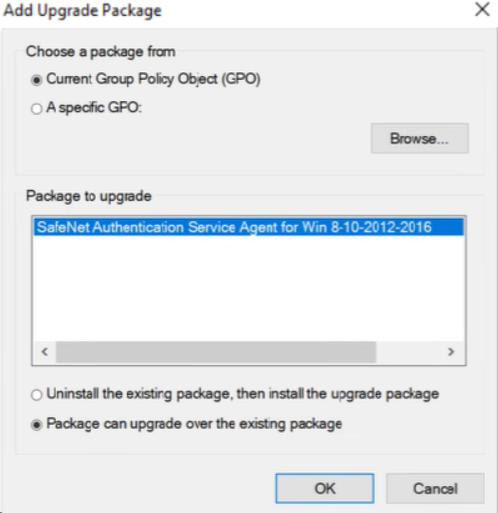
Under Choose a package from, select Current Group Policy Object (GPO) or click Browse to select a specific GPO.
-
Under Package to upgrade, select the desired package from the list, and then select Package can upgrade over the existing package.
-
Click OK.
Updating the agent configuration file
Before deploying the updated agent configuration file, ensure that the .agent file contains the required configuration. For more information, see Configuring the agent file.
Deploying the updated agent configuration file
Perform the following steps to deploy the updated .agent file Sample_Passwordless_UCA_FIDO.agent:
-
Click here to download the
UpdateAgentConfig_GPOzip file. -
Unzip the downloaded zip file. It contains the
UpdateAgentConfig.cmdcommand script. -
Rename the updated
.agentfileSample_Passwordless_UCA_FIDO.agenttoUpdatedWindowsLogon.agent. -
Copy and paste the following into a network folder location that must be accessible from the GPO client machine:
UpdateAgentConfig.cmdcommand scriptUpdatedWindowsLogon.agentfile
-
Launch the Group Policy Management Editor on the GPO server or domain controller.
-
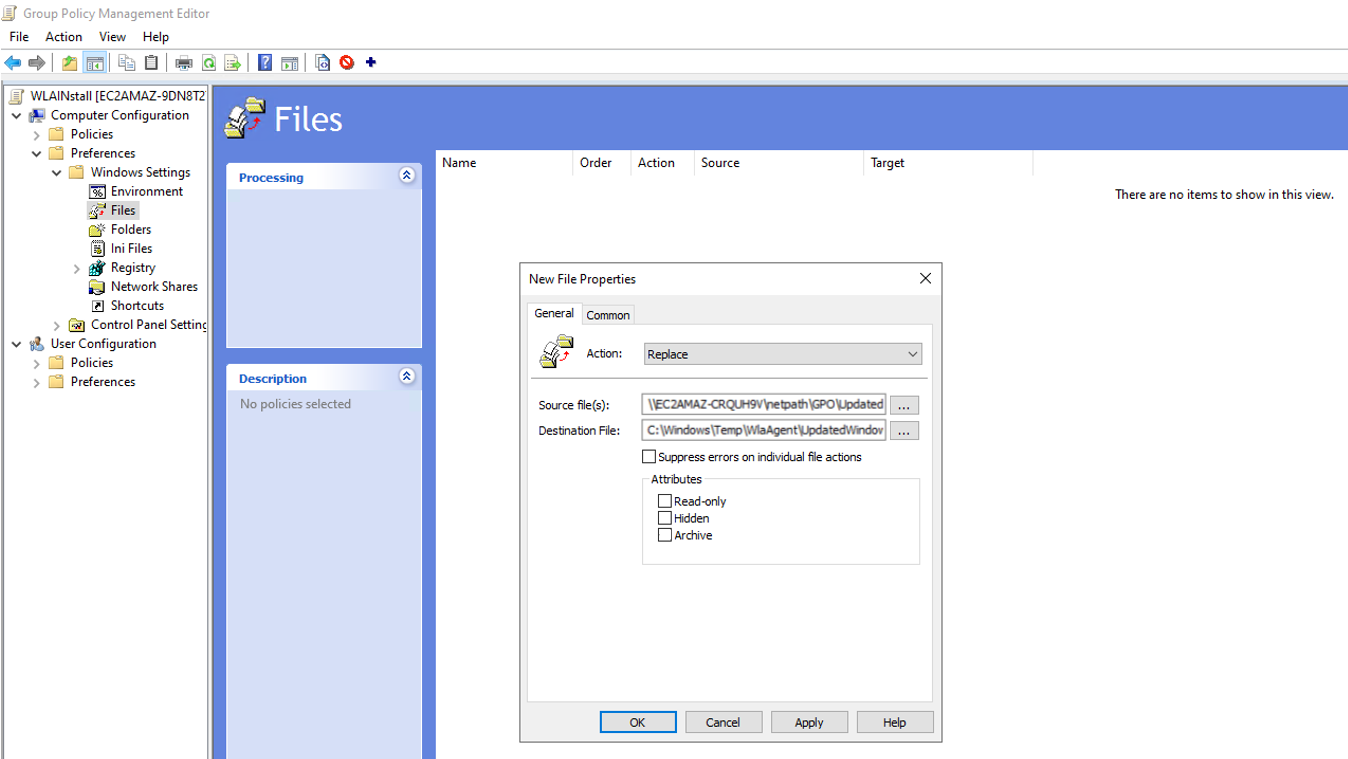
In the left pane, navigate to Computer Configuration > Preferences > Windows Settings > Files.
-
Right-click and select New > File. On the New File Properties window, on the General tab, perform the following steps:
-
From the Action dropdown, select Replace.
-
In the Source file(s) field, enter the network path of the
.agentfile. For example,\\Server\Share\DeploymentFiles\UpdatedWindowsLogon.agent. -
In the Destination file field, enter
C:\Windows\Temp\WlaAgent\UpdatedWindowsLogon.agent. -
Click Apply > OK.
-
-
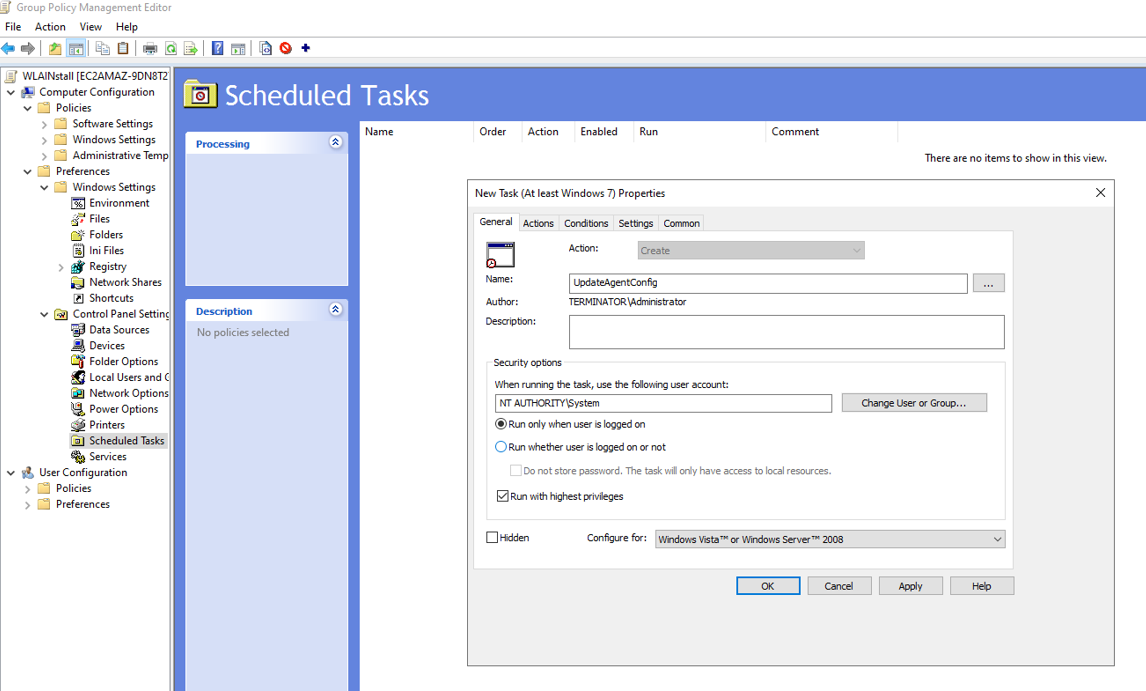
In the left pane, click Control Panel Settings > Scheduled Tasks.
-
Right-click and select New > Immediate Task (At least Windows 7). On the New Task (At least Windows 7) window, perform the following steps:
On the General tab:
-
In the Name field, enter
UpdateAgentConfig. -
Under Security options, click Change User or Group. On the Select User or Group window, in the Enter the object name to select field, enter
system, and then click OK. -
Select the Run with highest privileges check box.
-
From the Configure for dropdown, select Windows 7, Windows Server 2008R2.
On the Actions tab:
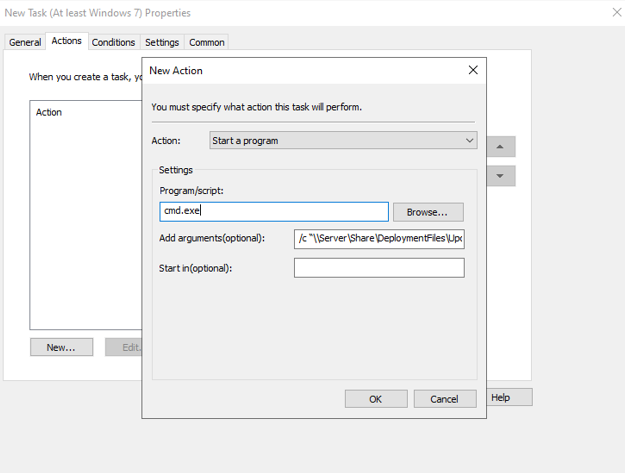
-
Click New.
-
On the New Action window, under Settings > Program/script, enter
cmd.exe. -
In the Add arguments (optional) field, enter
/c "\\Server\Share\DeploymentFiles\UpdateAgentConfig.cmd". -
Click OK.
-
Click Apply.
-
-
To apply the changes immediately, run the following command on the client machine:
gpupdate/force
Note
After the update, under Scheduled Tasks, right-click the newly created task, and then click All Tasks > Disable.
Uninstalling the agent
Perform the following steps to uninstall the agent:
-
Perform Step 1 to Step 3 in Creating a Group Policy Object section.
-
Select Group Policy Objects, right-click the desired group policy, and then click Edit.
-
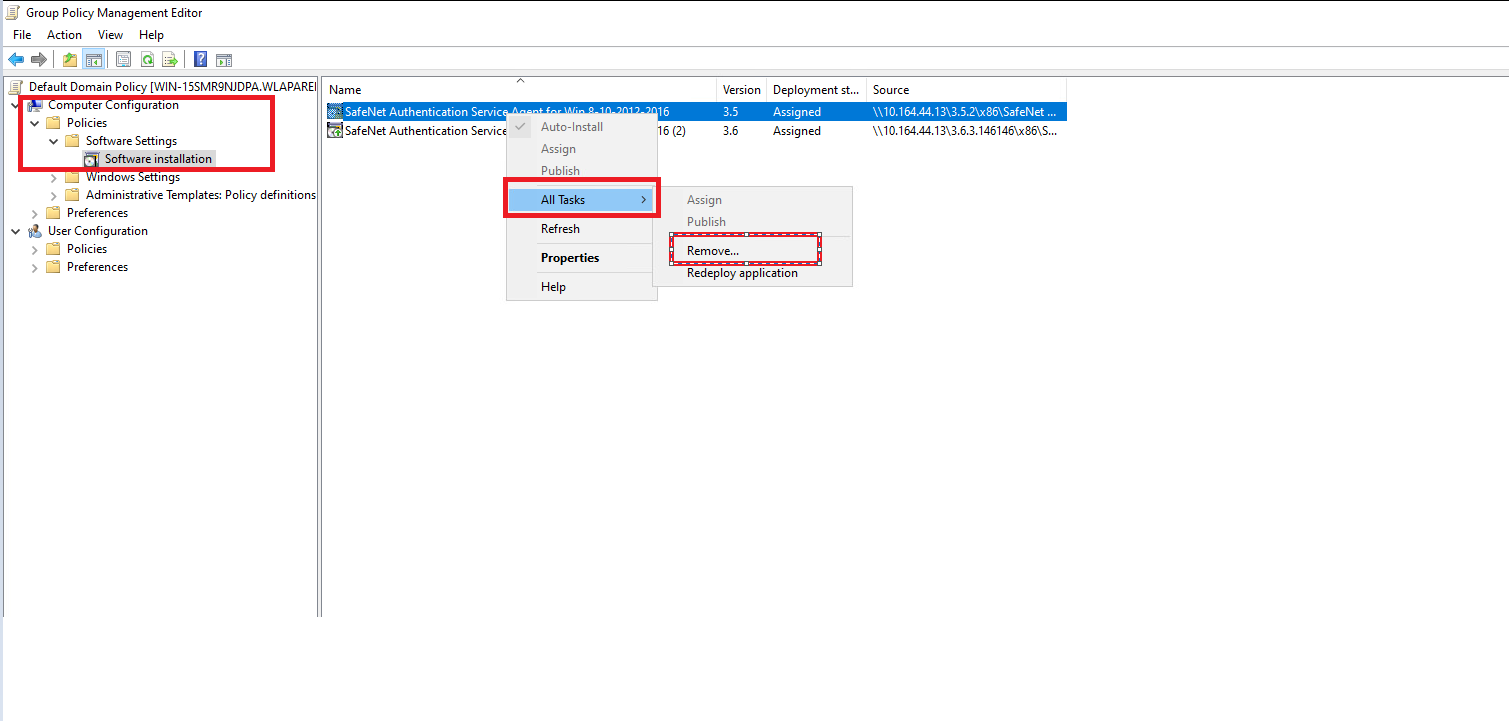
In the left pane, go to Computer Configuration > Policies > Software Settings > Software installation.
-
In the right pane, right-click the software package that you want to uninstall, hover on All Tasks, and then click Remove.
-
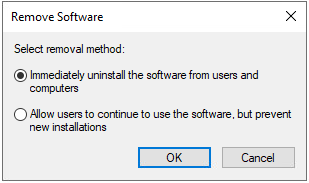
On the Remove Software window, select Immediately uninstall the software from users and computer, and then click OK.