Device Inventory
Device Inventory provides a centralized, real-time view of all registered FIDO authenticators in an organization. It enables administrators to quickly locate, monitor, and manage configured and assigned devices, as well as devices held in stock (unassigned devices).
The Device Inventory section includes the following tabs for device management:
- Configured & Assigned – Displays devices that are configured and assigned to users.
- Stock – Displays devices that have been added to the inventory but are not yet assigned to users.
Configured & Assigned
On the Configured & Assigned tab, administrators can perform the following actions to manage configured and assigned devices:
- View Configured and Assigned Devices
- Search Devices
- Export Devices
- Revoke Devices
- View Initial Device PIN
- Unlock Devices
View Configured and Assigned Devices
The following two views are provided to help administrators access device information:
- Summary View: Displays essential device details in a compact format for quick identification and action.
- Expanded View: Provides complete device information, including lifecycle and compliance details, for in-depth management.
Summary View
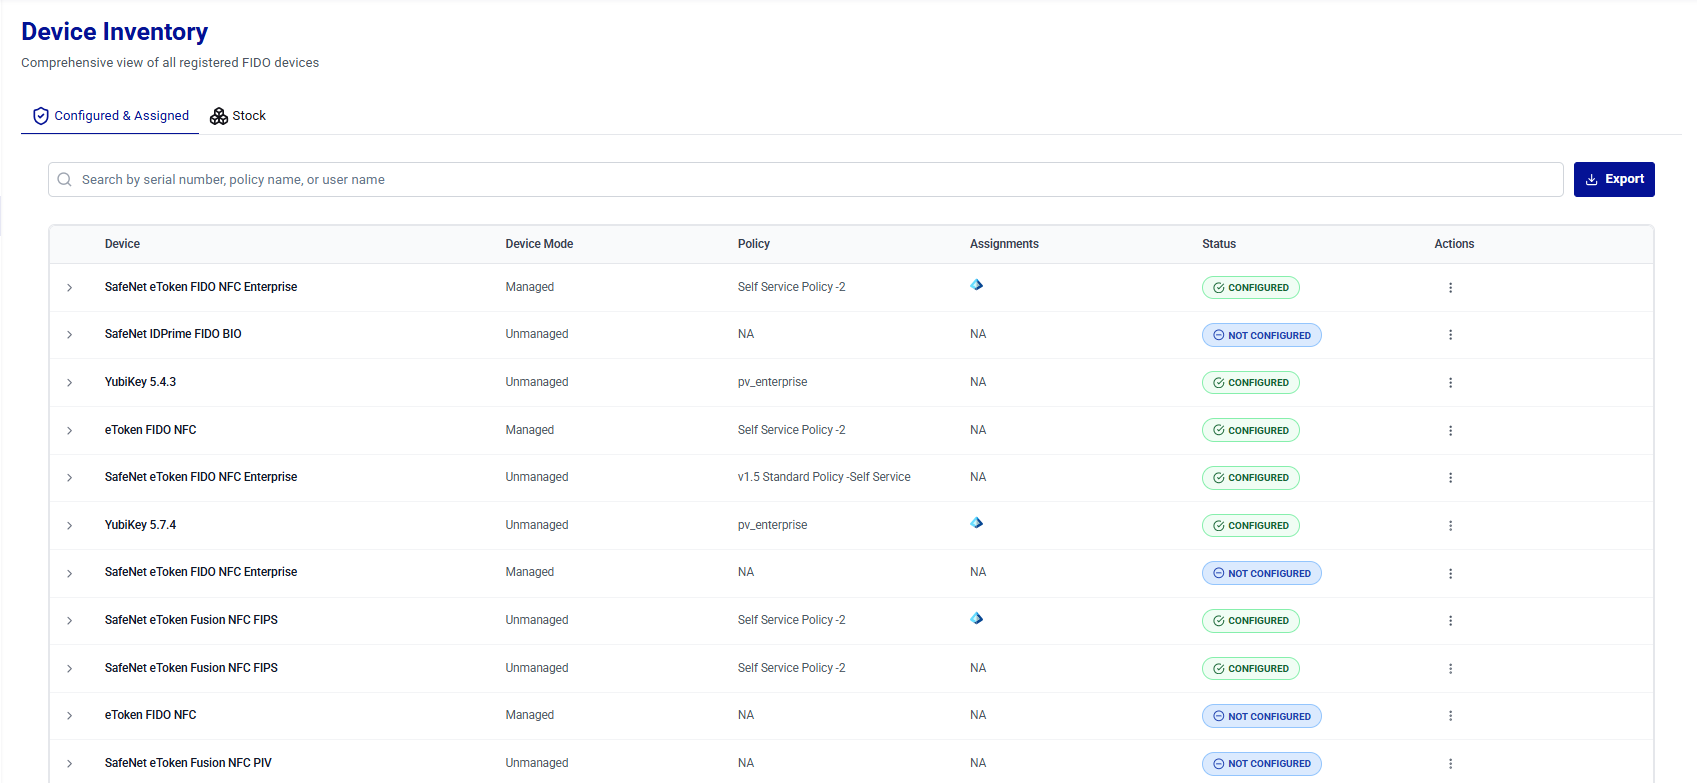
| Column | Description |
|---|---|
| Device | Displays the names of the FIDO authenticators (for example, SafeNet eToken Fusion NFC PIV Enterprise). |
| Device Mode | Indicates whether a device is Managed or Unmanaged. Managed devices are Thales FIDO 2.1 devices, which support setting an admin PIN and enterprise features. Some of the enterprise features include configuring a minimum PIN length, enforcing PIN changes, enforcing user verification, and whitelisting web services. |
| Policy | Displays the authentication policies assigned to devices. |
| Assignments | Displays the active identity provider assignments for the device. Each assignment is represented by an identity provider icon. Hover over an icon to view the identity provider name and the associated user. If the device is assigned to multiple identity providers, a separate icon is displayed for each active assignment. |
| Status | Indicates the device's state (CONFIGURED or NOT CONFIGURED). |
| Actions | Provides options to perform the following actions on a device: - Revoke - Initial PIN - Unlock a device remotely. |

Expanded View
In addition to the information available in the Summary view, the Expanded view provides more device-specific details that support device lifecycle management and compliance tracking.
To view these details, under Device Inventory, click on the expand arrow  icon for the desired device.
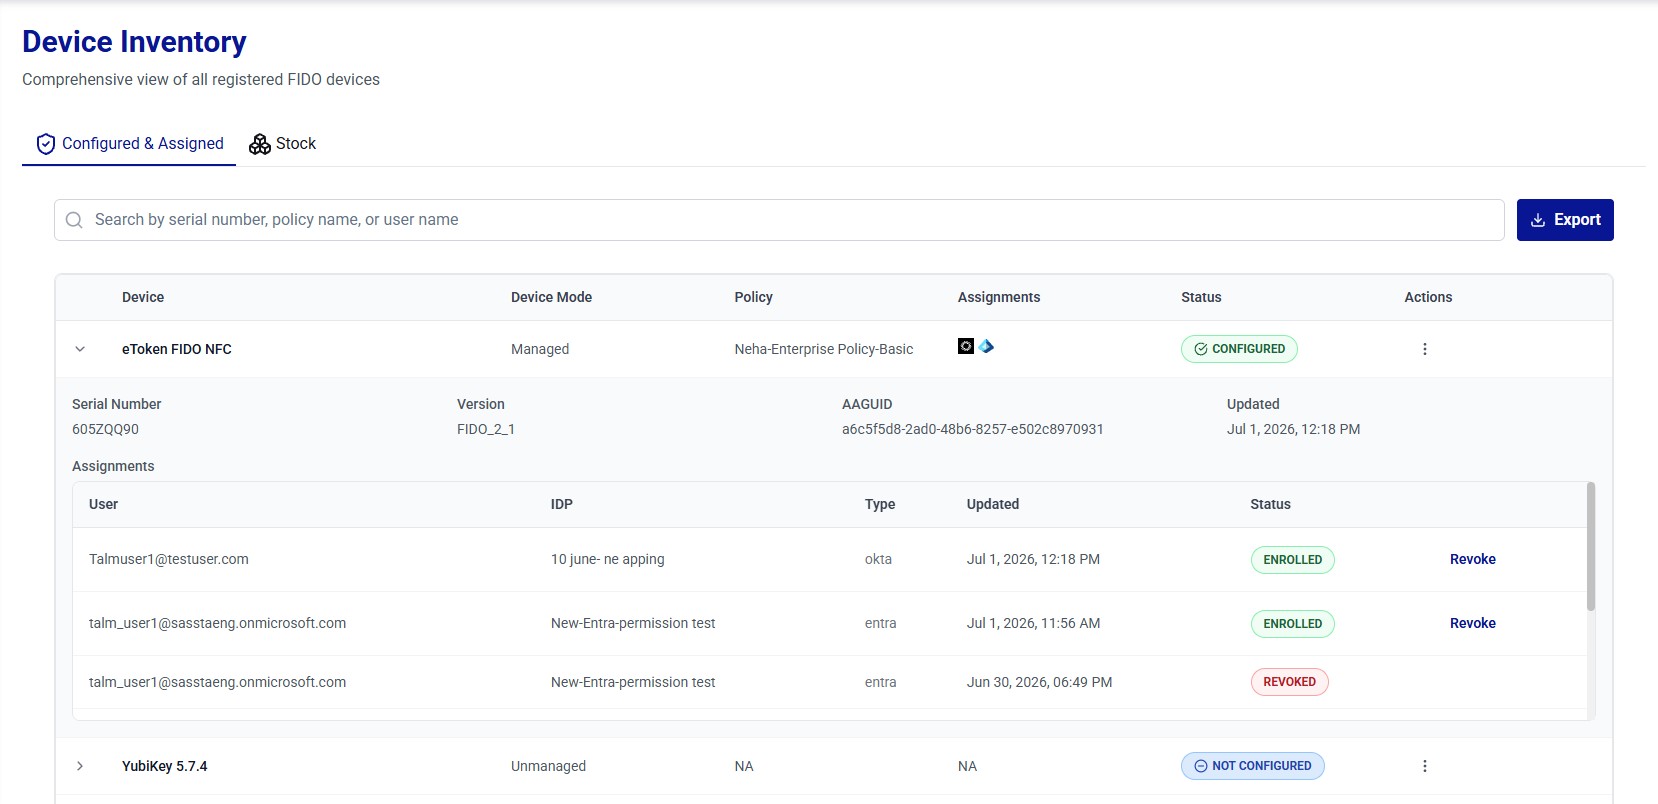
| Column | Description |
|---|---|
| SERIAL NUMBER | Displays the unique serial number of the device. |
| VERSION | Displays the device version (for example, FIDO_2_1). |
| AAGUID | Provides Authenticator Attestation Globally Unique Identifier (AAGUID), a unique identifier for device identification. |
| Assignments | Displays a table of all user assignments for the device. Each row displays the User, IDP, Type (provider type, such as entra, okta, or sta), Updated date and time, and Status (ENROLLED or REVOKED). Active (ENROLLED) assignments provide a Revoke action. |
| UPDATED | Displays the last updated date and time for the device record. |
Search Devices
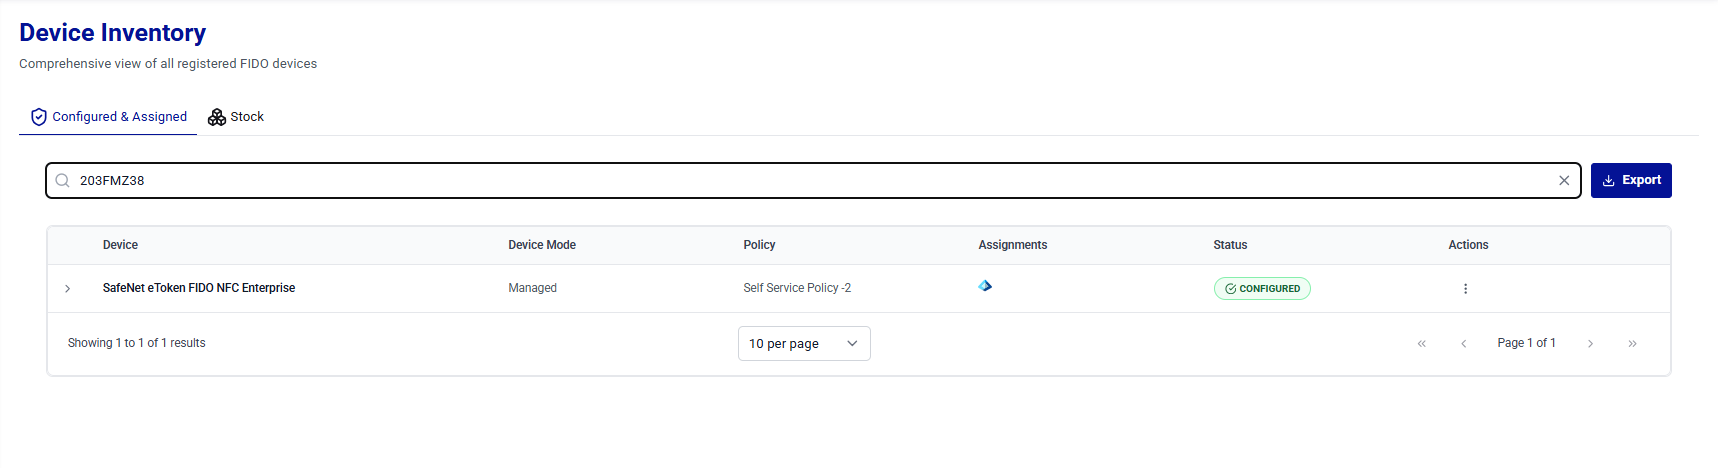
The Search operation allows administrators to quickly locate devices across large inventories. Use the search bar to filter configured devices and view their details based on any of the following criteria:
-
Serial Number – To search for a device using its unique serial number.
-
Policy Name – To list all devices to which a specific policy is applied.
-
User Name – To list device(s) assigned to a specific user.
Tip
For best results, search using the full value (for example, a complete Serial Number) . If the exact value is unavailable, begin with a partial serial Number, the policy name, or user name to narrow down the results.
Export Devices
The Export operation generates complete details (in a .csv file) of all the devices listed under Device Inventory. The exported file includes information from the Summary view and the Expanded view for devices listed in the current inventory list.
To export devices' details, under Device Inventory, on the Configured & Assigned tab, click Export.

Note
If required, use the Search operation to refine the device list and then click Export.
Caution
Exported files may contain sensitive information such as serial numbers and assignment details. Store and share the exported files in accordance with your organization’s data handling and security policies.
Revoke Devices
The Revoke operation revokes a device for one or more users by permanently disabling the associated credential assignments. Use this operation when user access must be removed or when the device is lost, stolen, compromised, or no longer authorized. Revocation changes the affected user assignment status to REVOKED.
In addition to Device Inventory, administrators can revoke devices directly from the FIDO Key Management window without leaving the connected-devices view.
The following revocation options are available:
-
Revoke Device for a Single User – Revokes the device for a single user. All other users' assignments on the device remain ENROLLED and unaffected.
-
Revoke Device for All Users – Revokes the device for all assigned users in a single operation.
Warning
Revocation is a permanent action. Once a device is revoked for a user(s), it cannot be used for authentication again by the user. To restore access, re-enroll the device for the user.
Revoke Device for a Single User
When a device is assigned to multiple users, you can revoke the device for an individual user without affecting other users. Only the selected user's assignment is revoked, and all remaining assignments on the device remain ENROLLED.
Perform the following steps:
-
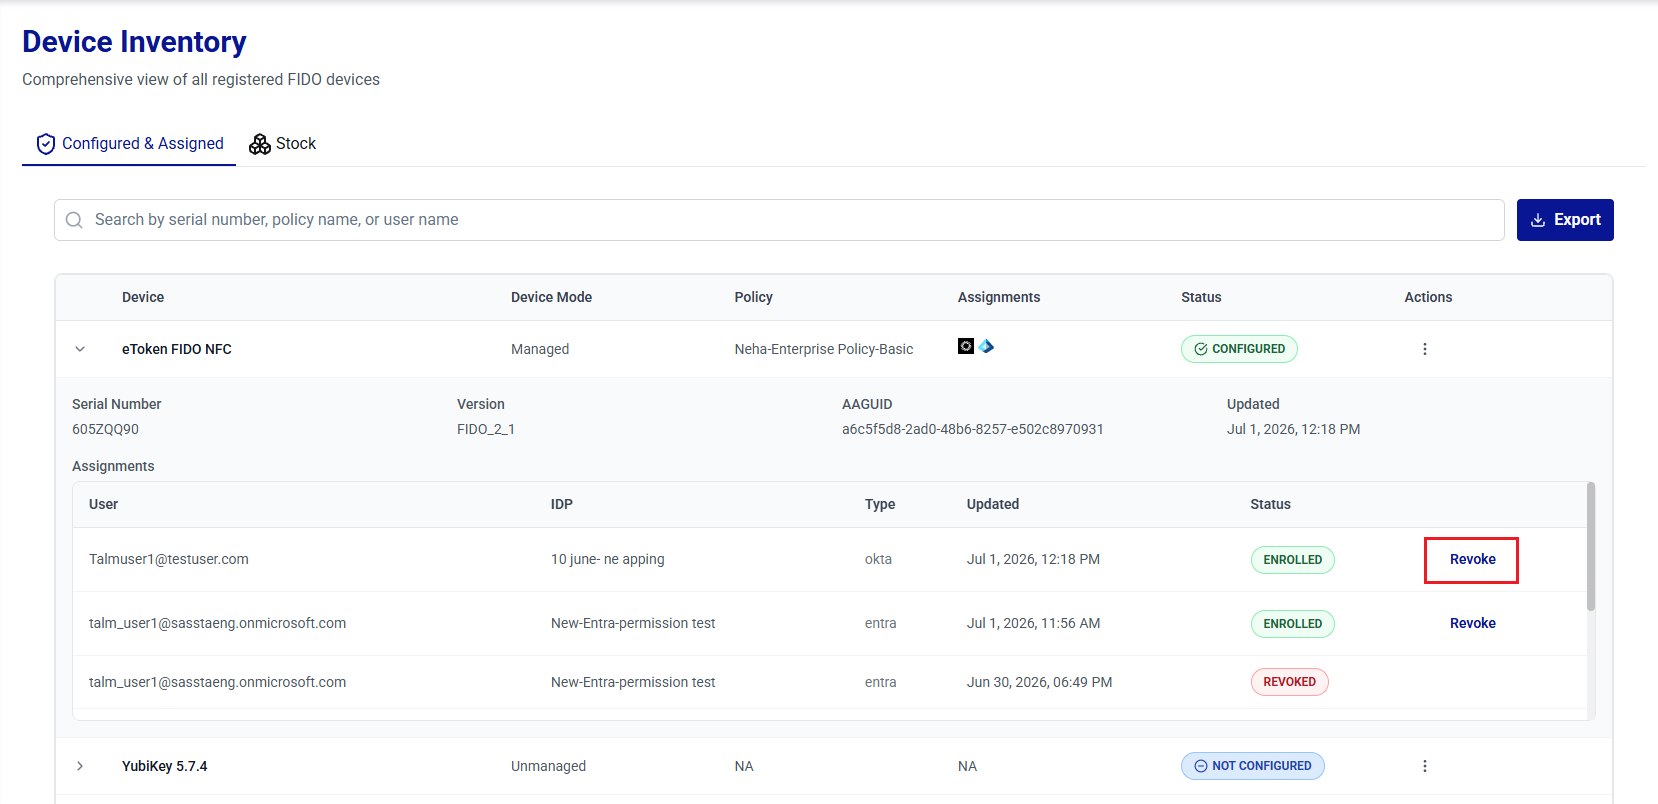
Under Device Inventory, search for and locate the device, and click the expand arrow
icon to open the Expanded view. -
In the Assignments table, locate the user for whom you want to revoke the device, and then click Revoke.
-
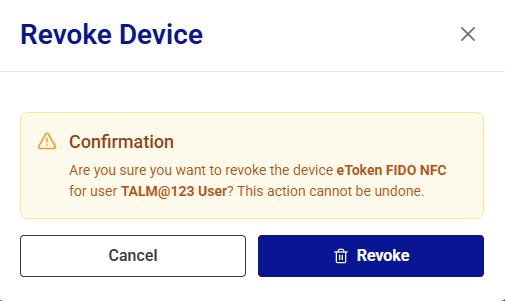
The Revoke Device window is displayed, showing the device name and the user name. Click Revoke to confirm the operation.
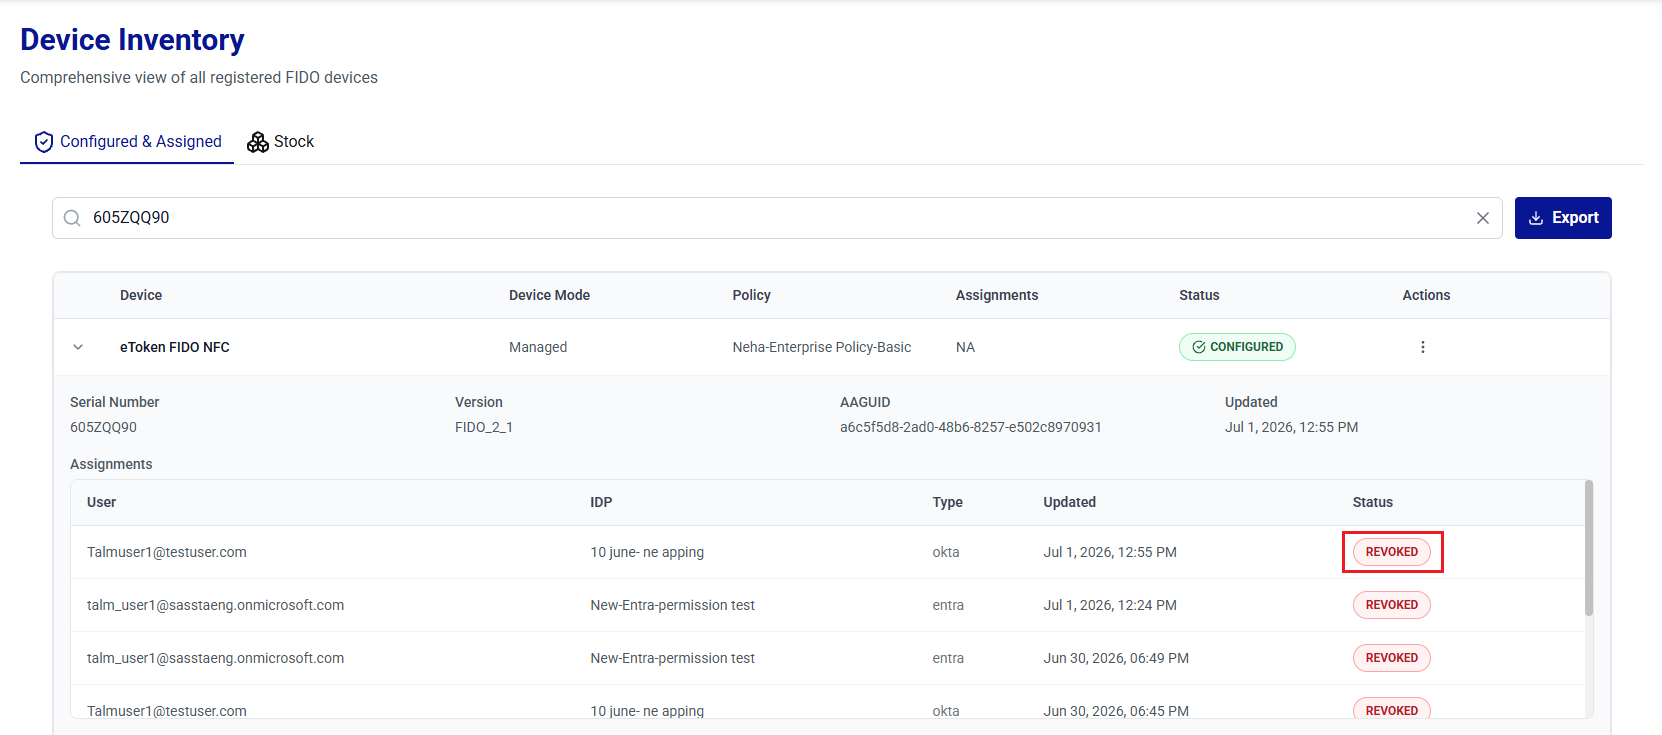
After the credential is revoked, the assignment status changes to REVOKED.
Note
Revoking a device for a single user removes the assignment from both the device and the selected identity provider. Revoking a device assignment does not affect the device STATUS, and the device remains CONFIGURED.
Revoke Device for All Users
Use this option to revoke the device for all assigned users in a single operation. Revoking all assignments does not affect the device status, and the device remains CONFIGURED.
Perform the following steps:
-
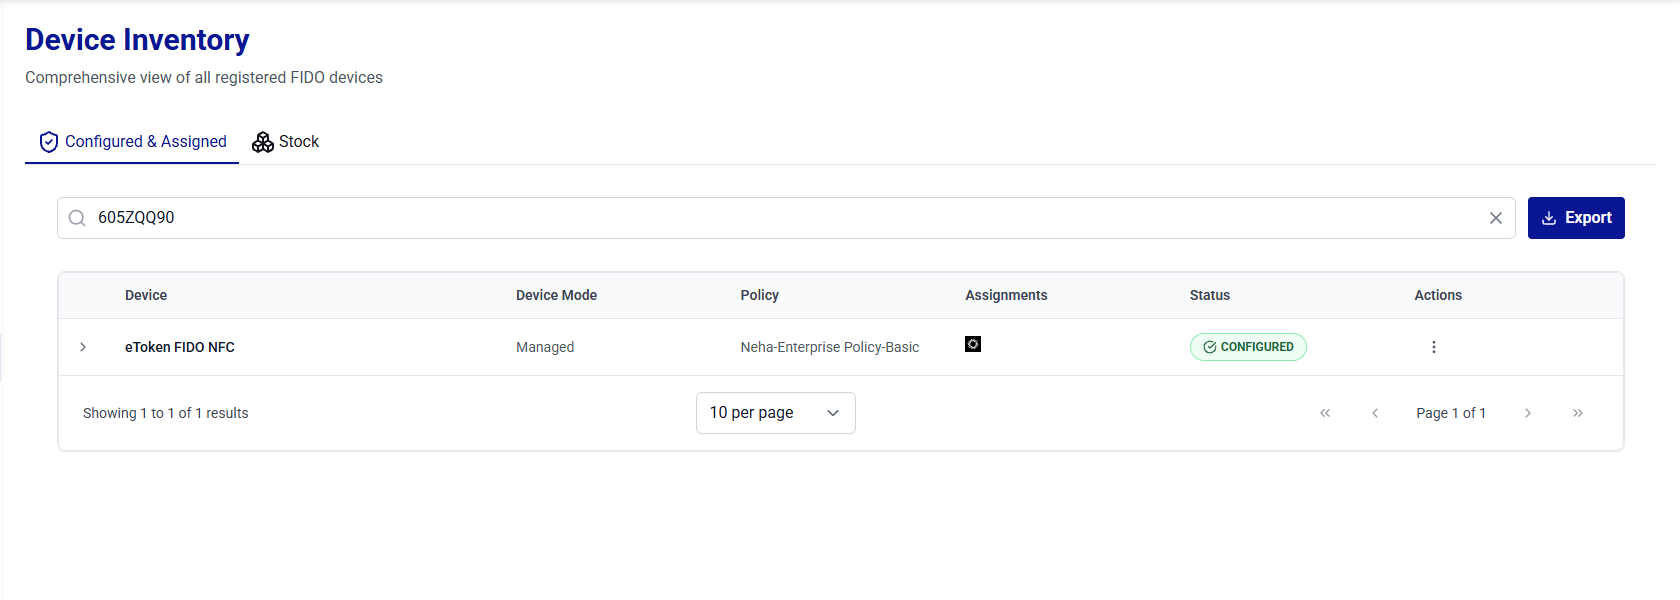
Under Device Inventory, search for and locate the target device.
-
In the Actions column, click the three-dots
 icon for the device, and then select Revoke.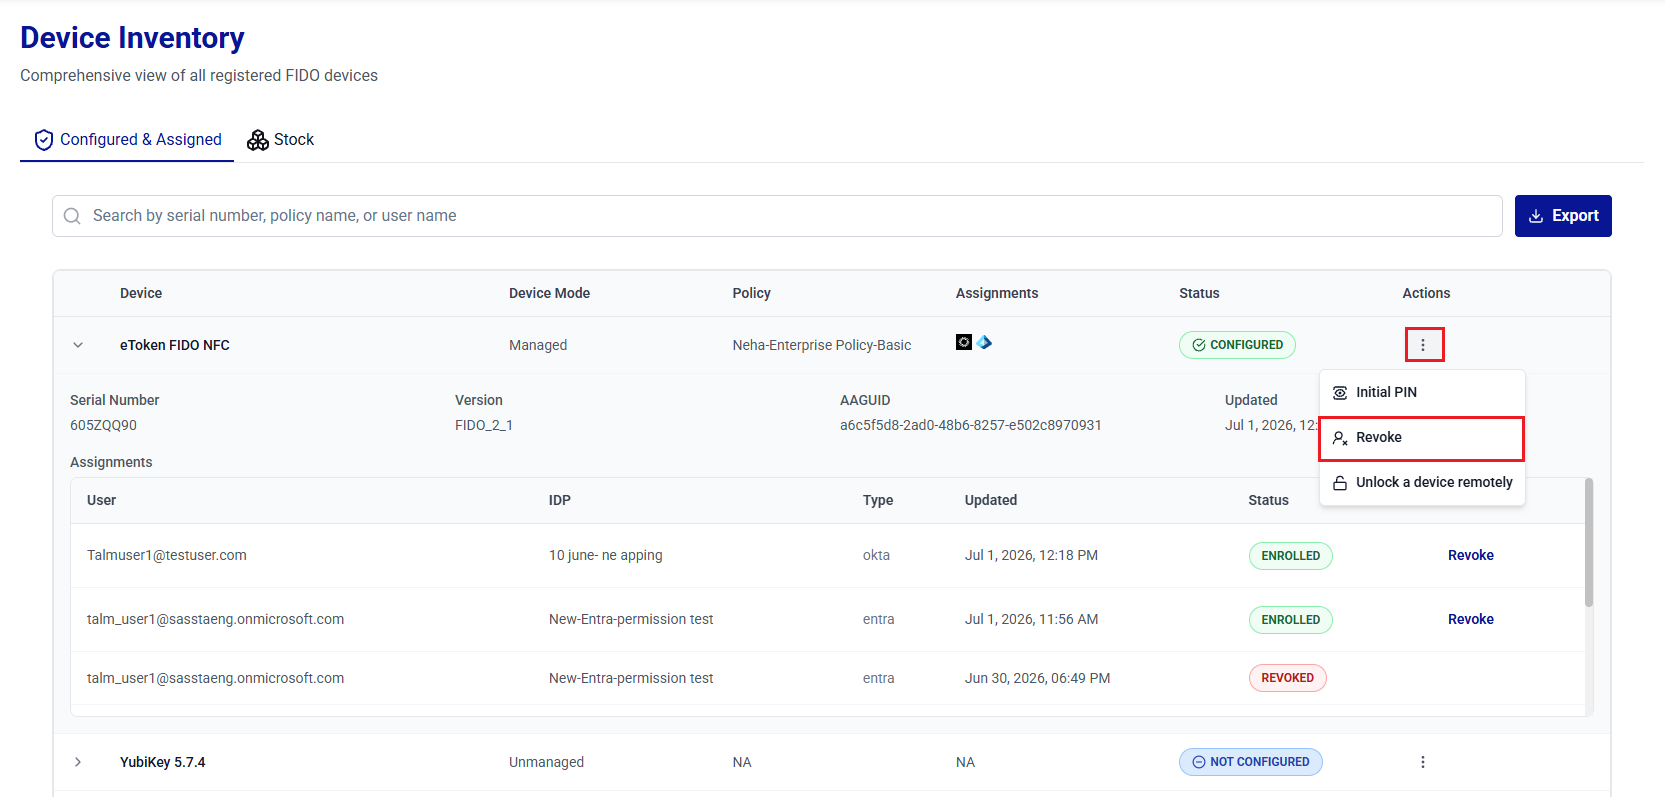
-
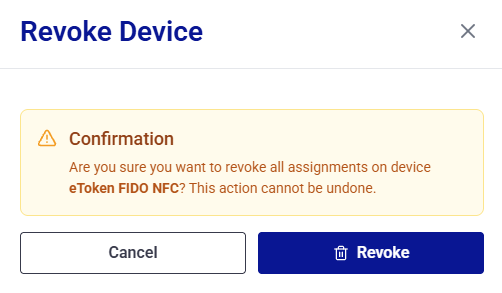
On the Revoke Device window, review the confirmation message, and then click Revoke to confirm the operation.
For a device with multiple assignments, the message confirms that the operation will revoke all assignments on the device across every identity provider.
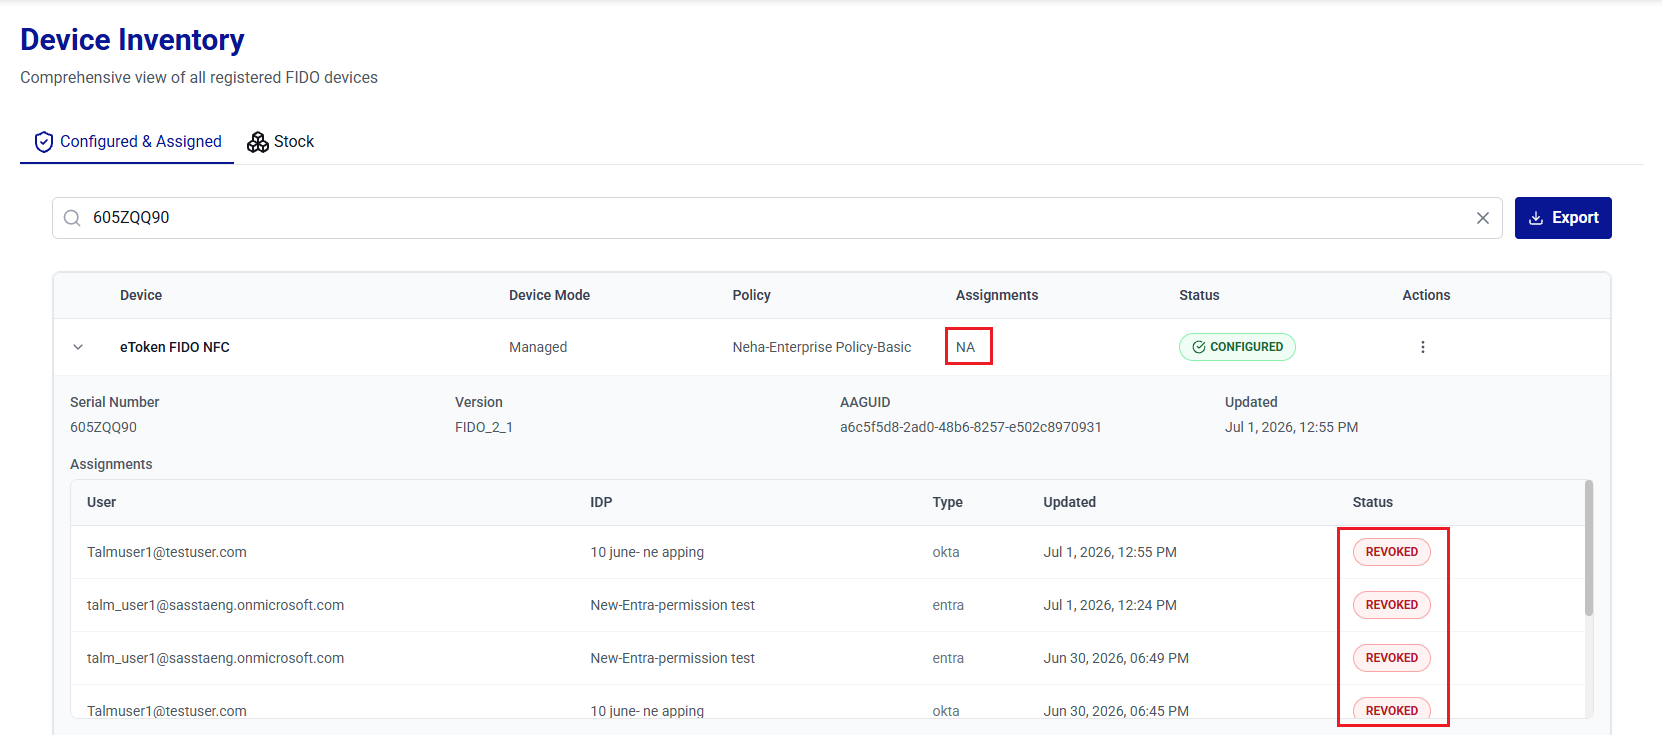
After the operation is complete, all assignments on the device are set to REVOKED and remain in the Assignments table as historical records. The Assignments column displays NA because the device no longer has any active assignments. The Revoke action remains disabled until the device has at least one active assignment.
Warning
Revocation is a permanent action. Once a device is revoked for a user(s), it cannot be used for authentication again by the user. To restore access, re-enroll the device for the user.
View Initial Device PIN
Administrators can view the initial device PIN for administrative verification.
Caution
Use this option only in secure environments to prevent unauthorized PIN exposure.
Permission-based visibility
The ability to view PIN values depends on the following permissions assigned to the administrator:
talm_device_userpin_read– Allows viewing the User PIN.talm_device_adminpin_read– Allows viewing the Admin PIN (applicable to enterprise devices that support administrator mode).
PIN Visibility by Permission and Device Type
User PIN Permission talm_device_userpin_read |
Admin PIN Permission talm_device_adminpin_read |
Standard device | Enterprise device |
|---|---|---|---|
| Enabled | Enabled | User PIN | User PIN and Admin PIN |
| Disabled | Enabled | No Initial PIN option | Admin PIN |
| Enabled | Disabled | User PIN | User PIN |
| Disabled | Disabled | No Initial PIN option | No Initial PIN option |
Perform the following steps to view a device user PIN and/or Admin PIN:
-
Under Device Inventory, search for and locate the device for which you want to view the PIN.
-
In the Actions column, click the three-dots
icon for the device, and then select Initial PIN.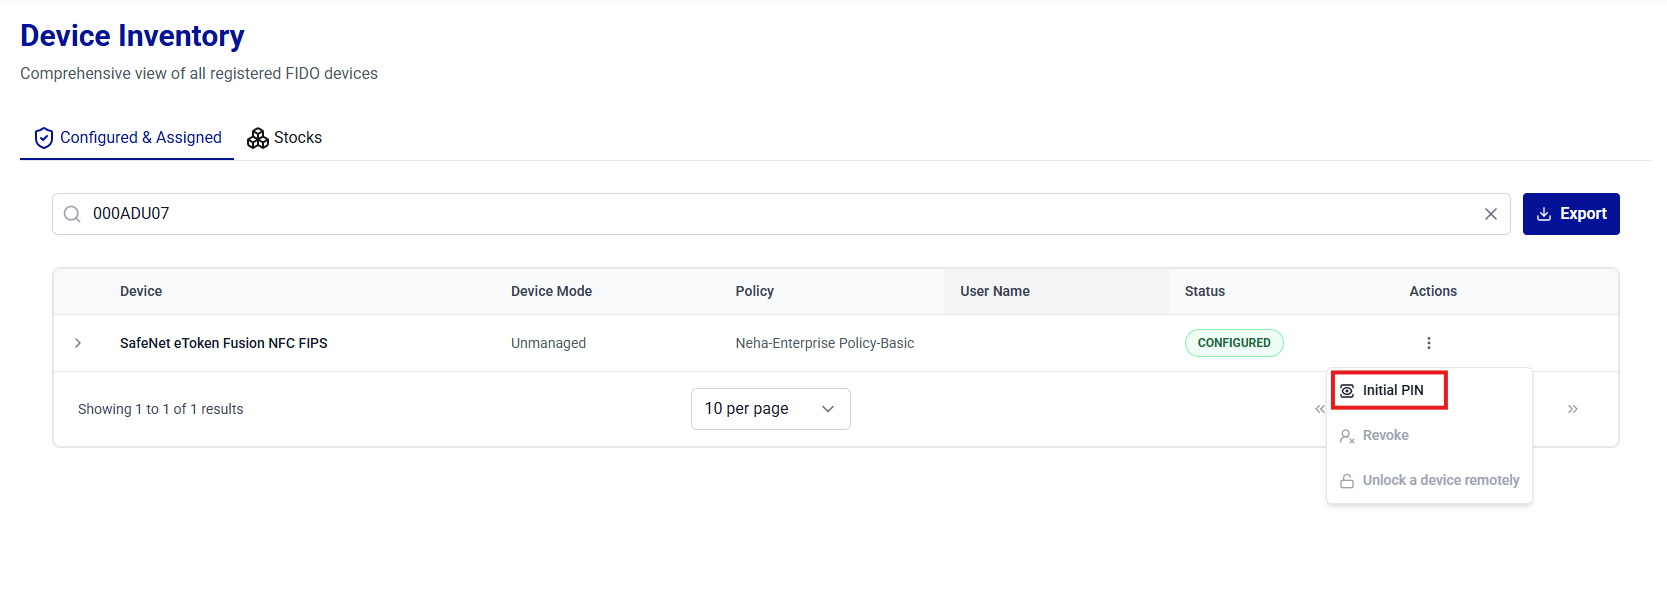
-
On the Device PIN window, click on the Show Password
 icon to view the initial device PIN.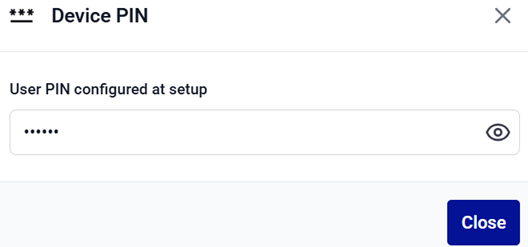
-
Click Close to close the window.
Unlock Devices
A FIDO device is locked after repeated incorrect PIN attempts. When the device is locked, the user cannot authenticate until it is successfully unlocked. Thales Authenticator Lifecycle Manager provides two secure options to unlock a device:
- Remote Unlock (Challenge–Response Method): The locked device stays with the end user, while the administrator assists remotely using Thales Authenticator Lifecycle Manager.
- Physical Unlock (Admin Mode): The administrator has physical access to the device and performs the unlock operation directly in Thales Authenticator Lifecycle Manager. This operation can be performed under FIDO Key Management.
Note
The Unlock a device remotely option is available only for managed devices (Thales FIDO 2.1 devices). It does not appear for unmanaged devices.
Remote Unlock
The remote unlock option is used when the locked device remains with the end user. This method uses a secure challenge–response mechanism. The user generates a challenge in SafeNet FIDO Key Manager (FKM), and the administrator generates the corresponding response in Thales Authenticator Lifecycle Manager. The user enters the response to reset the PIN and unlock the device.
Before starting the remote unlock process, ensure to complete the following prerequisites:
- The end user must have SafeNet FIDO Key Manager (FKM) installed.
- The FIDO device remains connected throughout the process.
- The end user must have an authorized support channel (for example, Teams, Slack, ticketing system, etc.) to contact the Thales Authenticator Lifecycle Manager administrator.
User Steps
-
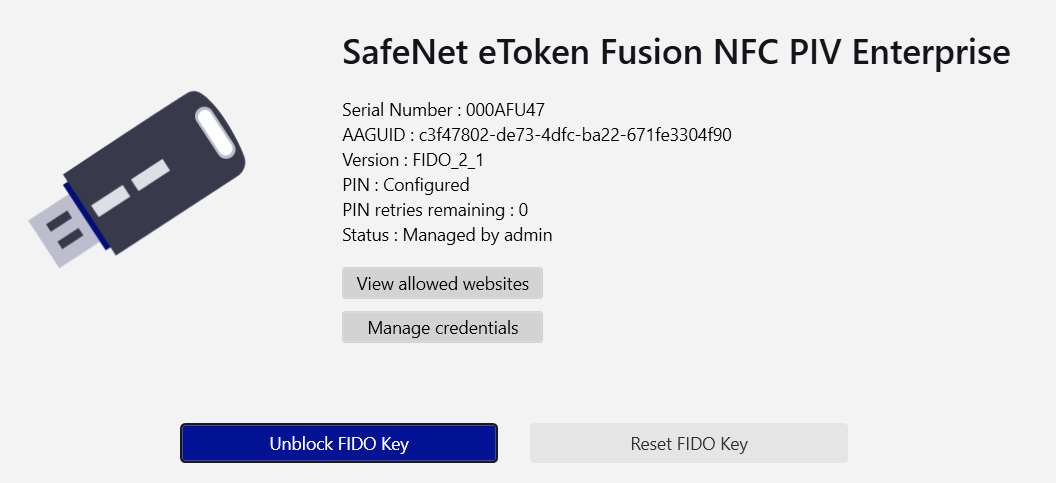
Insert the FIDO device, open SafeNet FIDO Key Manager (FKM), and click Unblock FIDO Key.
Caution
Do not remove the FIDO device at any point during the unlock process.
-
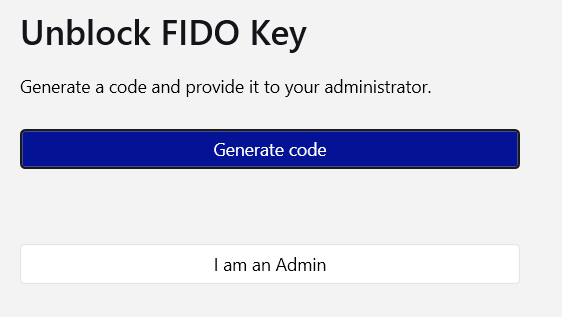
Click Generate Code to generate a challenge.
-
Click Copy to copy the generated code and share it with the Thales Authenticator Lifecycle Manager administrator.
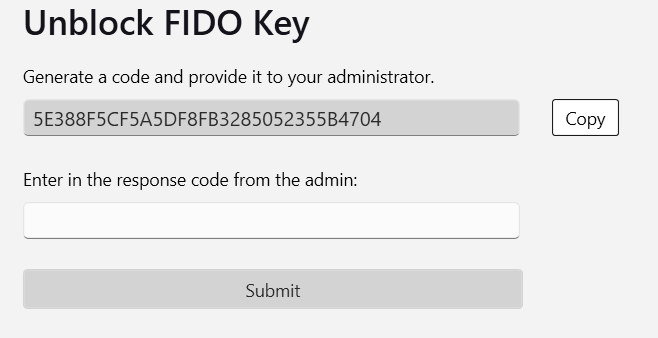
After sharing the challenge, wait for the administrator to complete the corresponding unlock steps in Thales Authenticator Lifecycle Manager and provide you with a response code. Refer to the Administrator Steps section.
-
After receiving the response code from the administrator, enter it in the response code field and click Submit.
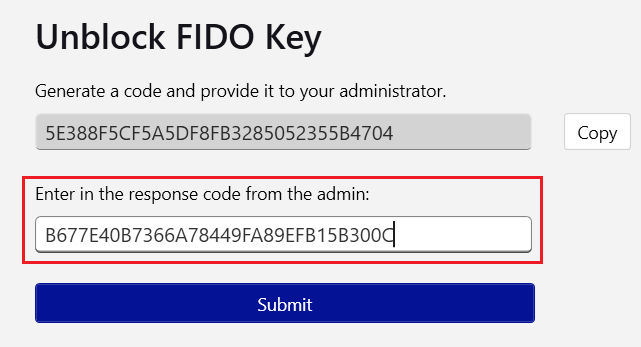
-
When prompted, enter a new PIN and re-enter it to confirm, then click Submit.
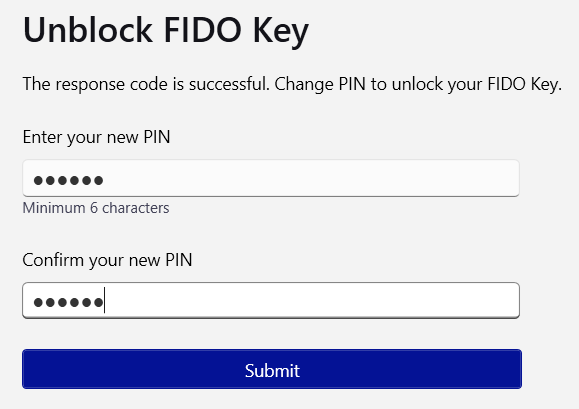
After the device is successfully unlocked, the success message is displayed.
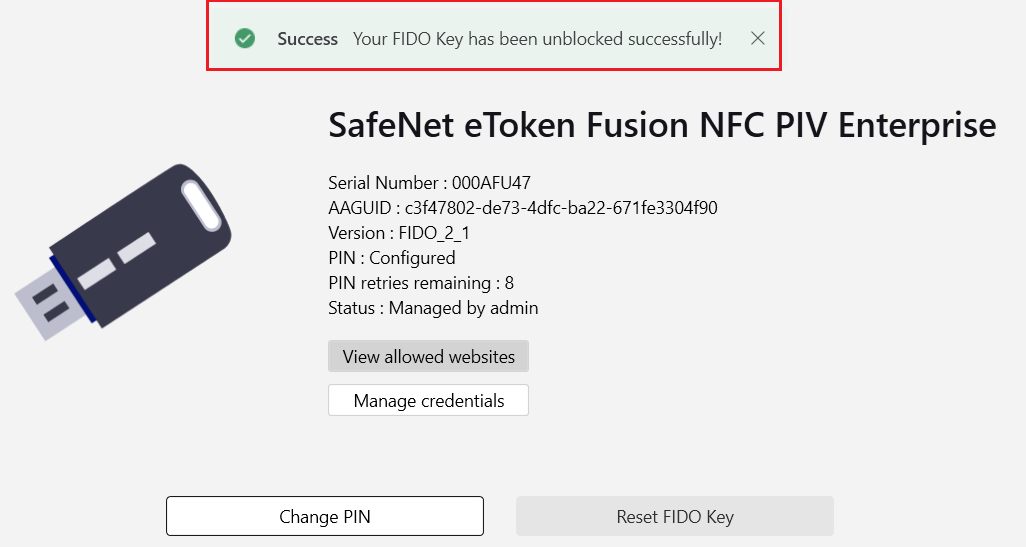
Administrator Steps
-
Log in to Thales Authenticator Lifecycle Manager and go to the Inventory menu.
-
In the Device Inventory list, search for and locate the device to be unlocked.
-
In the Actions column, click the three-dots
icon and select Unlock a device remotely. 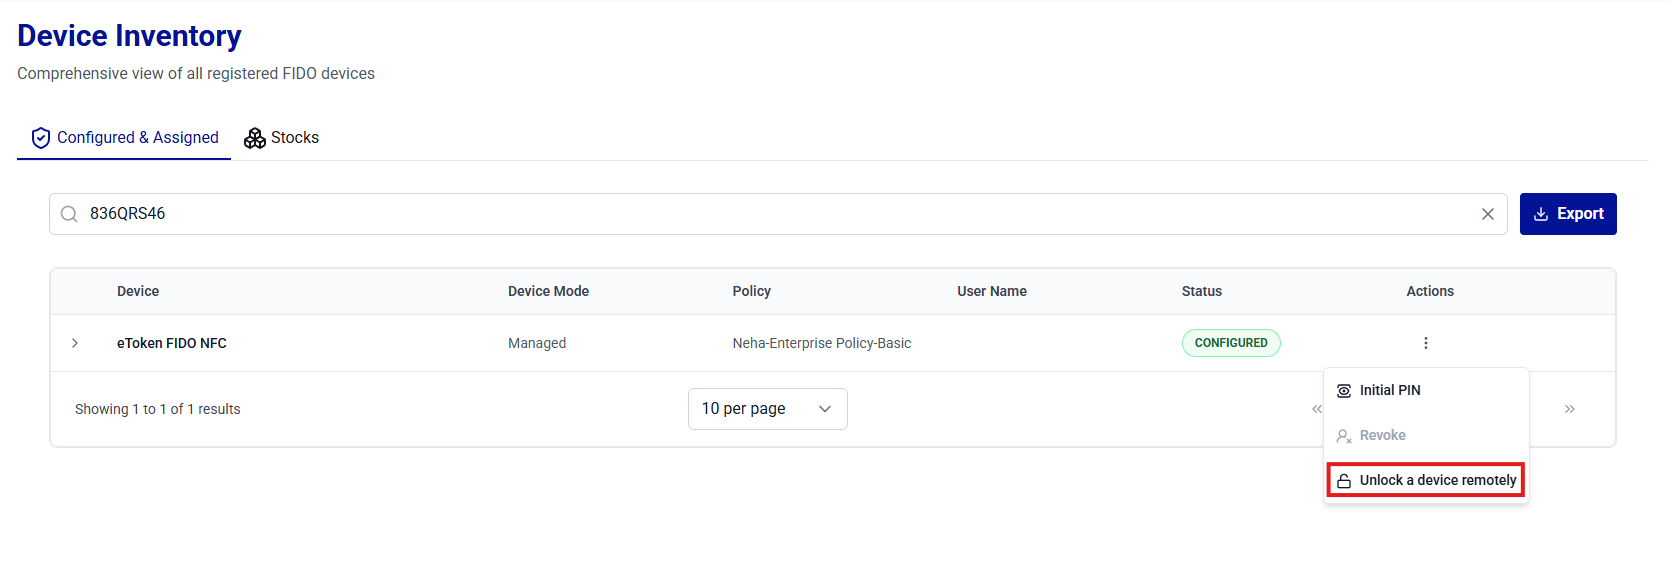
-
Under Unlock device remotely, enter the challenge code provided by the user, and click Submit.
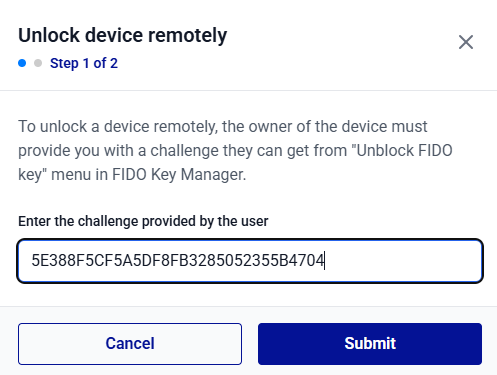
-
Click the Copy to clipboard button to copy the generated response code. Share this code with the user and click Finish.
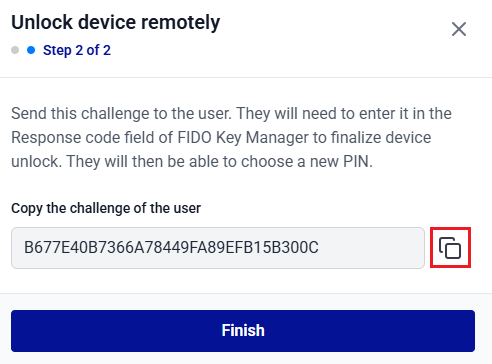
Next steps for users: The user must continue from user step 4 to enter the response code and reset the device PIN.
Stock
On the Stock tab, administrators can perform the following actions to manage unassigned devices:
- View Devices in Stock
- Search Devices in Stock
- Import Devices into Stock
- Link a Policy to Devices
- Link a Policy to a Single Device
- Unlink a Policy from a Single Device
- Delete a Device from Stock
View Devices in Stock
Administrators can view complete information about devices held in stock.
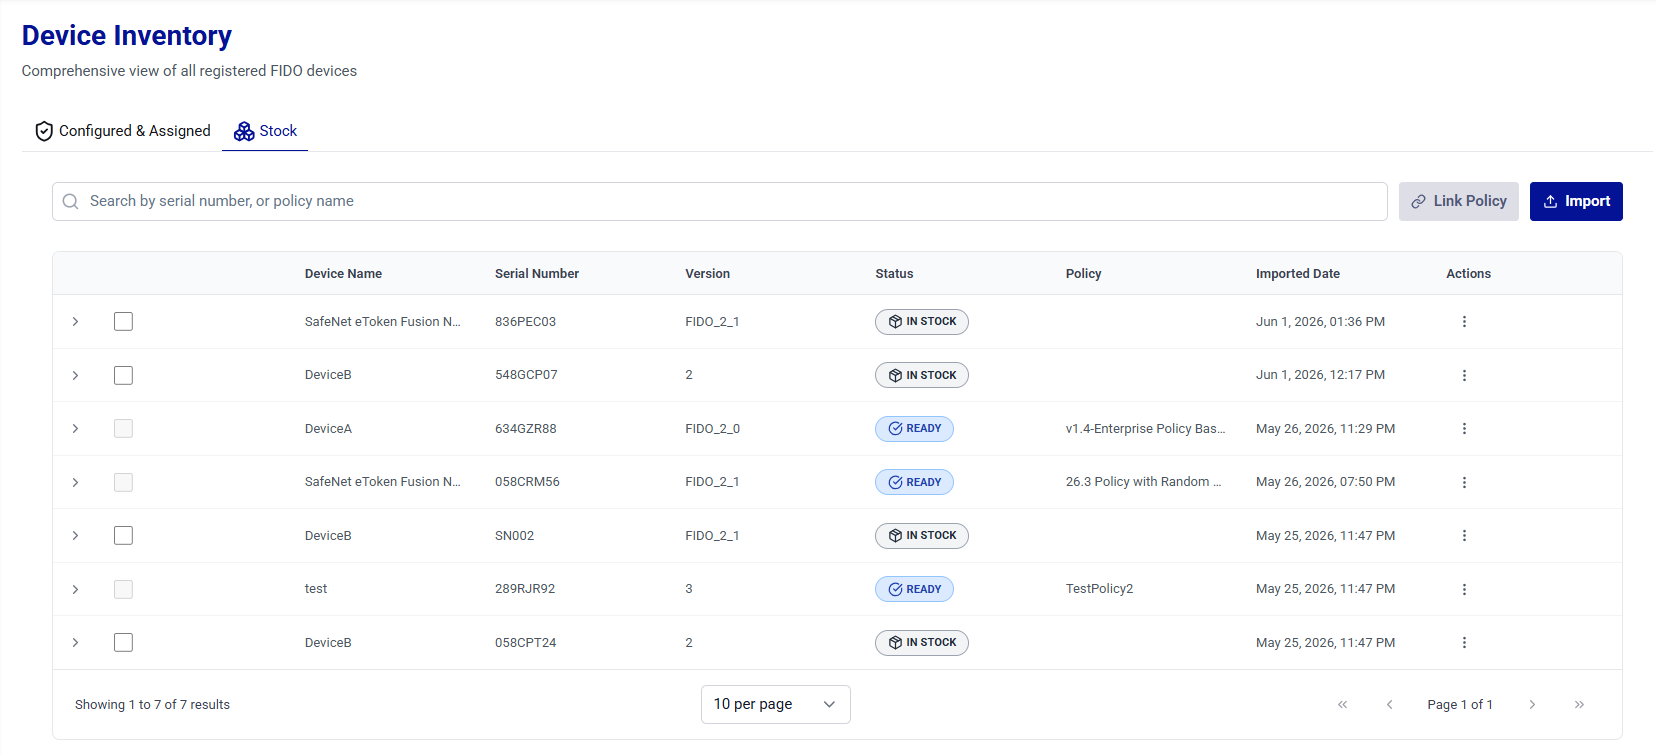
| Column | Description |
|---|---|
| Device Name | Displays the names of the FIDO authenticators (for example, SafeNet eToken Fusion NFC PIV Enterprise). |
| Serial Number | Displays the unique serial number of the device. |
| Version | Displays the device version (for example, FIDO_2_1). |
| Status | Indicates the current state of the device (for example, READY, IN STOCK). |
| Policy | Displays the authentication policies assigned to devices (if any). |
| Imported Date | Date on which the device record was imported into stock. |
| Actions | Provides options to perform the following actions on devices: - Link a policy to a device - Delete a device. |
Note
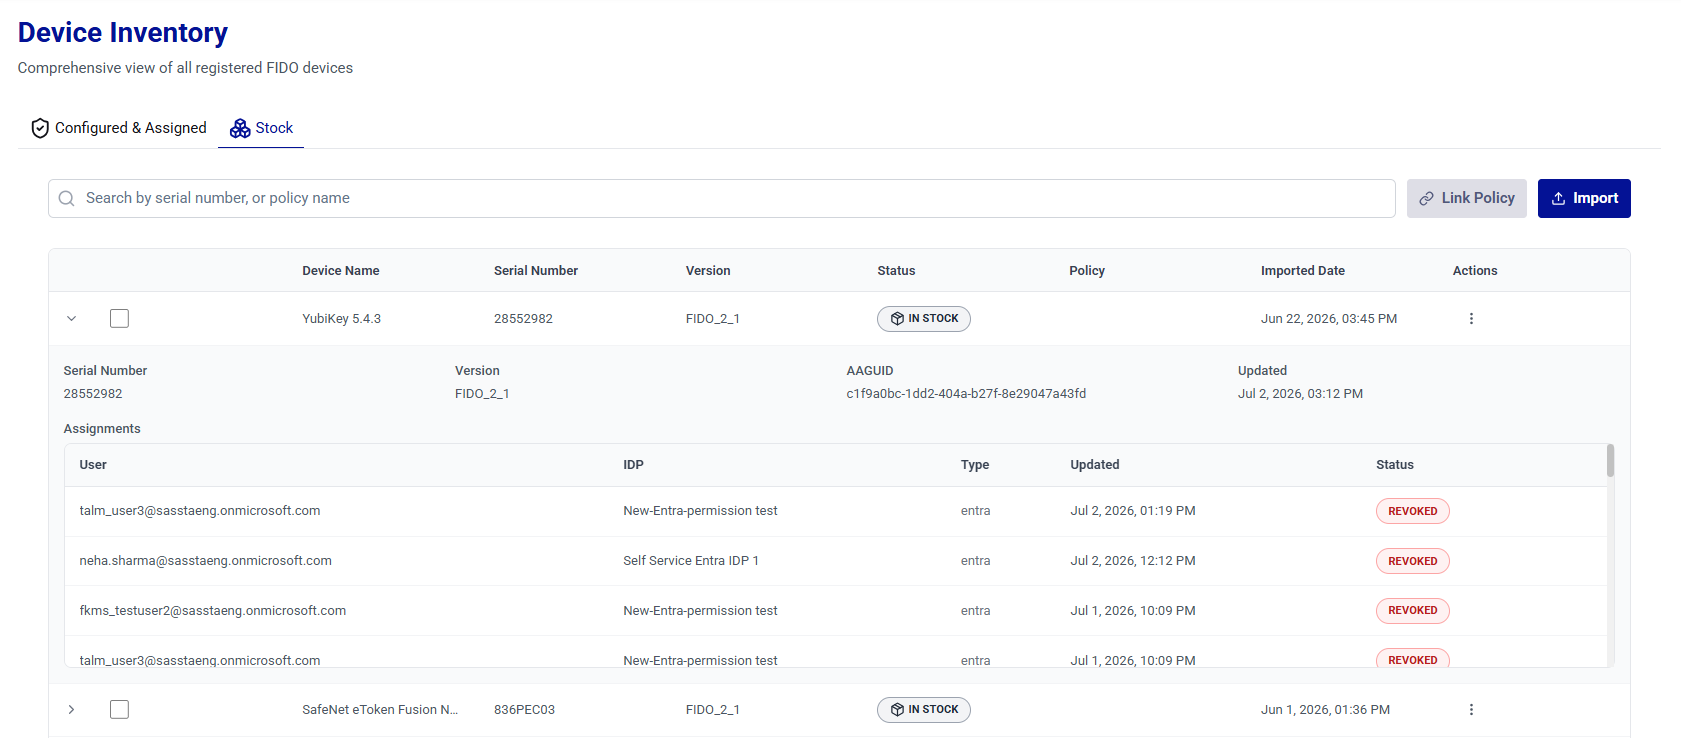
You can expand a device row to view its assignment history in the Assignments table. Assignments from previously reset devices are retained as REVOKED records. For more information, see View Configured and Assigned Devices.
Search Devices in Stock
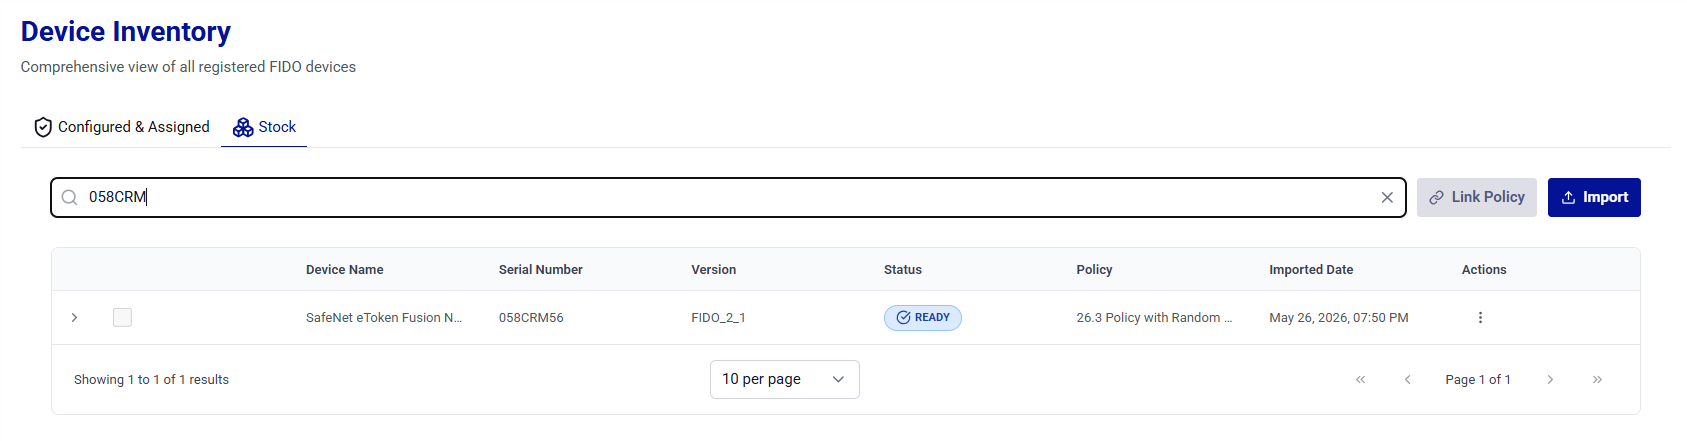
The Search operation allows administrators to quickly locate devices from the list. Use the search box to filter devices in stock and view their details based on any of the following criteria:
-
Serial Number – To search for a device using its unique serial number.
-
Policy Name – To list all devices to which a specific policy is applied.
Tip
For best results, search using the full value (for example, a complete Serial Number) . If the exact value is unavailable, begin with a partial serial number, or policy name to narrow down the results.
Import Devices into Stock
The Import operation allows administrators to add multiple unassigned devices to stock in a single action.
Note
Importing devices into stock requires the talm_device_import_write permission.
-
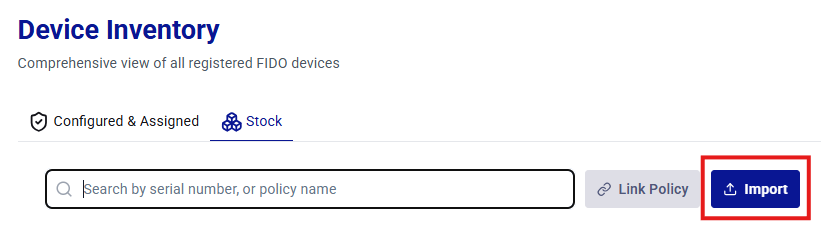
On the Stock tab, click Import.
-
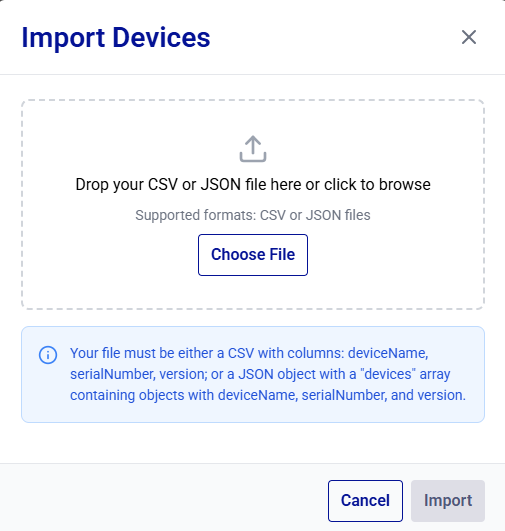
In the Import Devices dialog box, drag and drop the file into the drop zone or click Choose File to browse for the file.
-
Select a supported format and ensure the file structure matches the requirements:
- CSV – The file must include the columns, deviceName, serialNumber, and version.
-
JSON – Provide an object that contains a
devicesarray. Each entry in the array must include the deviceName, serialNumber, and version fields.Caution
Ensure that the file matches the required structure and that serial numbers are unique within your environment.
-
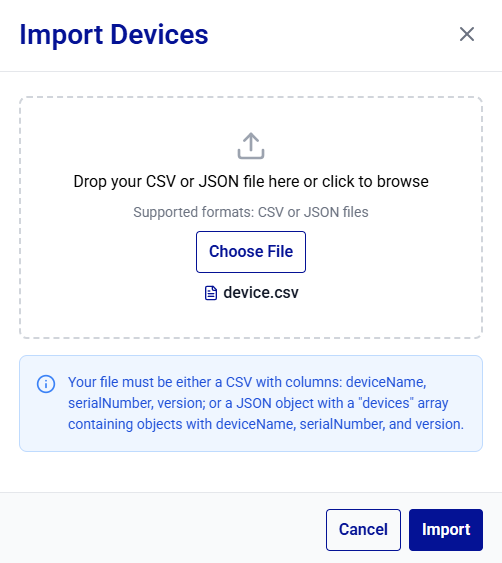
Click Import to upload and process the file.
The Import Successful! message is displayed.
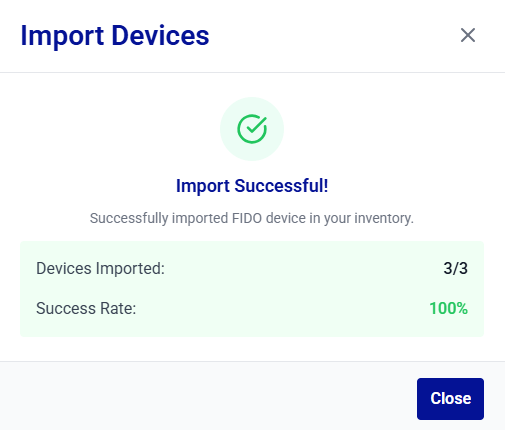
-
Newly imported Device records are displayed in the device list with their corresponding import date.
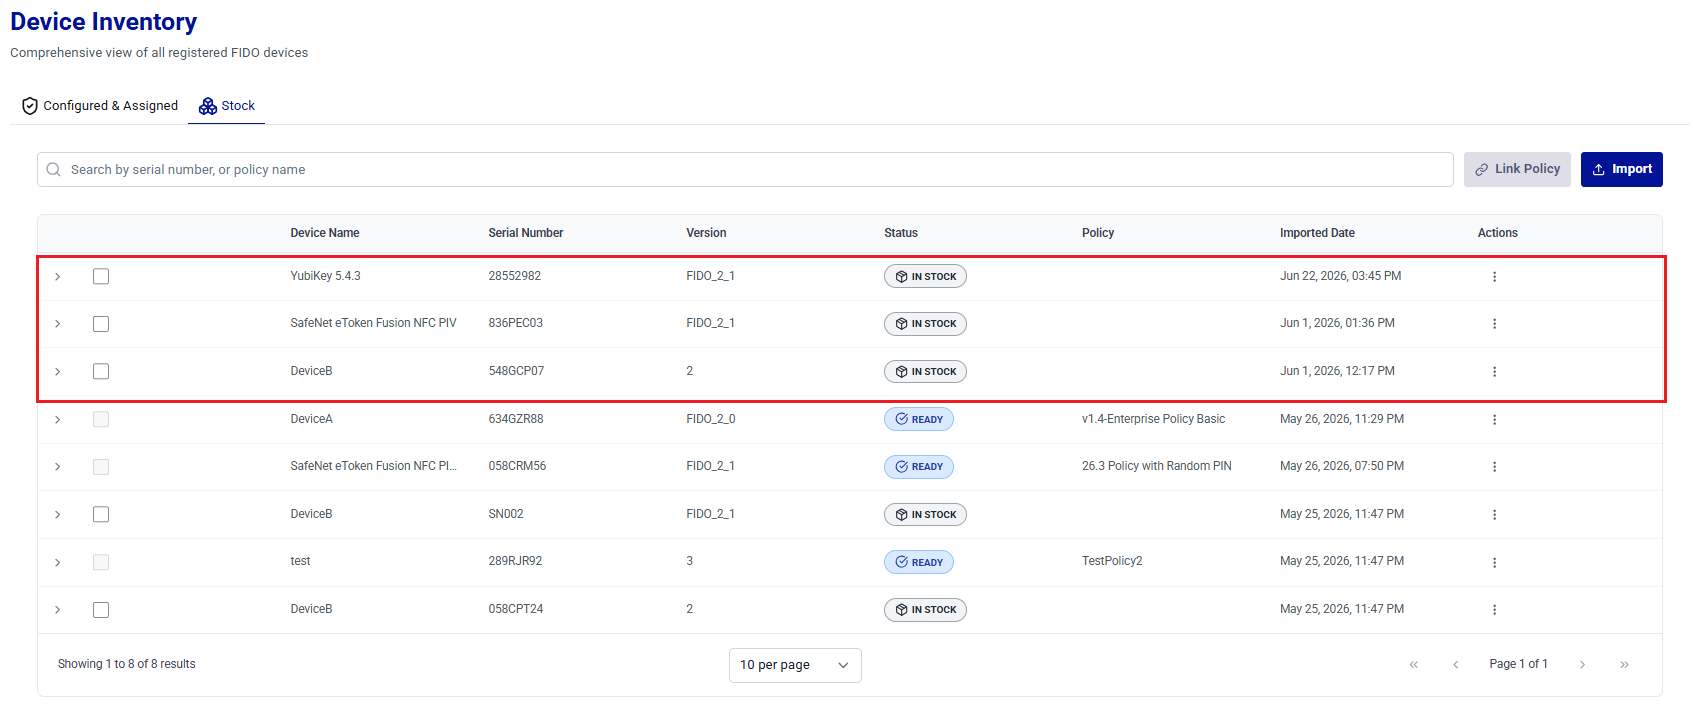
Link a Policy to Devices
The Link Policy operation allows administrators to associate devices with an authentication policy, ensuring consistent policy enforcement when the devices are assigned to users.
Note
Linking a policy to a device requires the talm_device_policy_link_write permission.
-
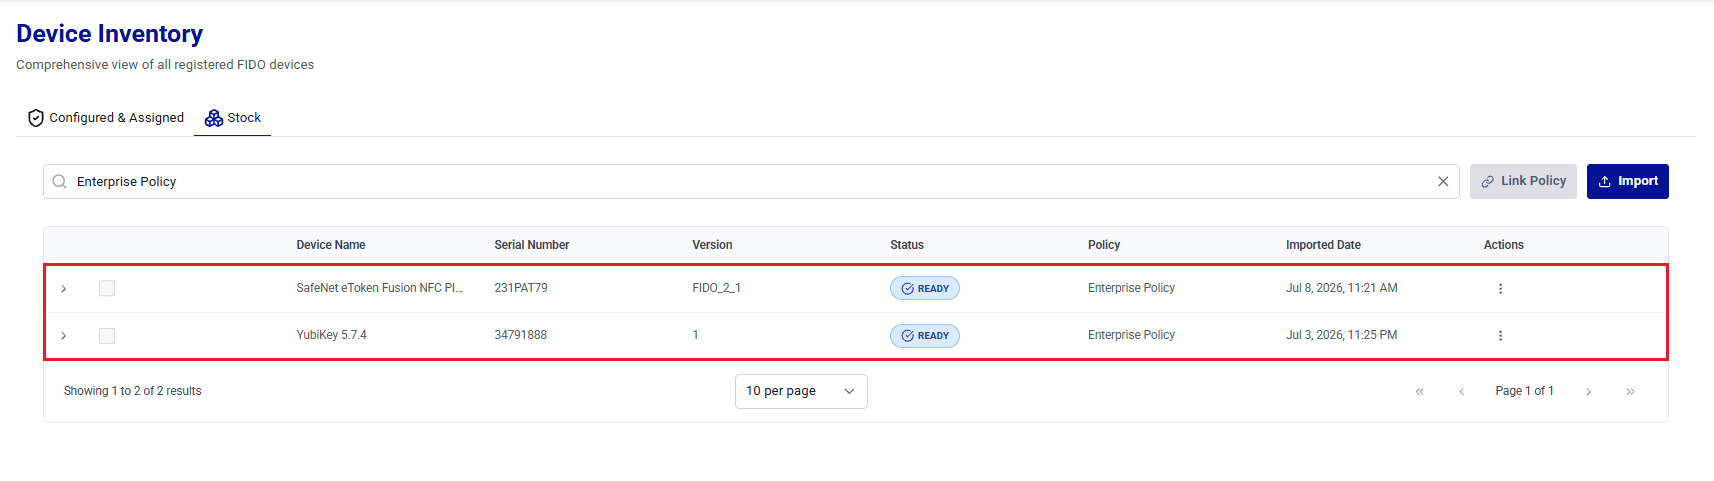
On the Stock tab, select the devices to be linked to a policy, and click Link Policy.
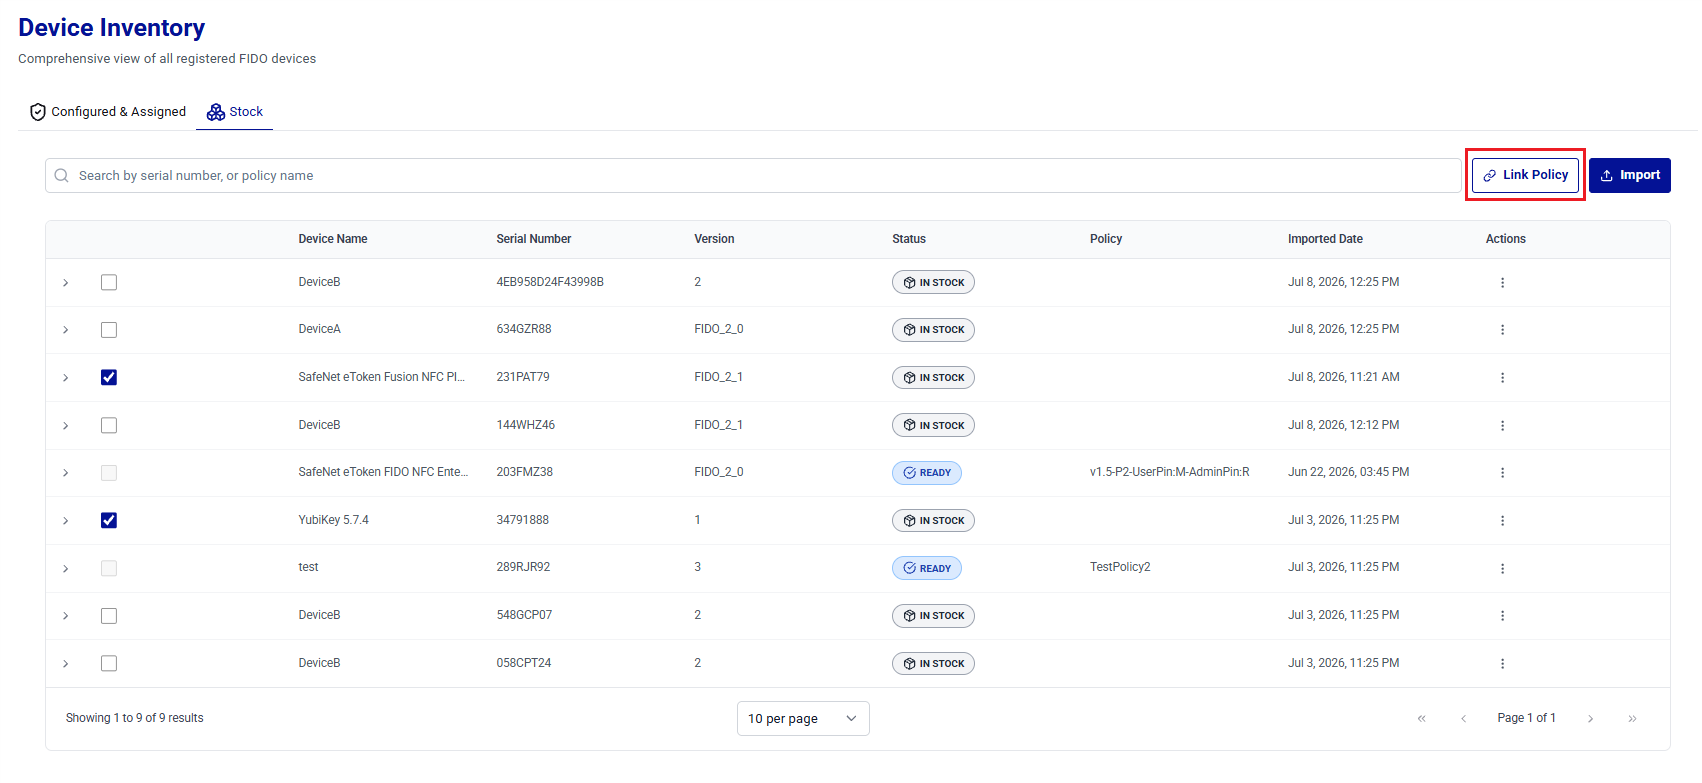
-
In the Link Policy dialog box, select the policy to be linked to device(s), and click Link Policy.
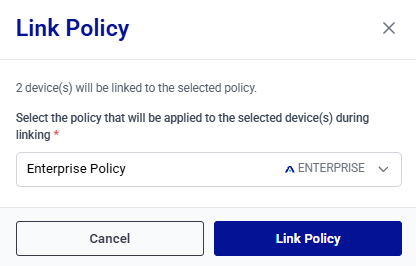
-
The Policy column is updated for the selected devices. Verify that the correct policy is displayed for each device.
Link a Policy to a Single Device
This operation allows administrators to associate a device with an authentication policy.
-
On the Stock tab, search for and locate the device you want to associate with an authentication policy.
-
In the Actions column, click the three-dots
icon for the device, and then select Link to a Policy.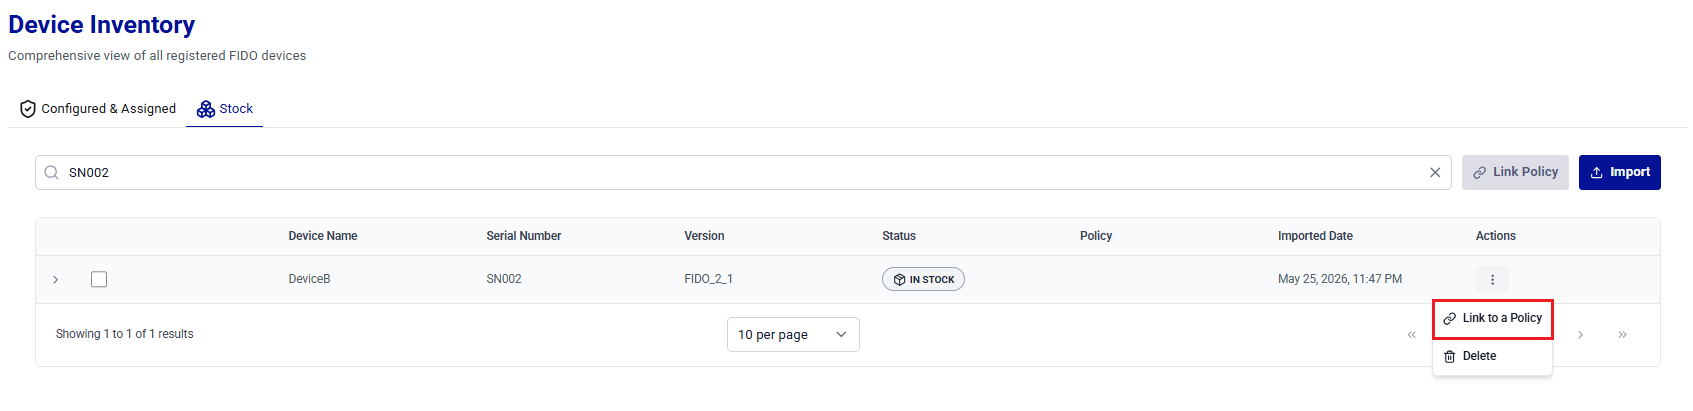
-
In the Link Policy dialog box, select the policy to be linked to the device, and click Link Policy.
-
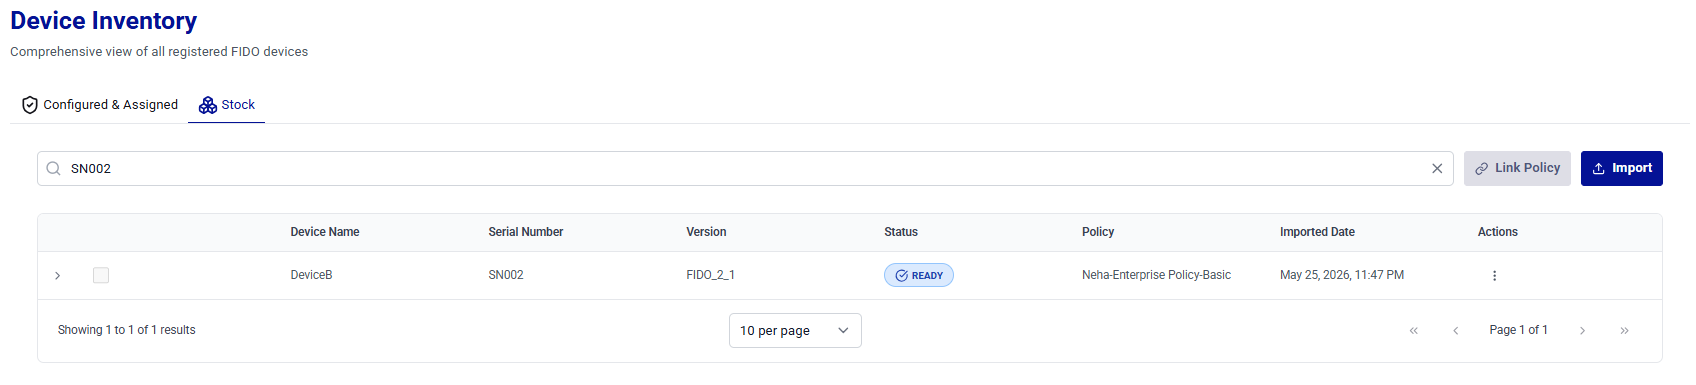
The Policy column is updated for the device. Verify that the correct policy is displayed for the device.
Unlink a Policy from a Single Device
This operation allows administrators to remove the policy association from a single device.
Note
- Unlinking a policy from a device requires the
talm_device_policy_unlink_writepermission. - Policies can be unlinked from devices only when the device state is Ready or In Stock.
-
On the Stock tab, search for and locate the device from which you want to unlink the authentication policy.
-
In the Actions column, click the three-dots
icon for the device, and then select Unlink Policy.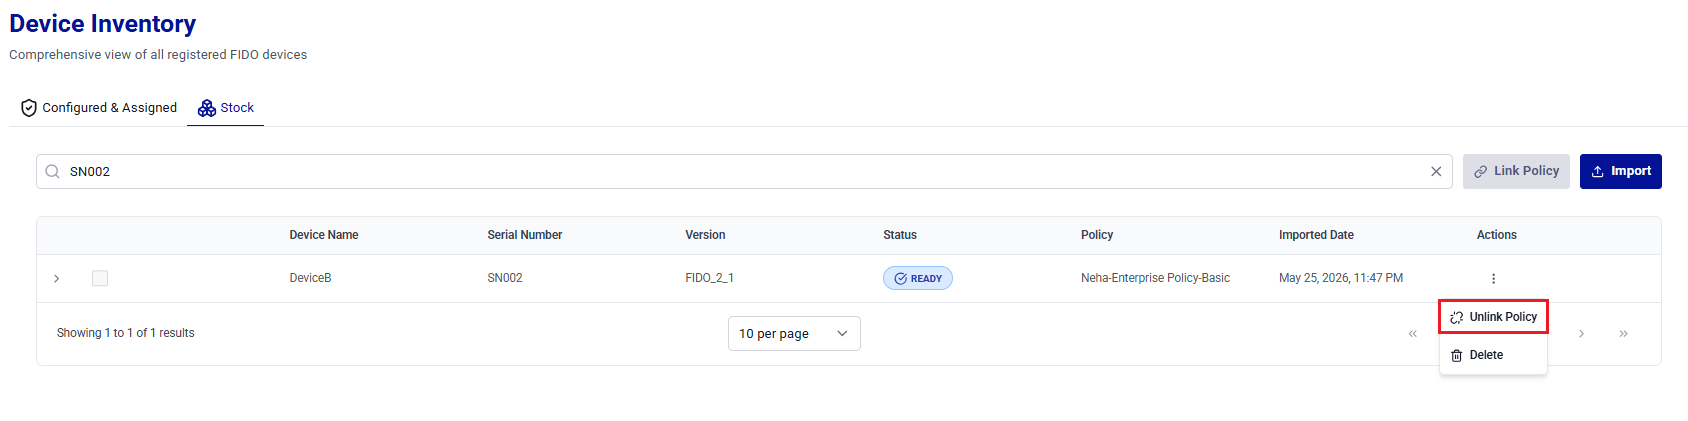
Caution
Before unlinking the policy, ensure that the operation is performed on the correct device to avoid unintended changes.
-
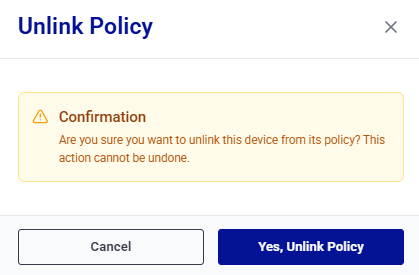
In the Unlink Policy dialog box, click Yes, Unlink Policy to confirm.
-
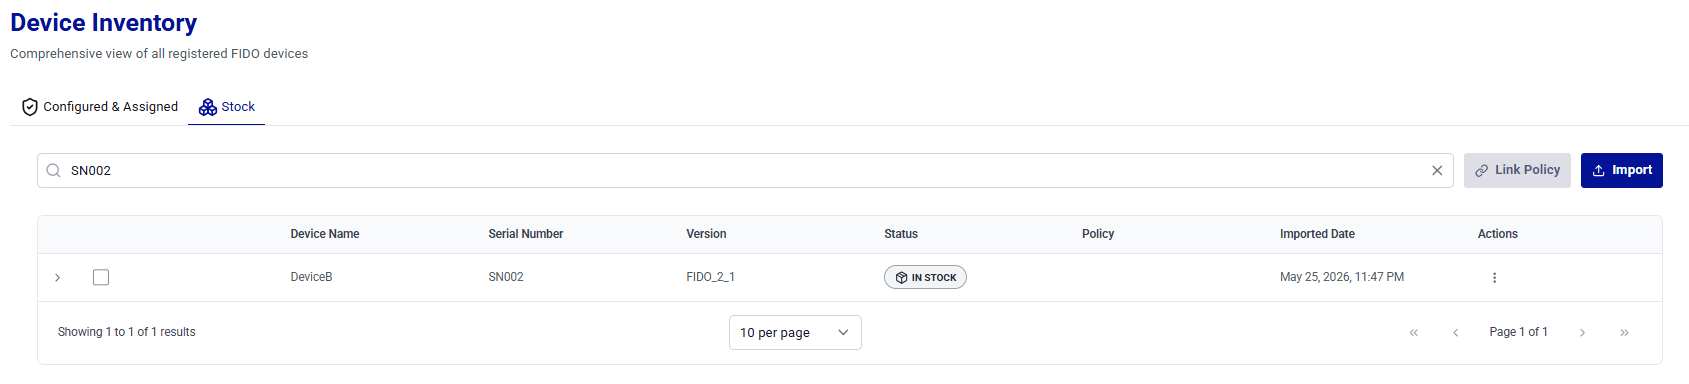
The policy is unlinked from the device. Verify that the Policy column is cleared for the device.
Delete a Device from Stock
This operation allows administrators to delete a device from stock.
-
On the Stock tab, search for and locate the device that you want to delete.
-
In the Actions column, click the three-dots
icon for the device, and then select Delete.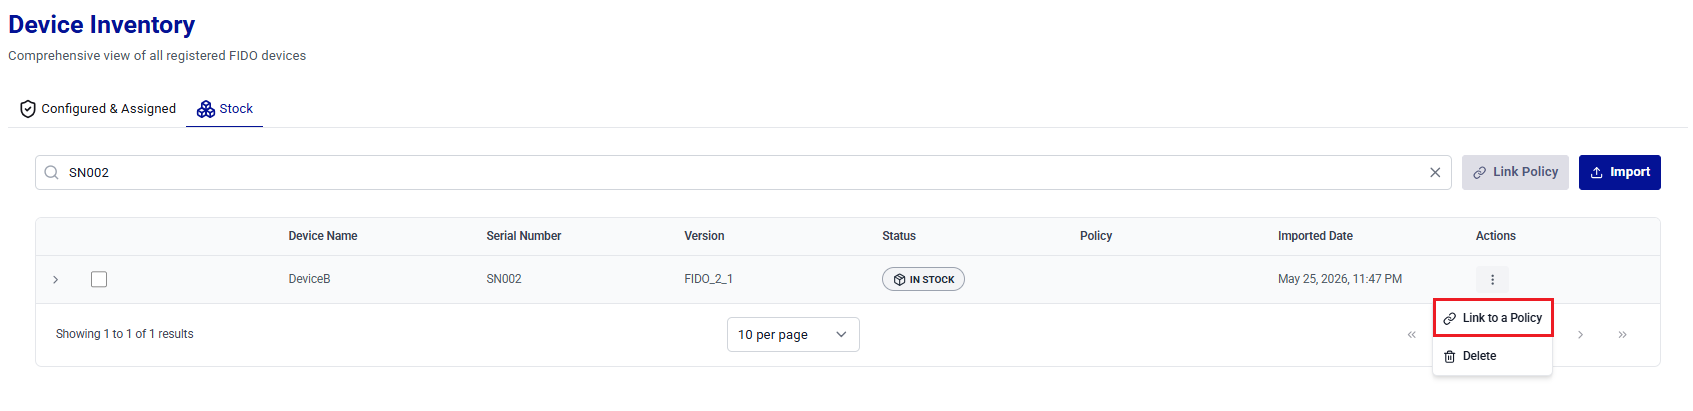
Caution
Deleting a device permanently removes it from the inventory. Ensure that the operation is performed on the correct device to avoid unintended changes.
-
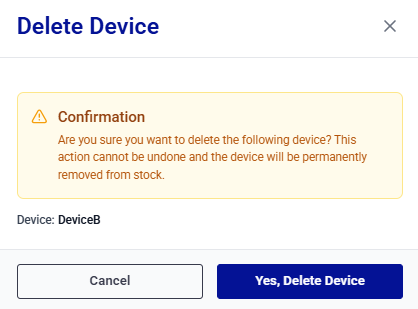
In the Delete Device dialog box, review the device name, and click Yes, Delete Device to confirm.
-
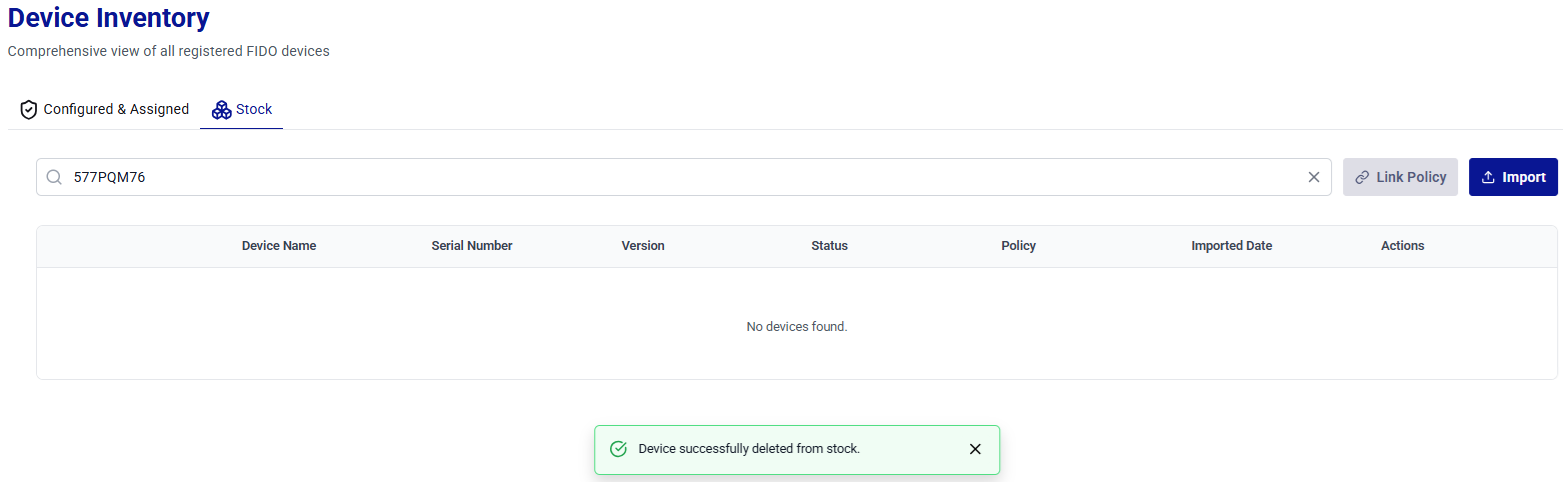
The Device successfully deleted from stock. message is displayed. Verify that the device no longer appears in the device list under Stock.