



External IDP Configuration for Self Service
Before users can register FIDO devices through the self-service registration portal, administrators must configure an external identity provider (IDP) and register it with the OneWelcome Identity Broker. These configurations are required to enable user authentication through the Identity Broker and the external IDP that manages user identities.
To enable self-service registration, complete the following prerequisite tasks:
- Configure an external IDP (Microsoft Entra ID) – Register an application in Microsoft Entra ID and obtain the configuration values required by the Identity Broker.
- Configure the OneWelcome Identity Broker – Add the external identity provider to the Identity Broker as an OpenID Connect (OIDC) provider.
Configure an External IDP (Microsoft Entra ID)
Perform the following steps:
Register the application
-
In the Azure portal, on the Azure services page, select Microsoft Entra ID.

-
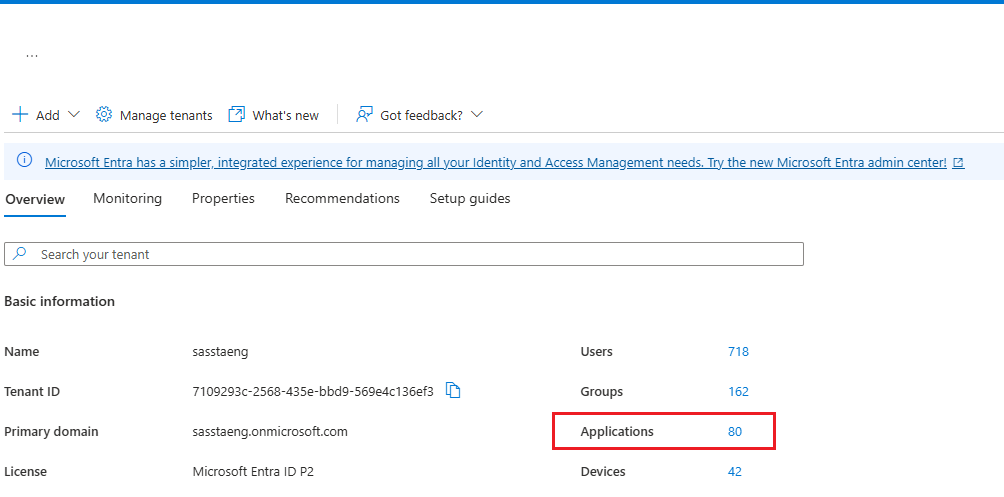
On the Microsoft Entra ID Overview page, review the tenant details, such as the Name and Tenant ID, and then open App registrations.
-
On the App registrations page, click New registration.

-
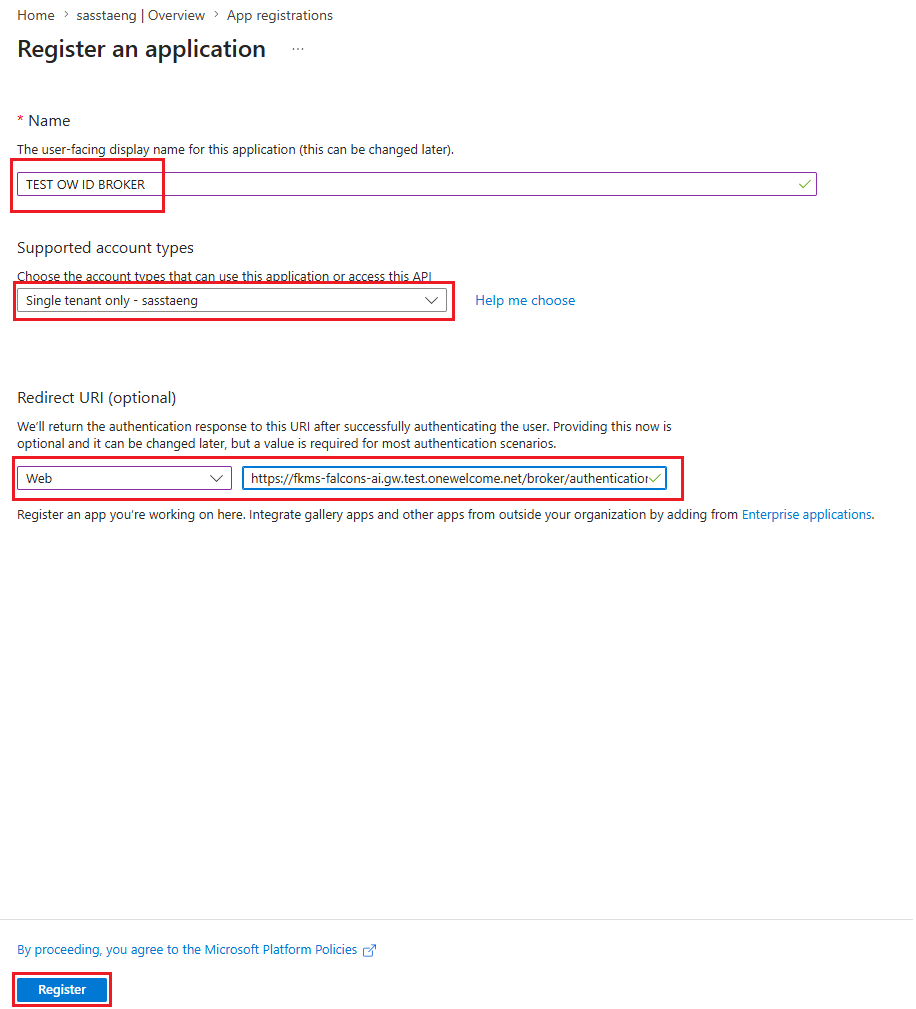
On the Register an application page, perform the following steps:
- In the Name field, enter a name for the application.
- Under Supported account types, select the Accounts in this organizational directory only (Single tenant) option.
- Under Redirect URI, select Web and enter the Identity Broker callback URL, for example
https://<identity-broker-host>/broker/authentication/callback. - Click Register.
Obtain the configuration values
Obtain the following configuration values required by the OneWelcome Identity Broker:
You will need these values while adding Microsoft Entra ID in the OneWelcome Identity Broker.
Client ID and OpenID Connect (OIDC) metadata endpoint
-
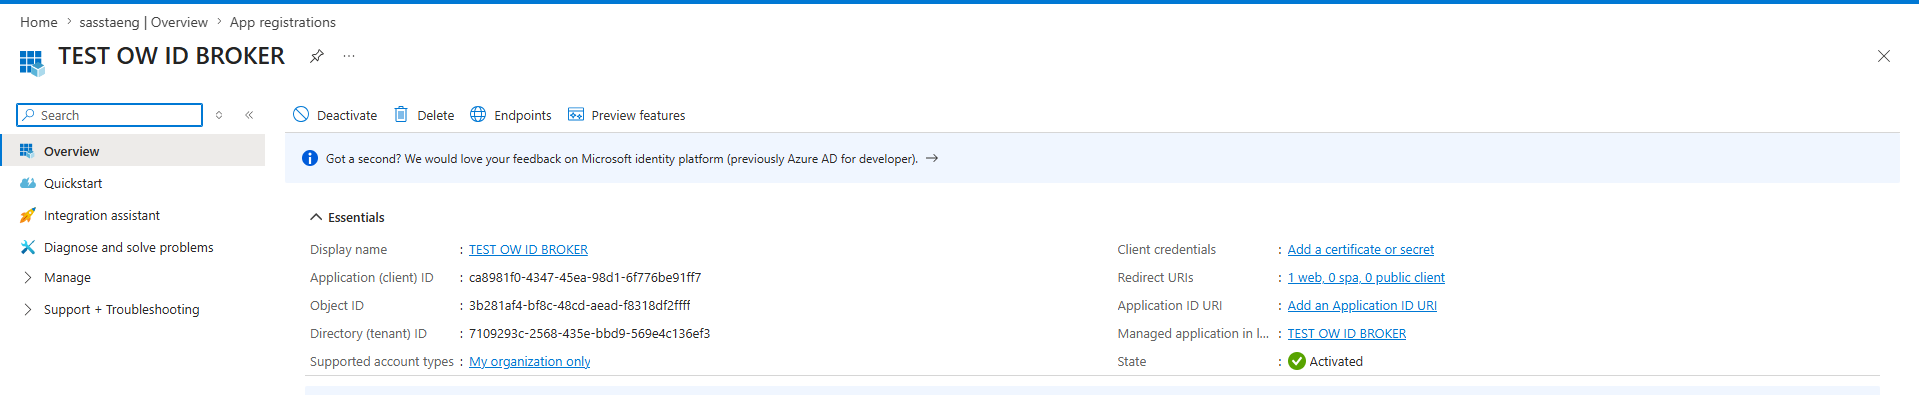
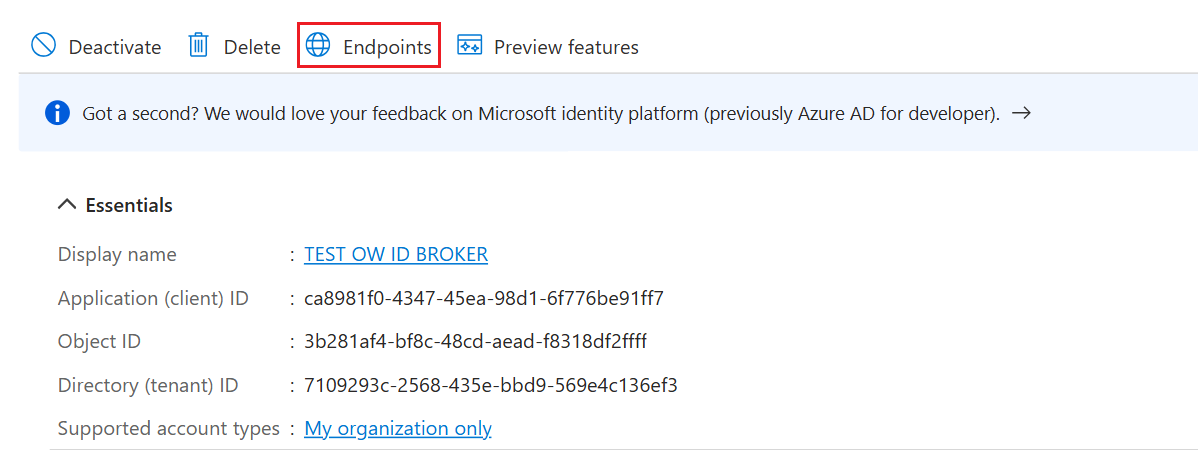
After the application registration, the application Overview page displays the Essentials details.
-
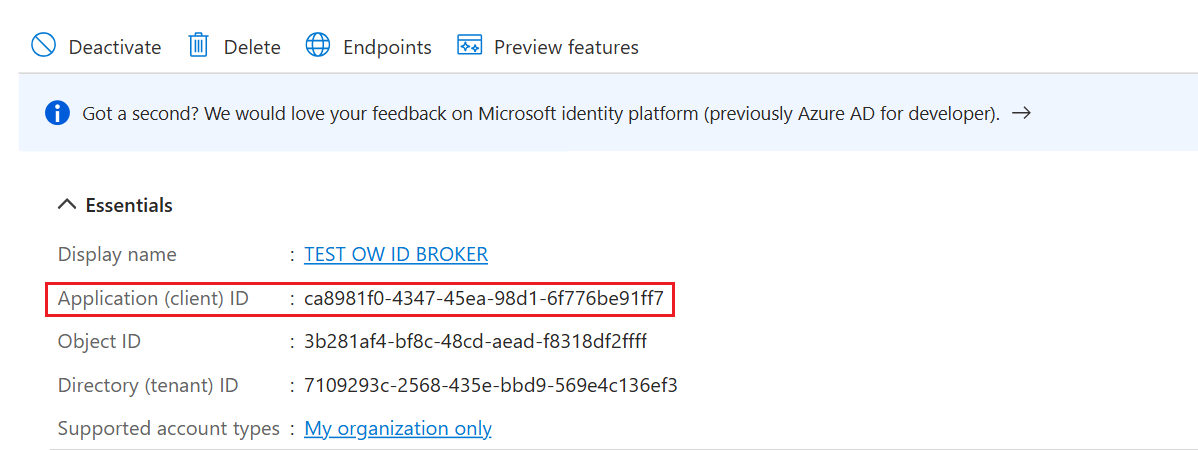
Copy the Application (client) ID and paste it in a text editor.
-
On the Overview page, click Endpoints.
-
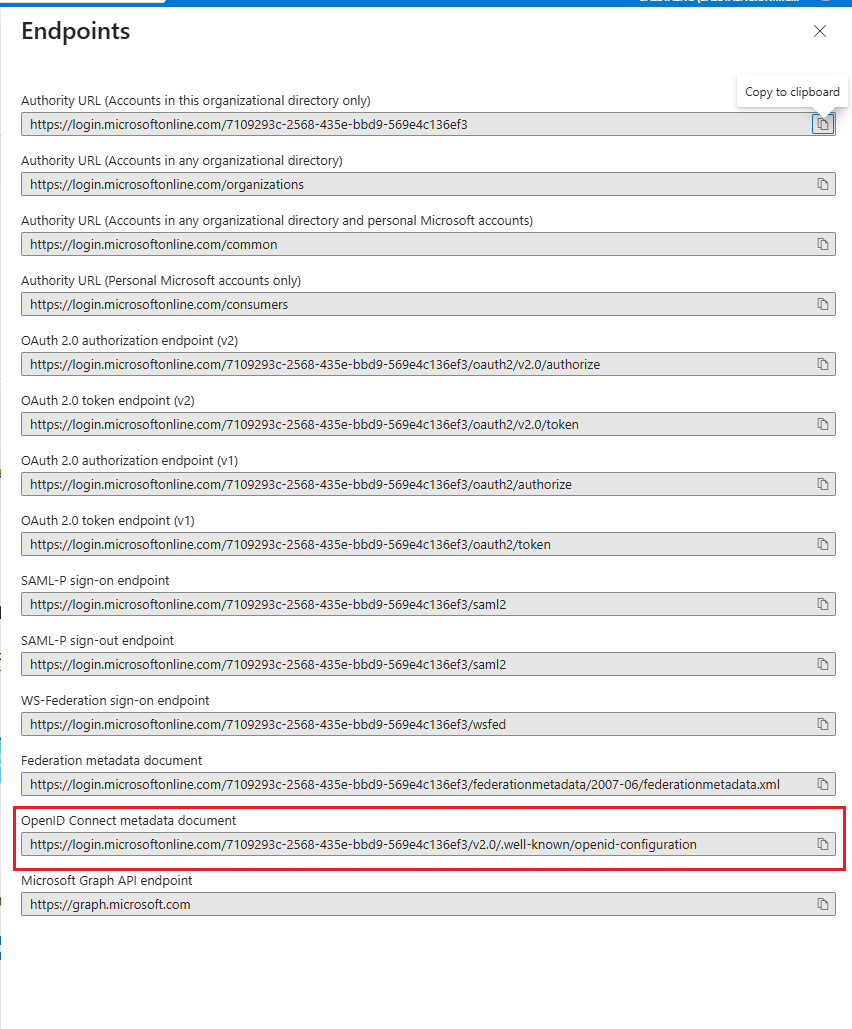
Under Endpoints, copy the OpenID Connect metadata document URL and paste it in the text editor. The Identity Broker uses this URL to discover the IDP endpoints.
Client secret
-
On the Overview page, in the Essentials section, click on the Client credentials link.

-
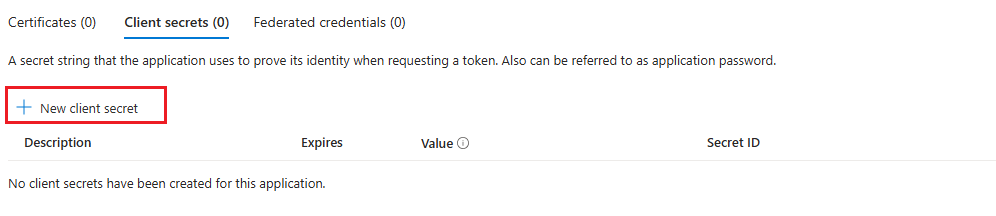
On the Certificates & secrets page, go to the Client secrets tab, and then click New client secret.
-
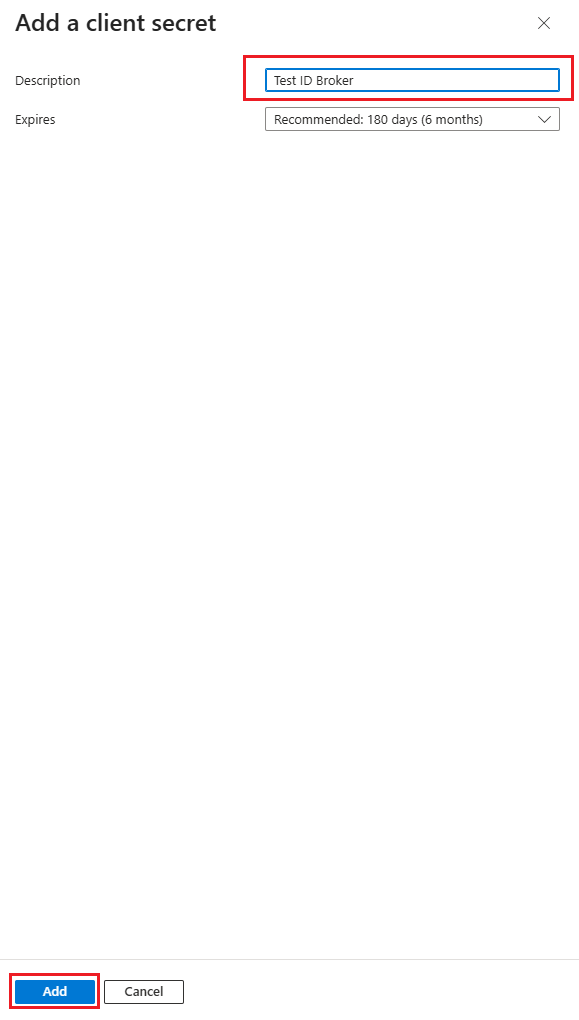
Under Add a client secret, enter a Description, select an expiry period, and then click Add.
Caution
When you create the client secret, the portal displays its Value only once. Copy the Value immediately and store it securely, because it cannot be retrieved later.
The Secret ID is not required for the remaining configuration. The Identity Broker uses the application (client) ID and the client secret Value.
Add the email optional claim
To include the user's email address in the ID token, add the email optional claim.
-
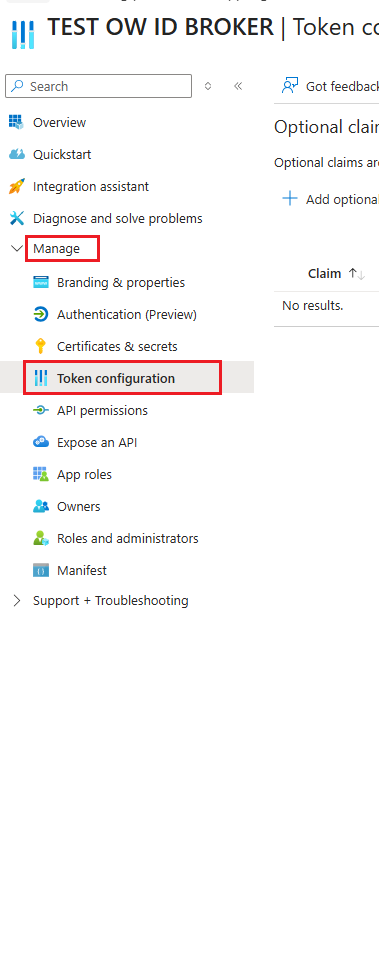
In the left menu, under Manage, select Token configuration.
-
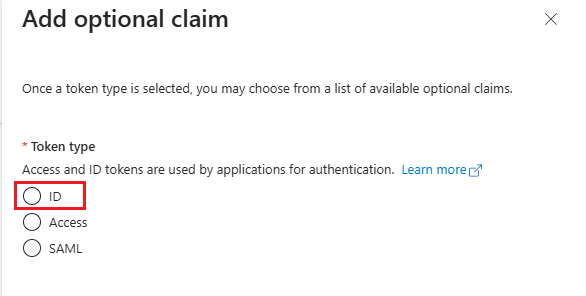
Click Add optional claim. Under Add optional claim, for Token type select ID, select the email claim, and then click Add.
-
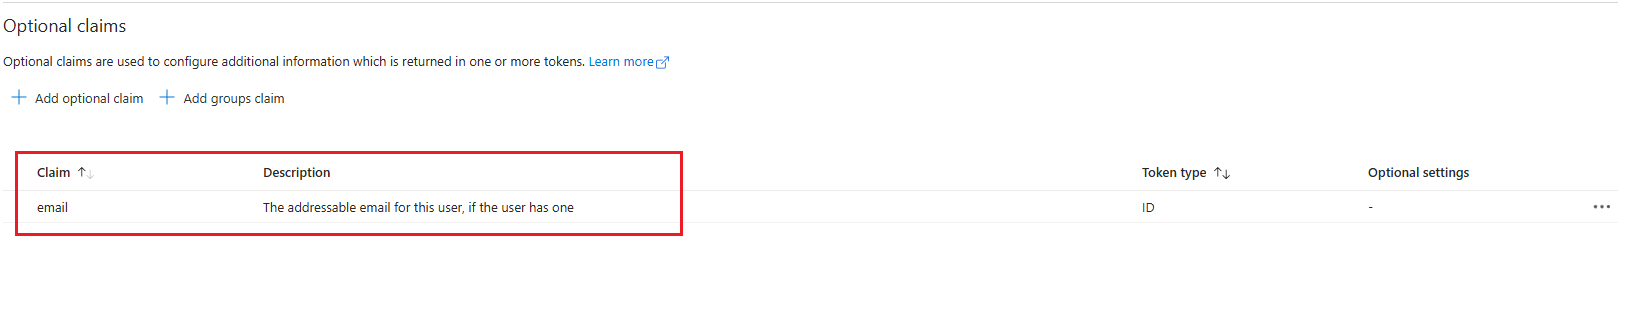
The email claim is added and appears in the Optional claims list.
Note
If a testing tool reports that the auth_time claim is not set in the ID token, add the auth_time optional claim in the same way that you added the email claim.
Grant Microsoft Graph permissions
-
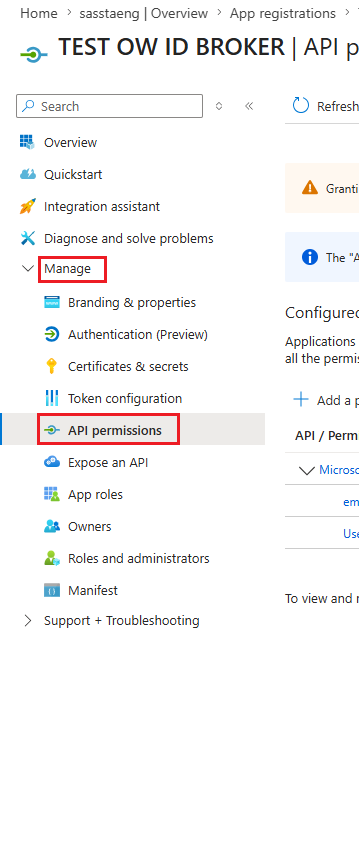
In the left menu, under Manage, select API permissions.
-
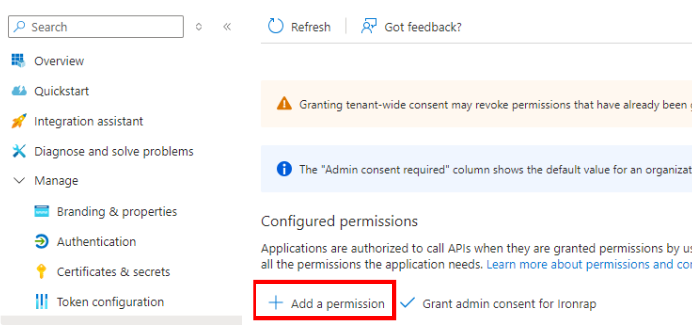
On the API permissions page, under Configured permissions, click Add a permission.
-
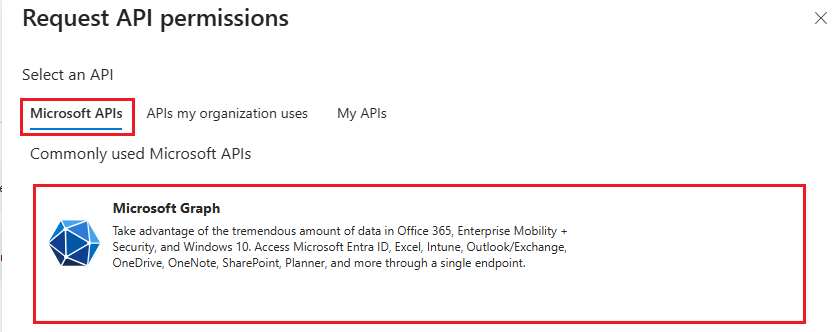
Under Request API permissions, on the Microsoft APIs tab, select Microsoft Graph.
-
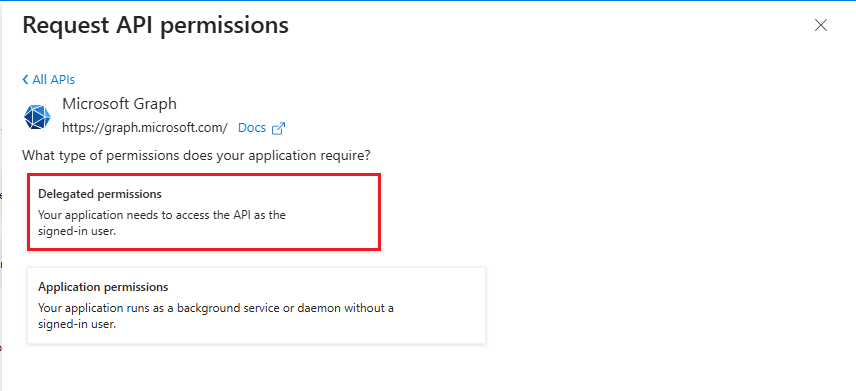
Select Delegated permissions.
-
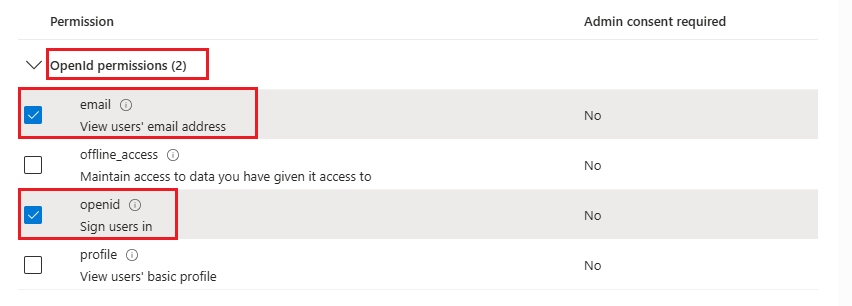
Under OpenId permissions, select the email and openid checkboxes, and then add the permissions.
-
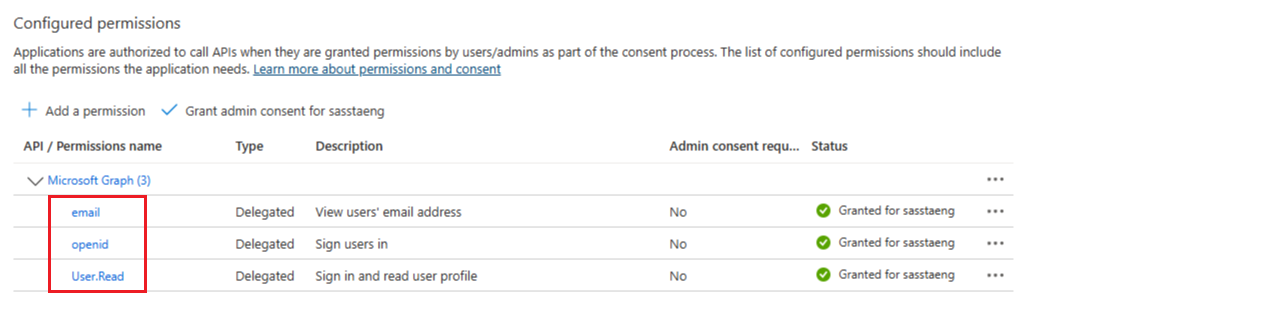
The configured Microsoft Graph delegated permissions (email, openid, and User.Read) appear in the Configured permissions list.
-
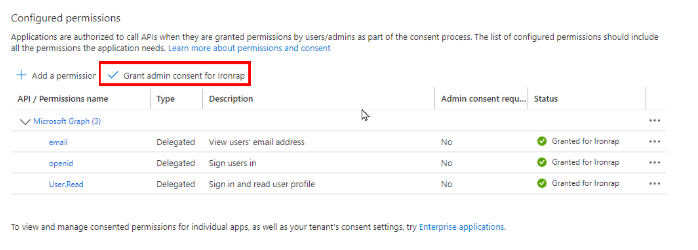
Click Grant admin consent for your tenant. The Status column shows Granted for each permission.
Configure the OneWelcome Identity Broker
Note
Configuring the External Identity Provider requires the required permission.
Perform the following steps to add the Microsoft Entra ID IDP to the OneWelcome Identity Broker:
-
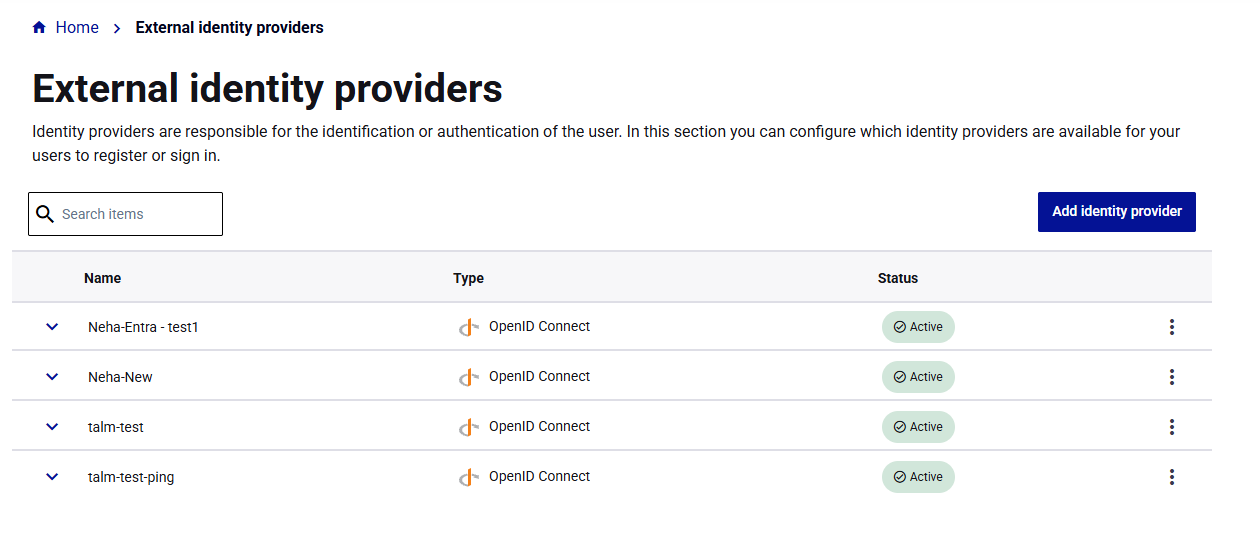
On the Thales console, click Settings > Authentication > External IDPs. The External identity providers page lists the configured providers.
-
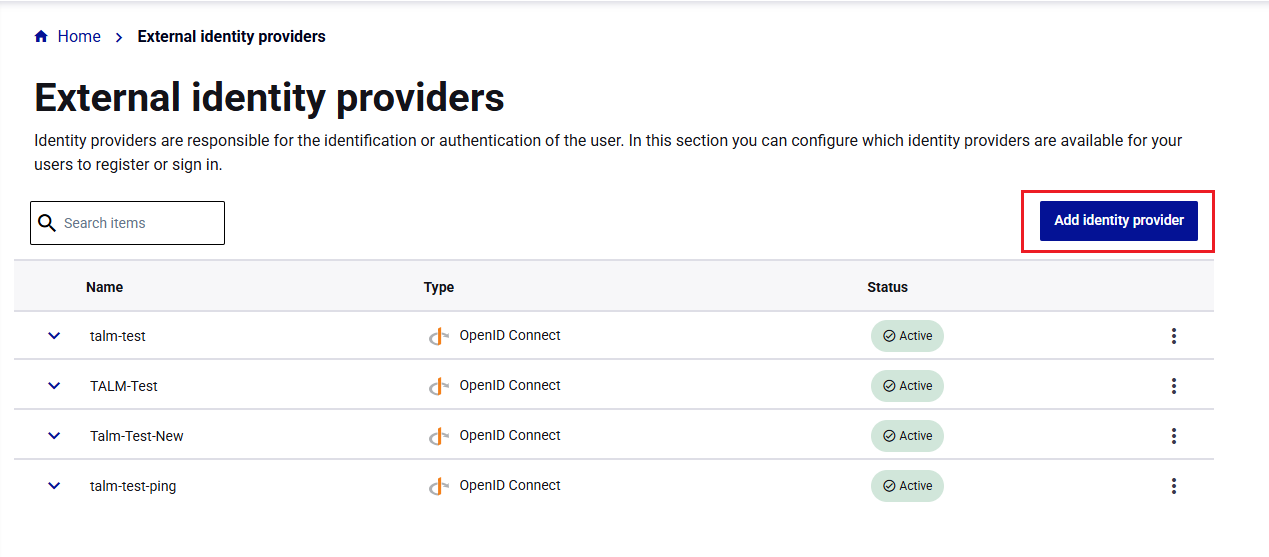
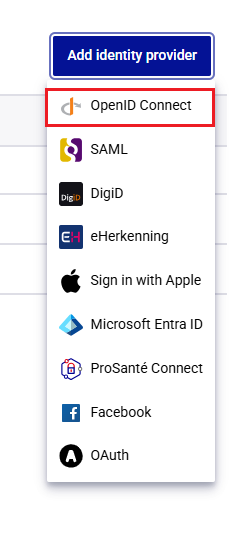
Click Add identity provider.
-
In the provider list, select OpenID Connect.
-
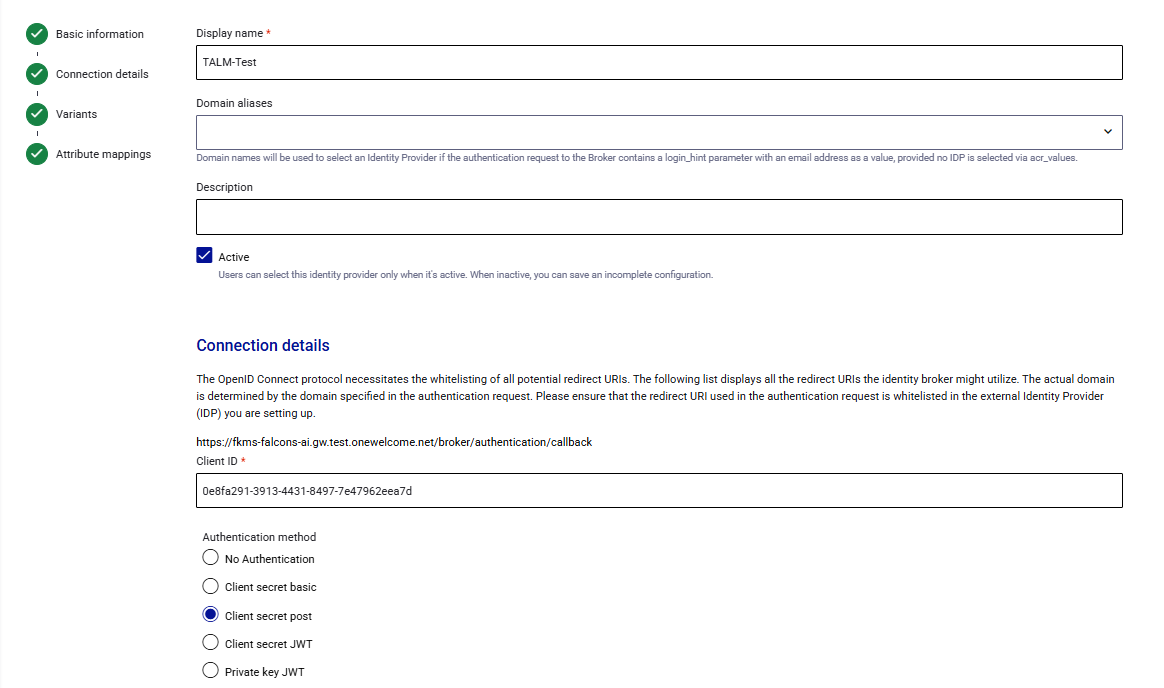
On the Edit identity provider - OpenID Connect page, complete the Basic information and Connection details:
- In Display name field, enter a name for the provider.
- In the Description field, enter a decsription.
- (Optional) In Domain aliases field, add the domains that use this identity provider when a
login_hintparameter is included in the authentication request. - Select the Active checkbox so that users can select the provider.
- Note the broker redirect URI that must be whitelisted in the external identity provider.
- In the Client ID field, enter the Application (client) ID that you obtained in step 2 of Client ID and OpenID Connect (OIDC) metadata endpoint.
- Under Authentication method, select Client secret post.
-
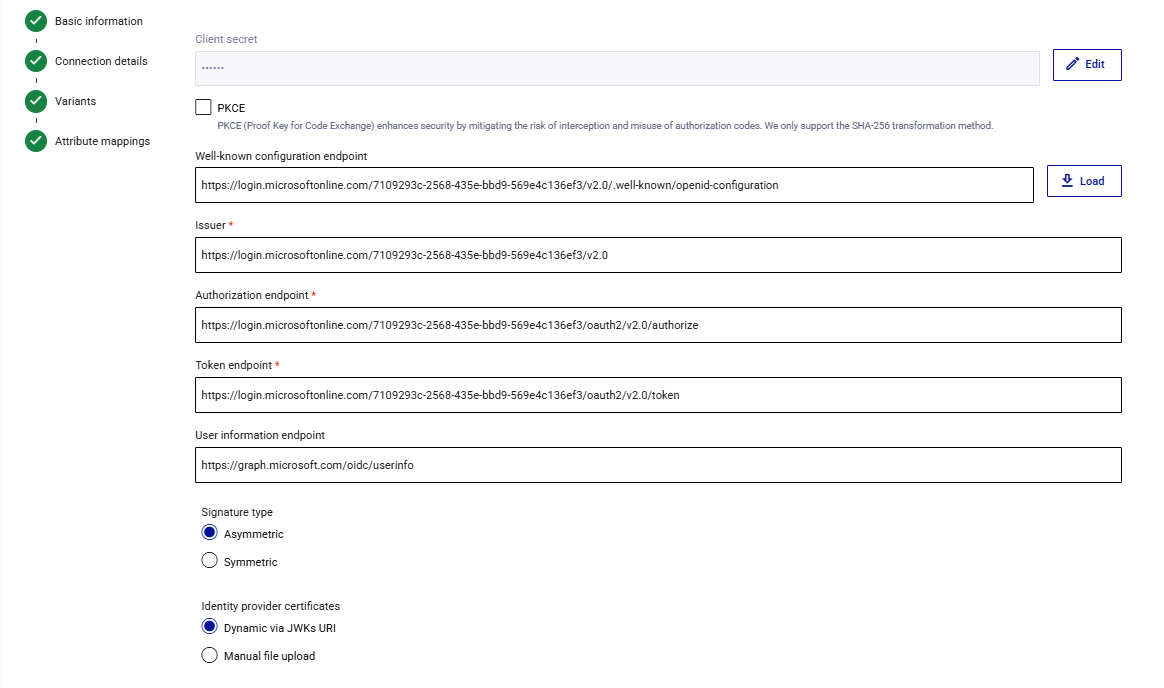
Continue with the connection endpoints:
- In the Client secret field, enter the client secret that you obtained earlier while configuring from Microsoft Entra ID.
- In the Well-known configuration endpoint field, paste the OpenID Connect metadata document URL, and then click Load to populate the Issuer, Authorization endpoint, Token endpoint, and User information endpoint.
- Set Signature type to Asymmetric.
- Set Identity provider certificates to Dynamic via JWKs URI.
-
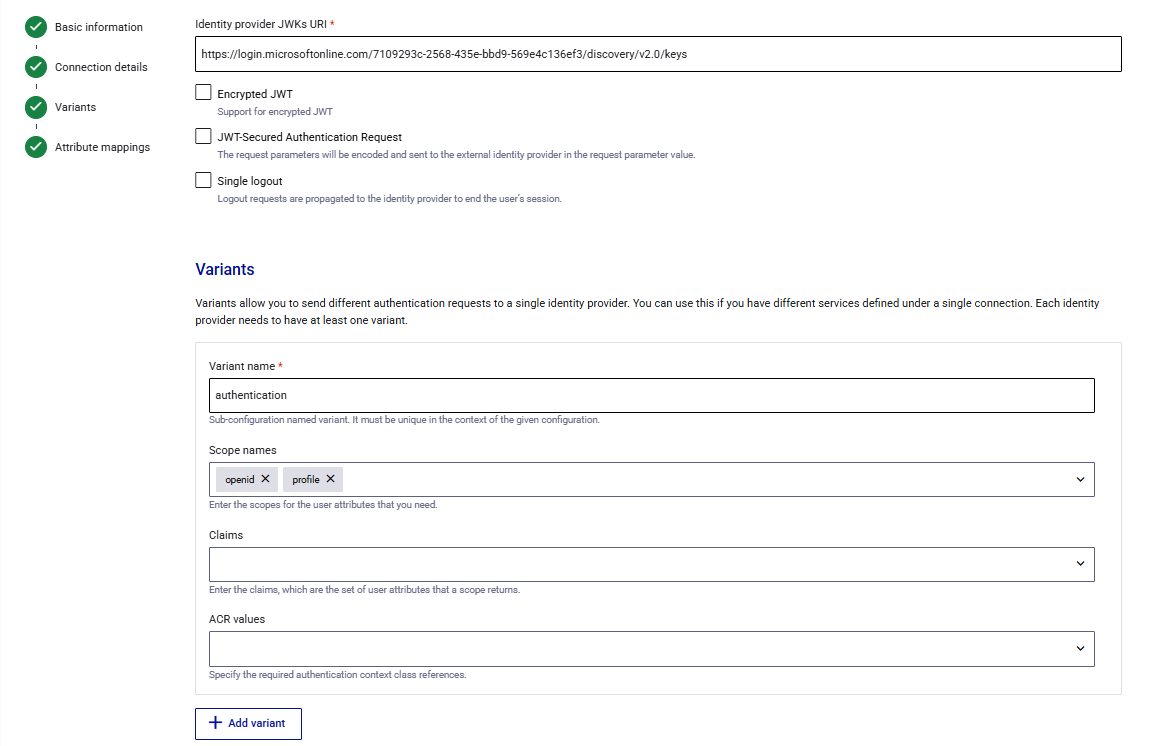
(Optional) Confirm the Identity provider JWKs URI, by selecting Encrypted JWT, JWT-Secured Authentication Request, or Single logout.
-
Under Variants,
- In the Variant name field, enter a name (for example, authentication).
- In the Scope names field, add the scopes (for example, openid and profile).
- In the ACR values field, enter the authentication context class references, if required.
-
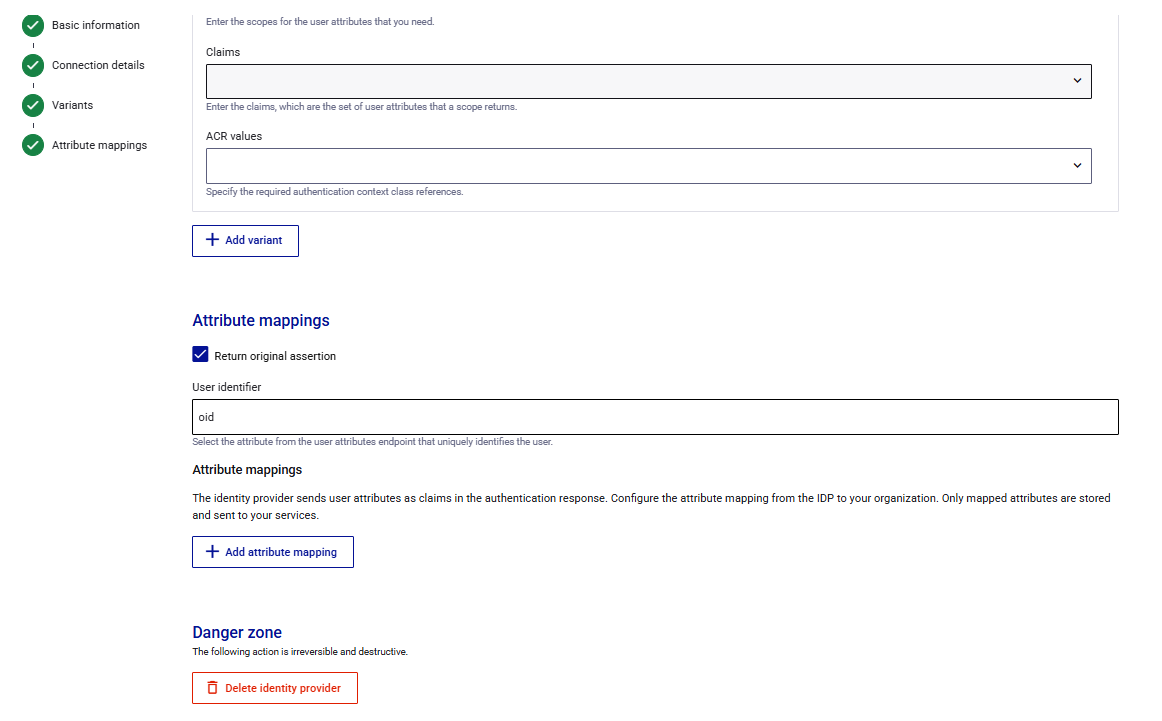
(optional)Under Attribute mappings, perform the following steps:
-
Select the Return original assertion checkbox.
-
In the User identifier field, enter
oid, the Microsoft Entra ID claim that uniquely identifies the user. -
Click Add attribute mapping to map additional identity provider claims.
-
Click Submit.
-
-
The External identity providers list displays the provider with its type and status. Expand the provider to view each variant and its ACR value, for example,
urn:onewelcome:broker:v1:talmtest:authentication.
Note
The ACR value identifies the broker configuration. The application passes this value in the acr_values parameter of the authorization request so that the Access server can route the user to the correct identity provider for authentication.
After you complete both prerequisite configurations, enable self-service on the identity provider and configure the required self-service settings. Users can then authenticate through the self-service registration portal and register their FIDO devices.
For more information, see:
- Authenticator Manager for the end-user device registration experience.
- FIDO Provisioning for information about configuring identity providers for FIDO device provisioning.

