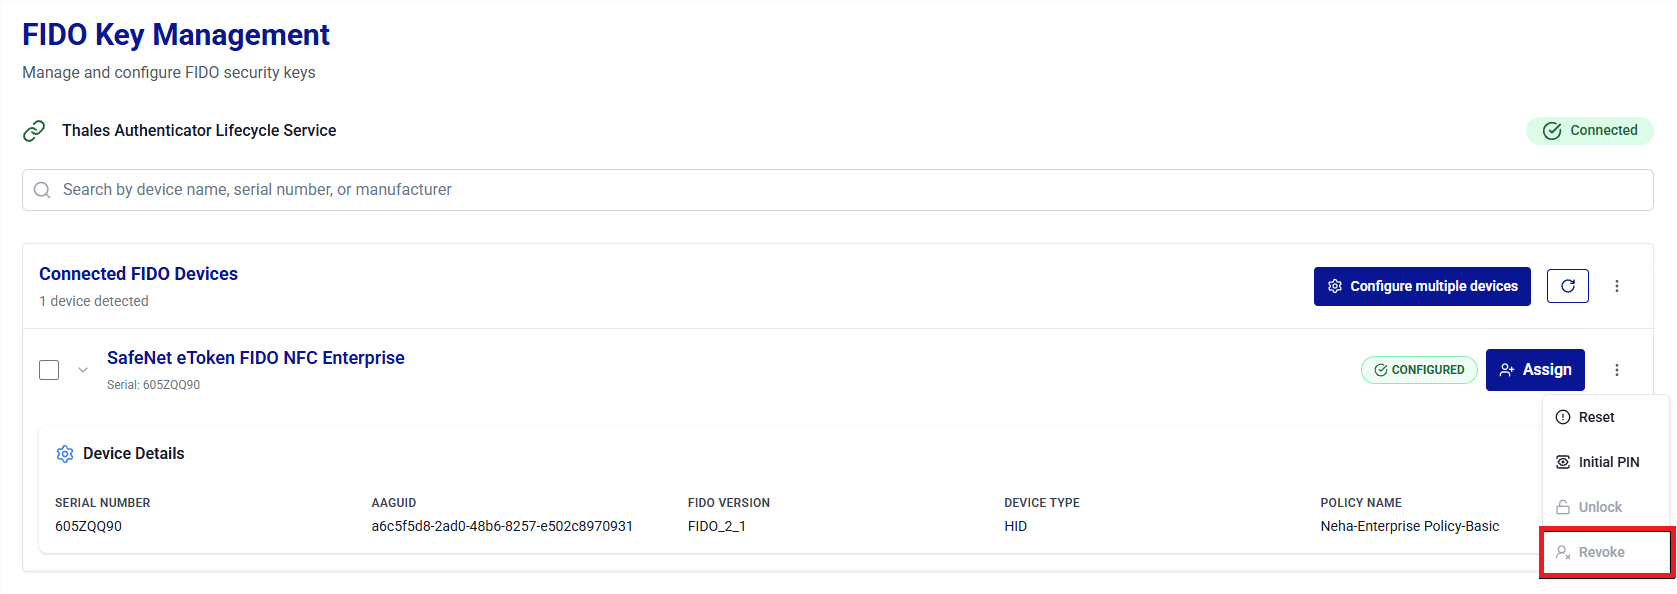
FIDO Key Management
FIDO Key Management provides administrators with secure and real-time control over FIDO authenticators connected to the local workstation. Using the Thales Authenticator Lifecycle Service (running on port 9333), administrators can perform FIDO device discovery, registration, configuration, lifecycle operations (such as device reset and revocation), and functional testing.
The FIDO Key Management window is optimized for routine device operations and complements the Device Inventory by enabling actions that require physical access to a FIDO key.
Under FIDO Key Management, administrators can perform the following operations:
- Connect to the Thales Authenticator Lifecycle Service
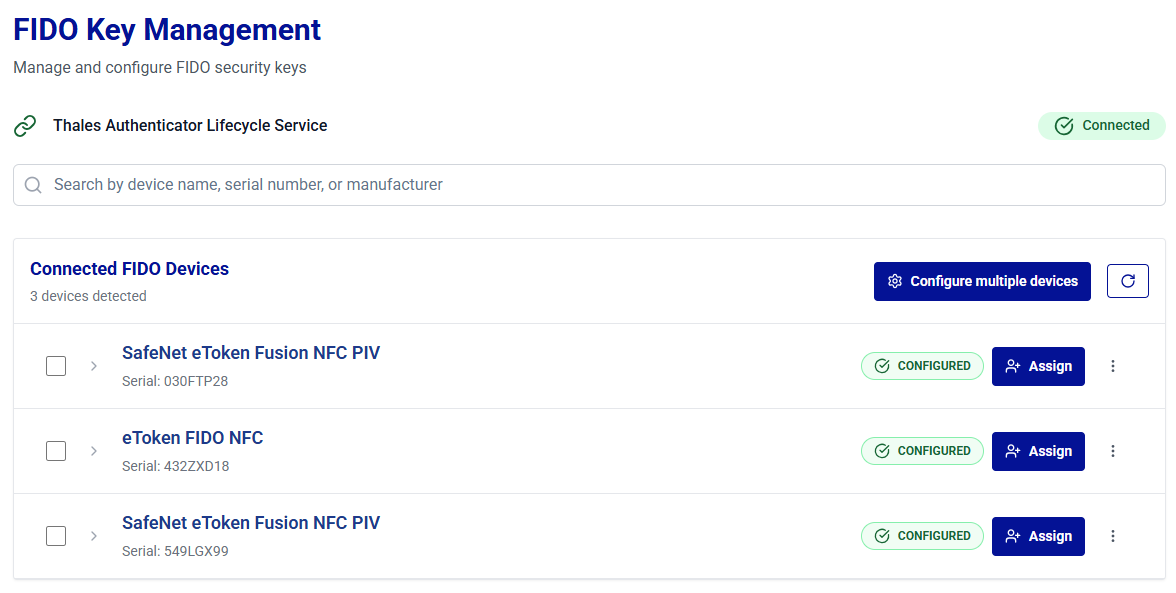
- View Connected FIDO Devices List
- Configure FIDO Devices
- Apply linked policy
- Assign FIDO Devices to Users
- View Initial PIN
- Reset FIDO Devices
- Unlock Devices
- Revoke Devices
Connect to the Thales Authenticator Lifecycle Service
For each new login session, Thales Authenticator Lifecycle Manager automatically connects to the Thales Authenticator Lifecycle Service before you perform any operations on FIDO devices.
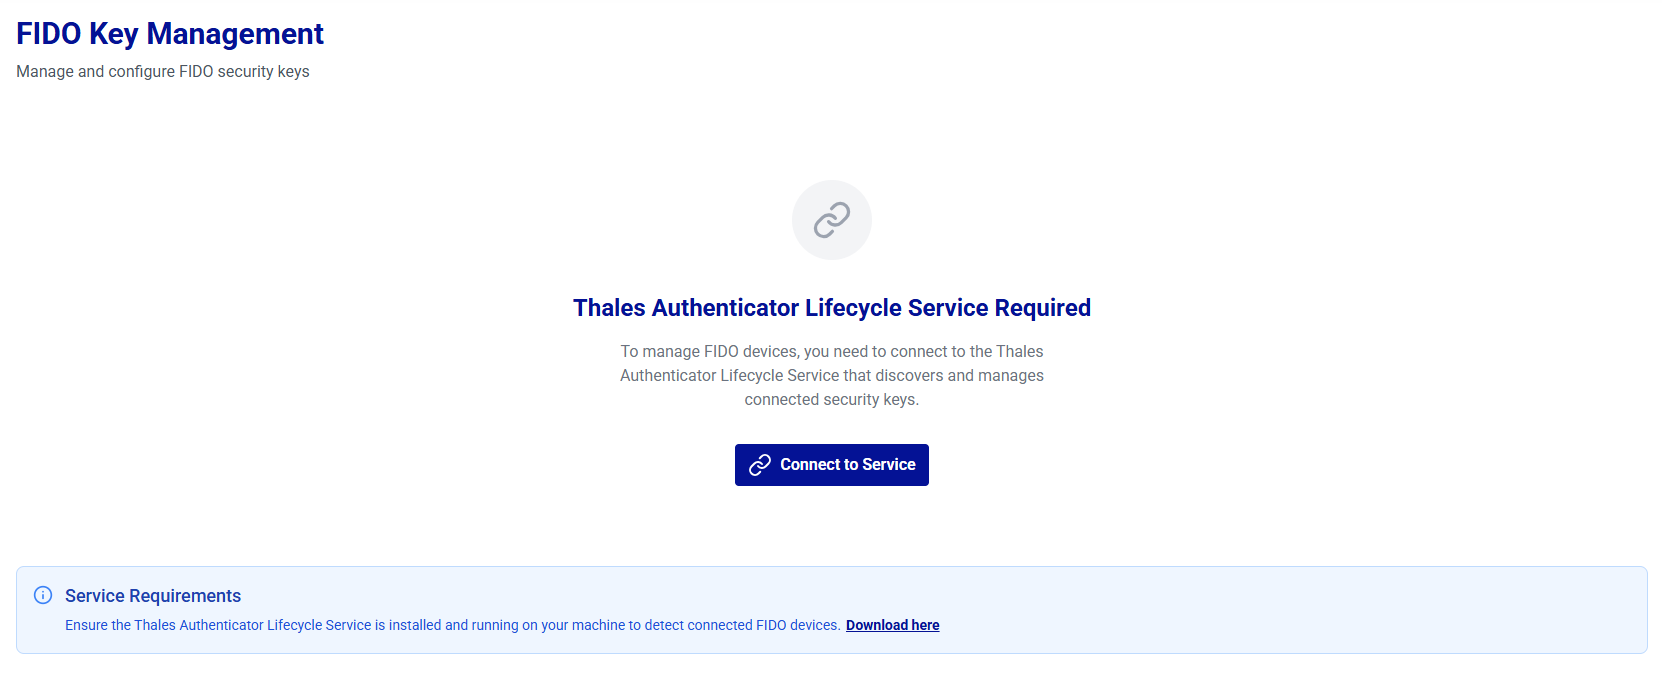
When you open the FIDO Key Management window, the connection to the Thales Authenticator Lifecycle Service (Windows service) is established automatically. If the service is stopped or the automatic connection attempt fails, click Connect to Service to retry.
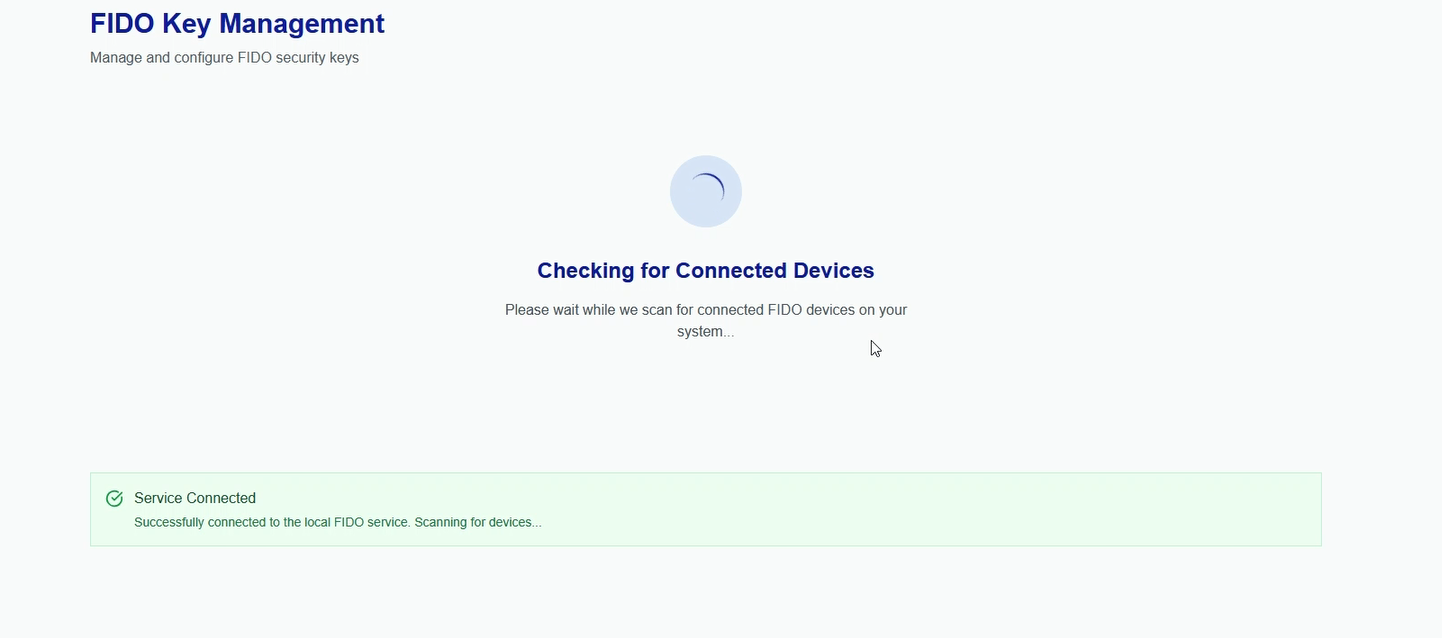
After the connection is successfully established, the Service Connected message is displayed.
Caution
Do not perform device operations in multiple browser tabs simultaneously, as performing actions such as configuration, enrollment, reset, or remote unlock across different tabs at the same time may lead to unexpected errors or inconsistent device or service behavior.
View Connected FIDO Devices List
Once the Thales Authenticator Lifecycle Service is connected, it automatically begins scanning for connected FIDO devices. After the scanning is complete, the detected devices are loaded and displayed on the window.
Note
-
Additional devices can be connected at any time. Clicking the Refresh button loads and displays them on the window.
-
Devices without a serial number are displayed with a NOT SUPPORTED status. You cannot perform any actions on such devices.
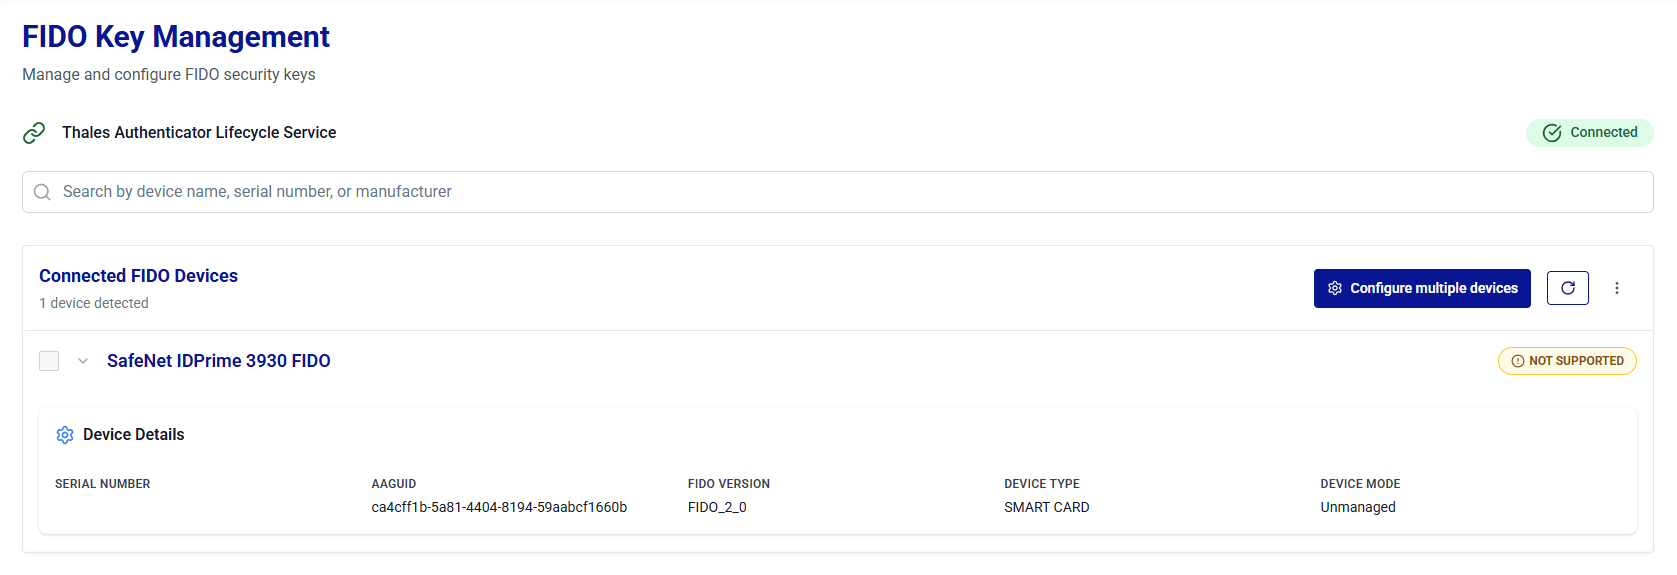
The connected FIDO devices are displayed in a collapsible list. Device details are presented in two views to help administrators access information efficiently.
-
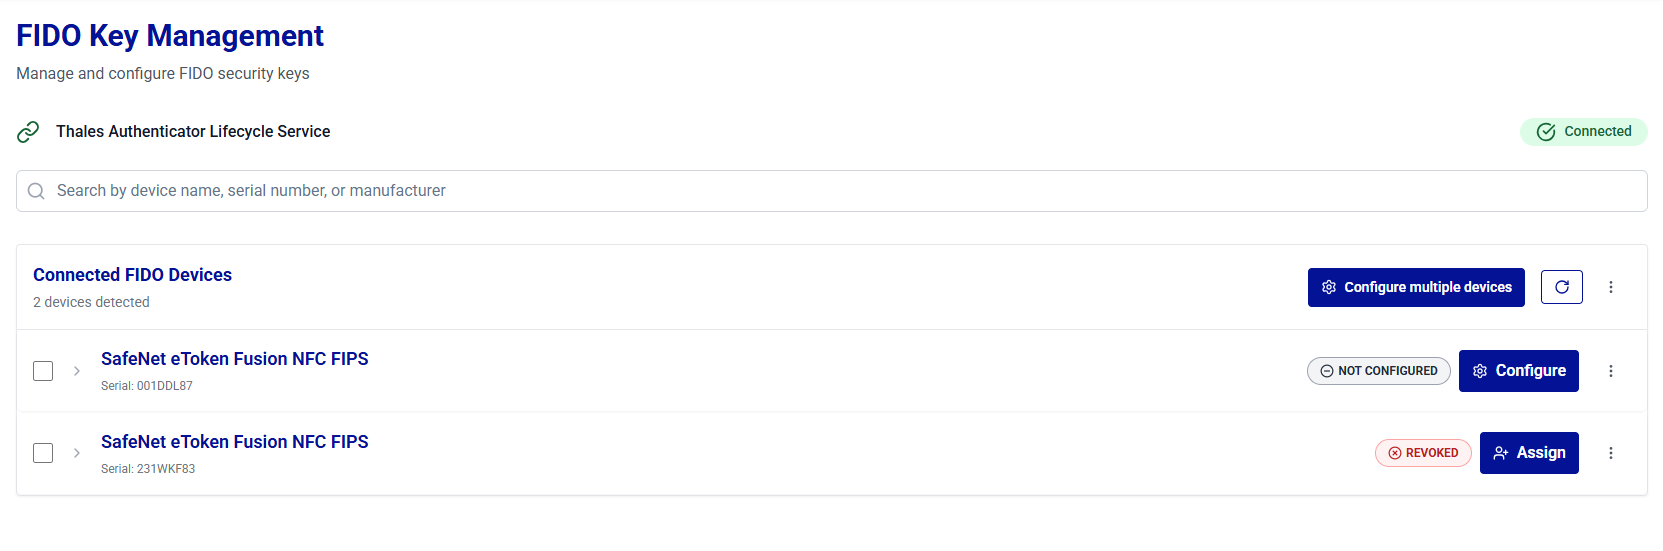
Summary View: Displays essential device details in a compact format for quick identification and action. The summary view displays:
- Device name
- Device serial number
- Device status as NOT CONFIGURED, READY, CONFIGURED, ENROLLED, IN STOCK, and REVOKED
Note
NOT CONFIGURED devices can be configured by using the Configure button and CONFIGURED devices can be assigned to users using the Assign button.
-
Expanded View: Displays complete device information, including lifecycle and compliance details, for in-depth management. After you click the expand arrow
 icon for the desired device, the following additional details are displayed:
- SERIAL NUMBER
- AAGUID
- FIDO VERSION
- DEVICE TYPE
- DEVICE Mode
- POLICY NAME
-
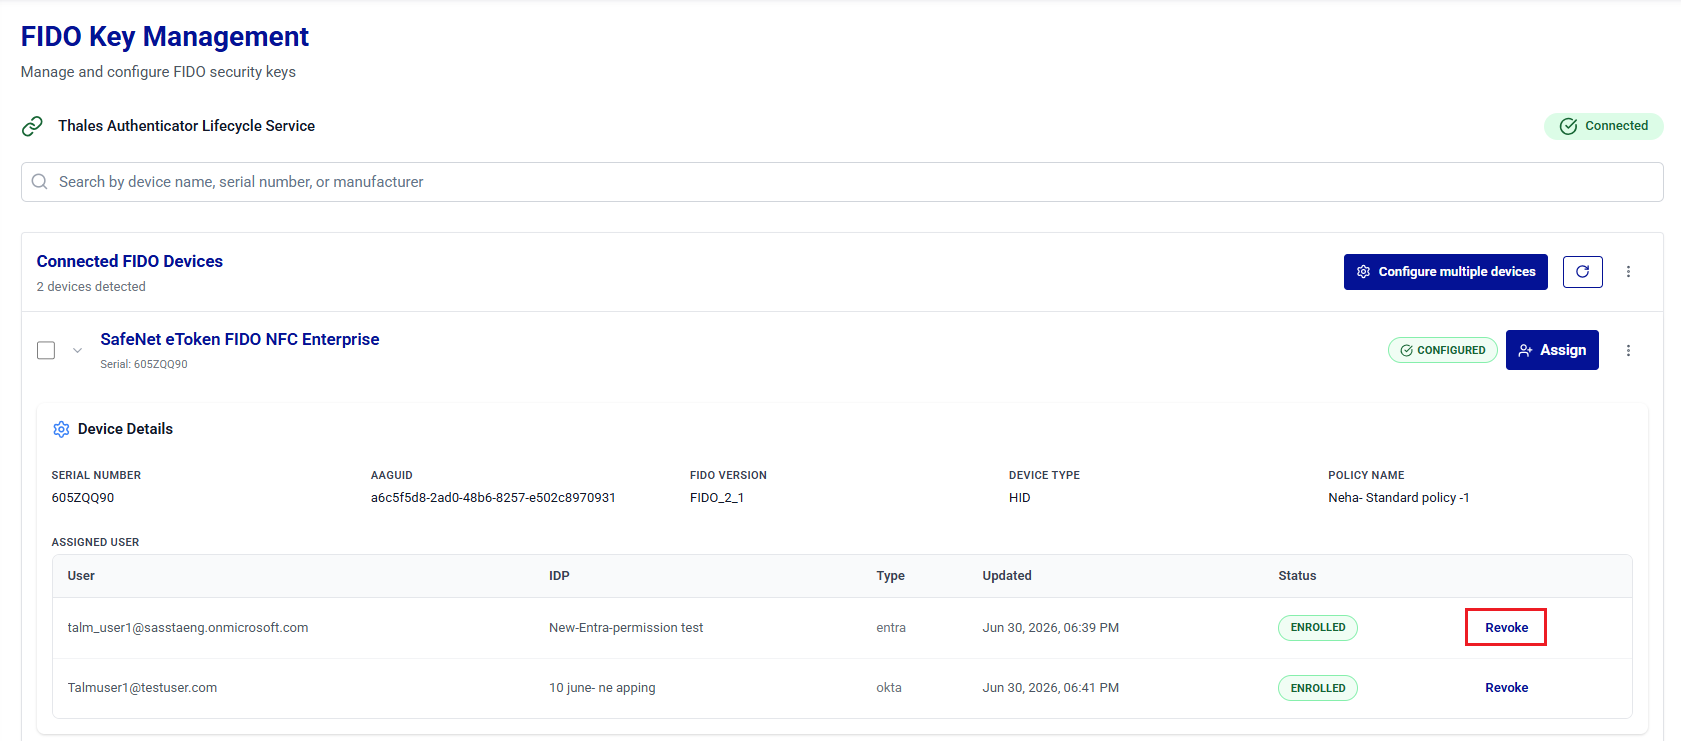
ASSIGNED USER: Lists each credential assignment in a table showing the following information:
- User
- IDP
- Type (Entra, Okta, or STA)
- Updated
- Status (ENROLLED or REVOKED)
A device supports up to five ENROLLED credential assignments, with a maximum of one assignment per identity provider. Each enrolled assignment includes a Revoke action. This limit is fixed and cannot be configured.
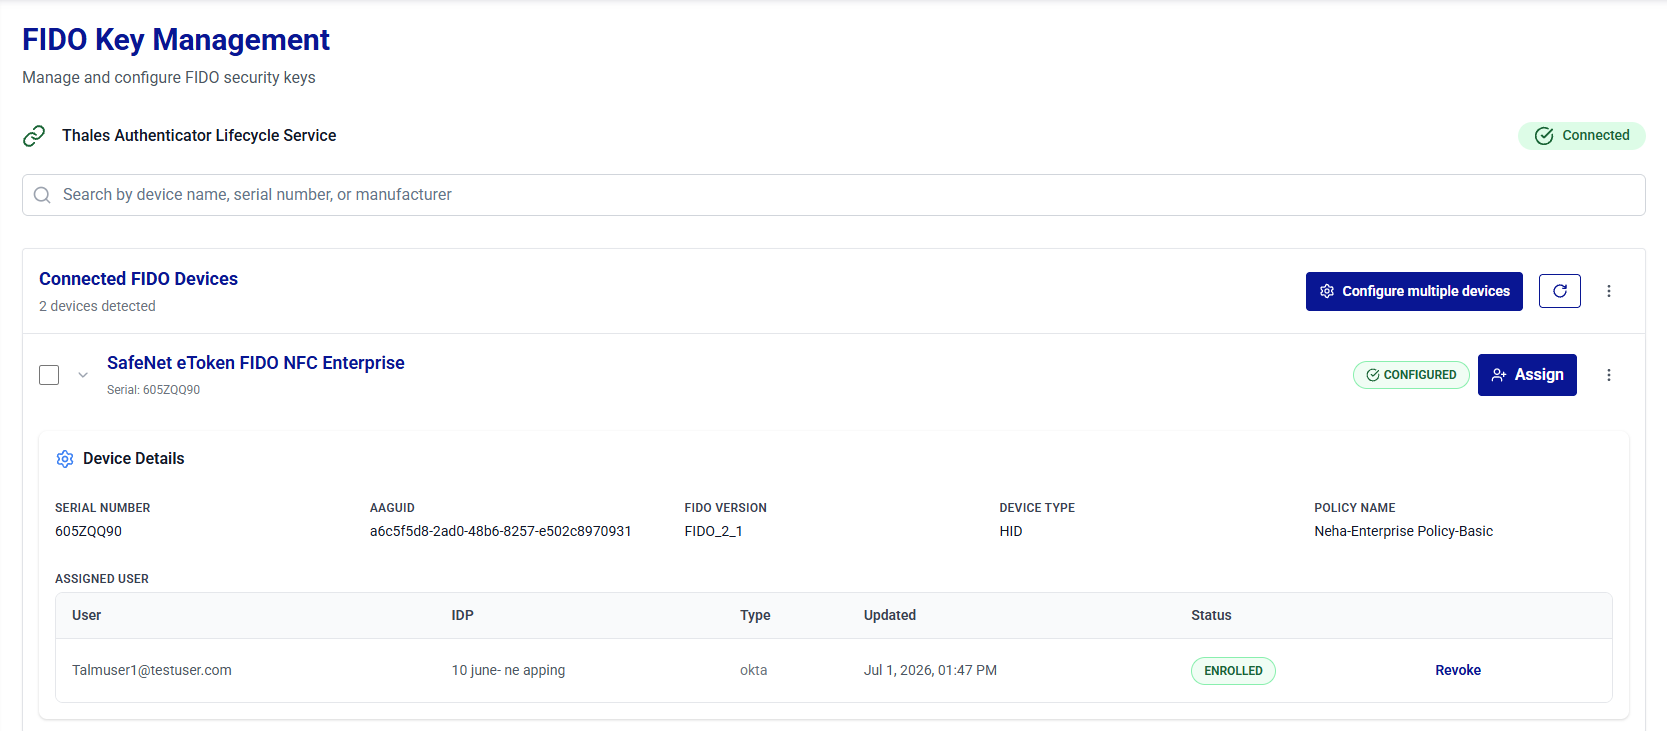
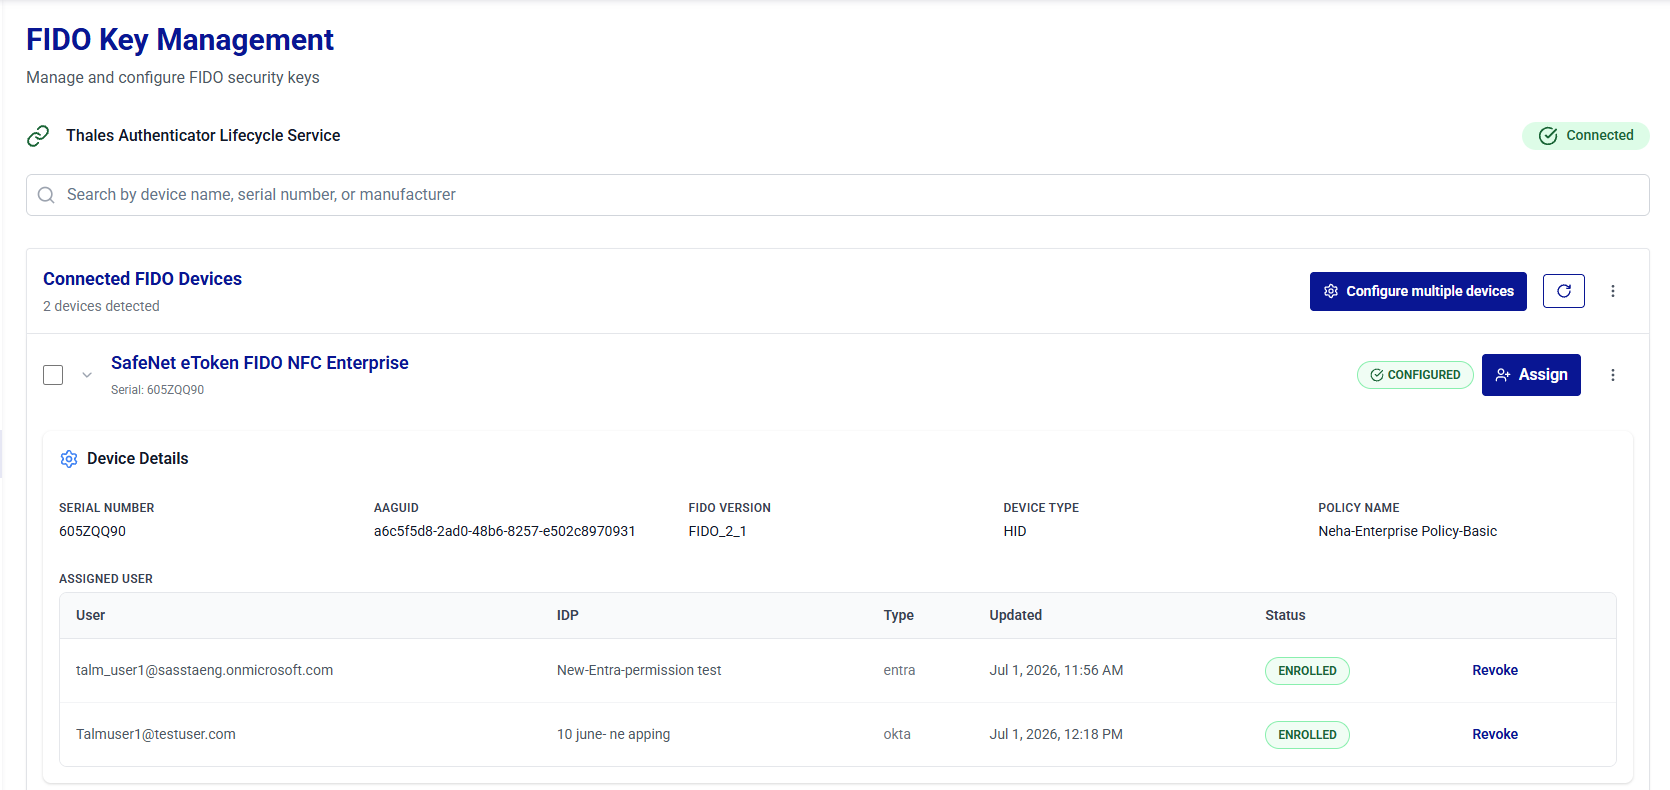
When a device is assigned to multiple identity providers, the Assigned User table displays each assignment in a separate row, as shown below.
Note
Multi-credential device assignment is controlled by the Allow assigning multiple credentials to the same device setting in Preferences. When the setting is disabled, the Assigned User table contains at most one ENROLLED assignment. For more information, see Preferences.
Configure FIDO Devices
Device configuration can be done using the following options:
- Configure Multiple FIDO Devices - To configure all the devices using a single policy in one operation.
- Configure Selected FIDO Devices - To configure selected devices using a single policy in one operation.
- Configure Specific FIDO Devices - To configure a specific device by applying a selected policy.
Configure Multiple FIDO Devices
-
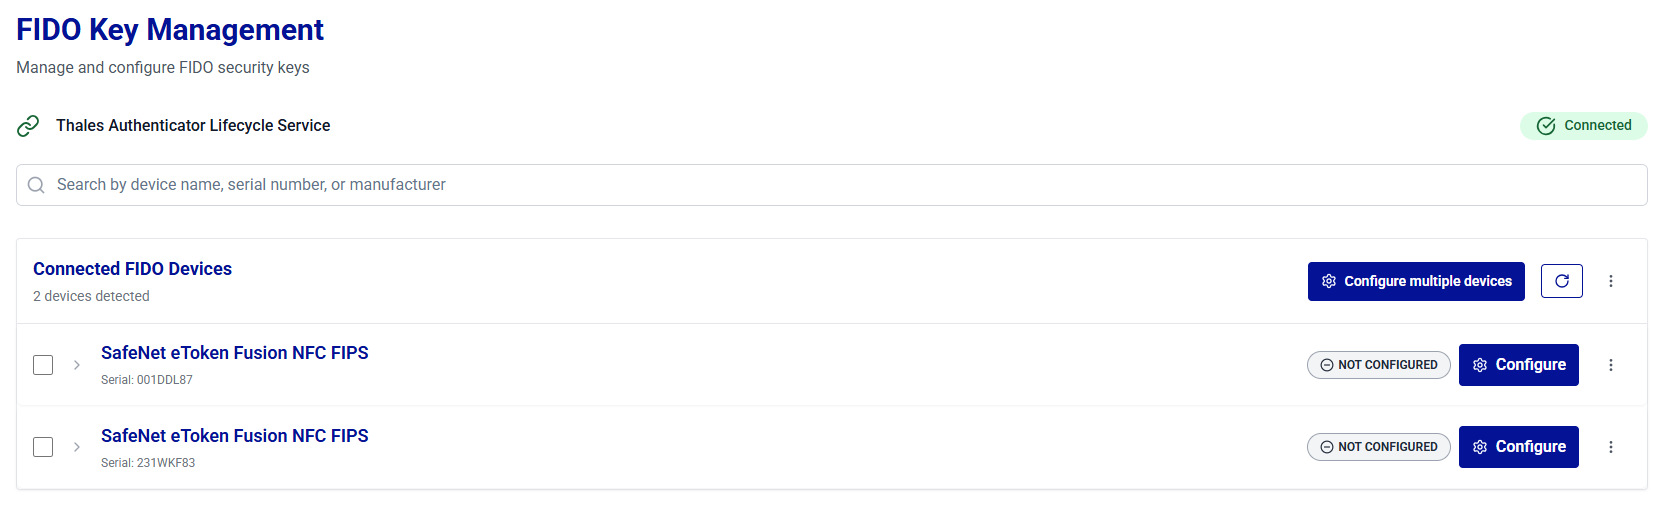
Under Connected FIDO Devices, click Configure multiple devices.
-
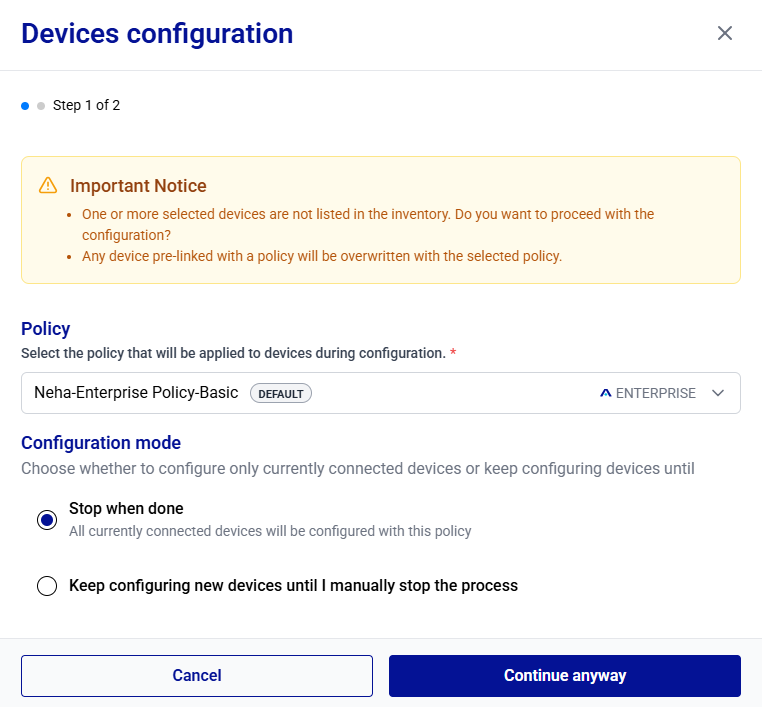
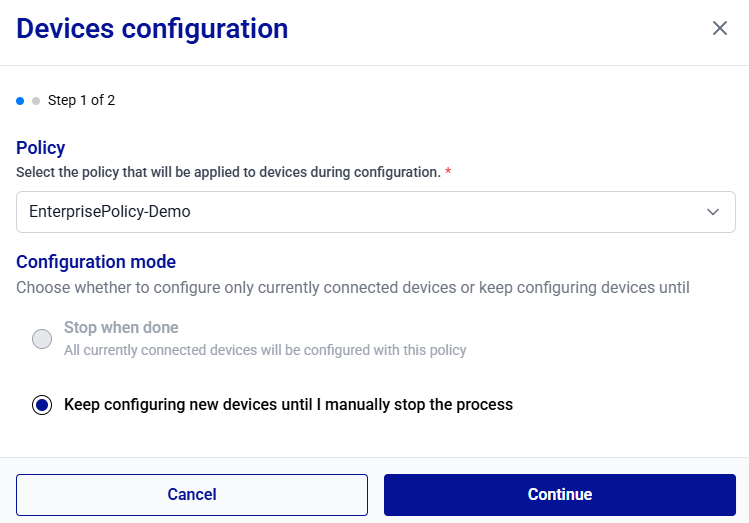
On the Devices configuration window, you can configure devices using one of the following two options:
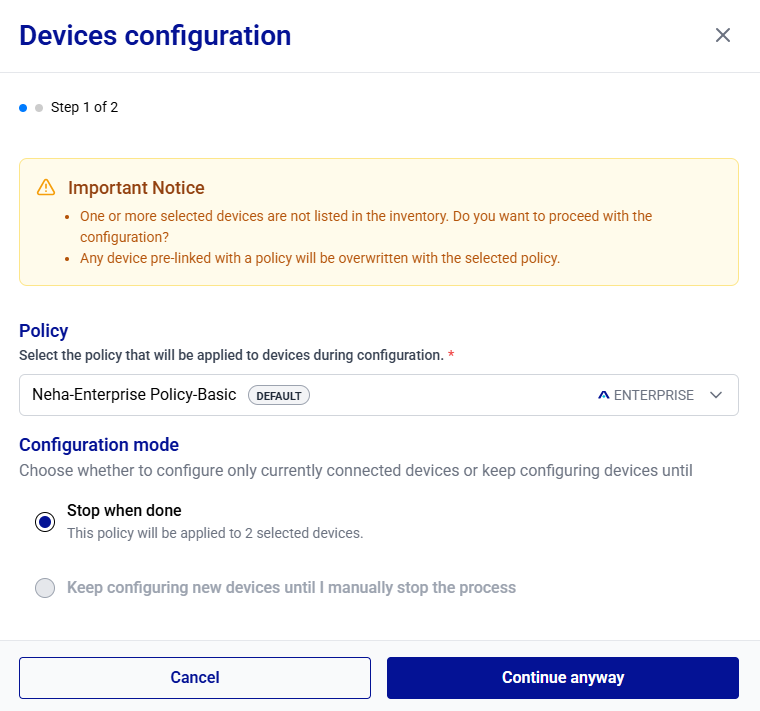
- Stop when done: Enables configuration of all devices that are currently connected. The process stops automatically once the configuration of these devices is complete.
- Keep configuring new devices until I manually stop the process: Enables continuous configuration mode. When this option is selected, the system automatically detects and configures each new device connected one by one by the administrator for configuration. The process continues until you manually stop it. Device configuration using this option can be initiated even if no devices are currently connected.
Stop when done
-
Under Policy, select a policy to be applied to the devices.
-
Under Configuration mode, ensure that the Stop when done option is selected.
-
Click Continue anyway.
-
Under Confirm configuration settings, select Start Configuration.
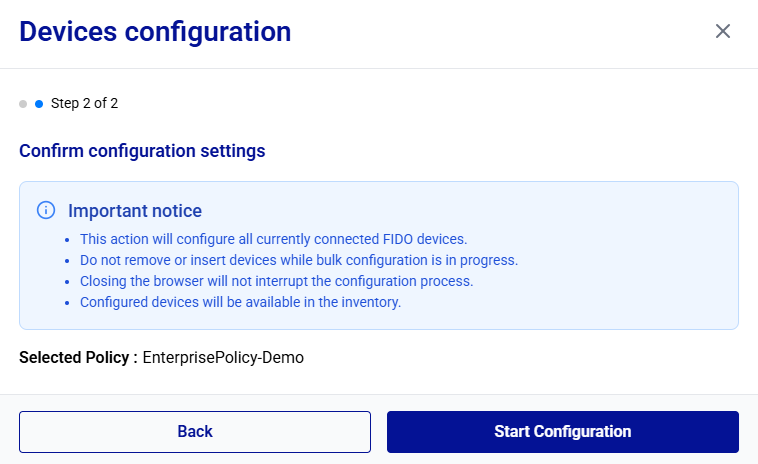
The device configuration is started. It may take some time to complete.
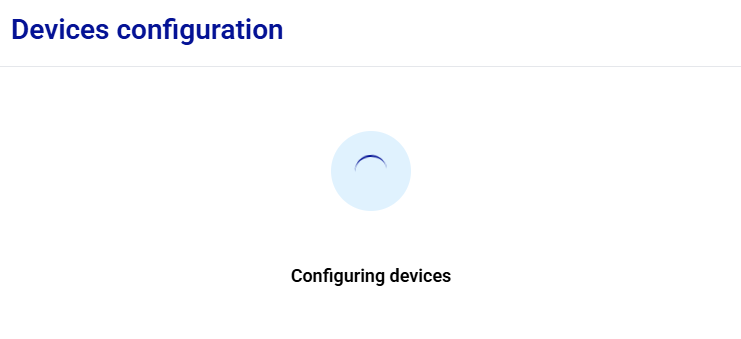
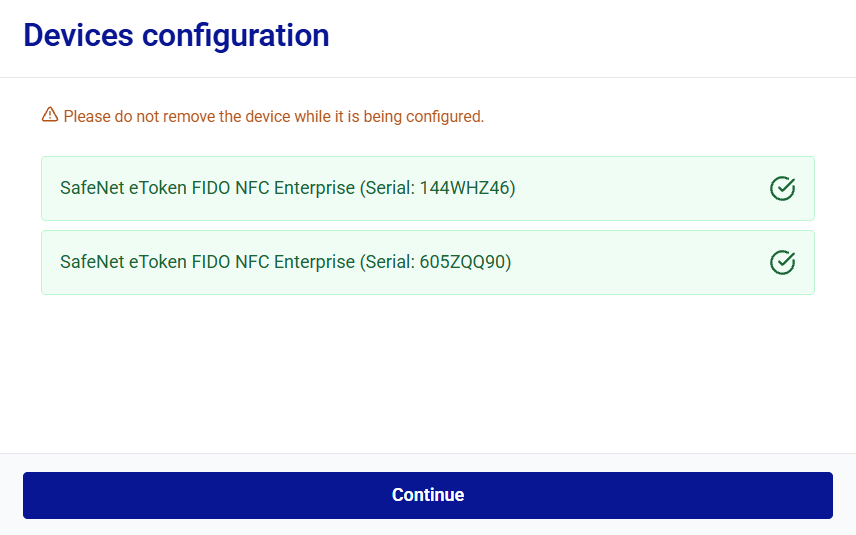
During device configuration, each device appears in green as soon as its configuration is completed.
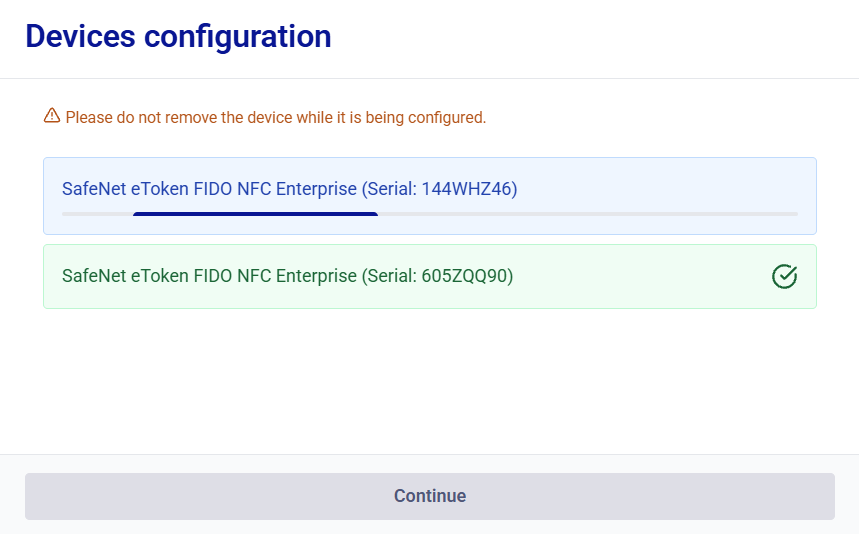
Warning
Removing a device during assignment may result in an inconsistent device state.
-
After all devices are configured, the Continue button is enabled. Click Continue to proceed.
-
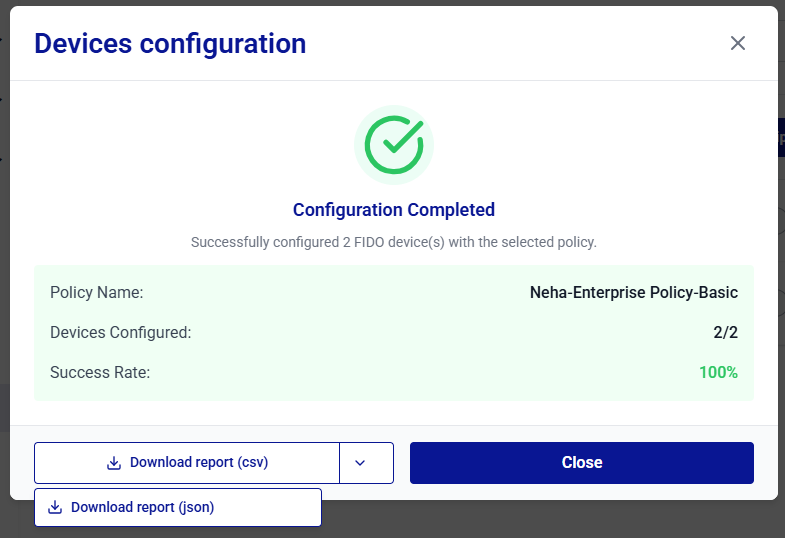
After you click Continue, the Configuration Completed message is displayed. Click Close.
Note
You can export the enrollment logs by clicking the Download report button to save a report (CSV or JSON) of the configuration session.
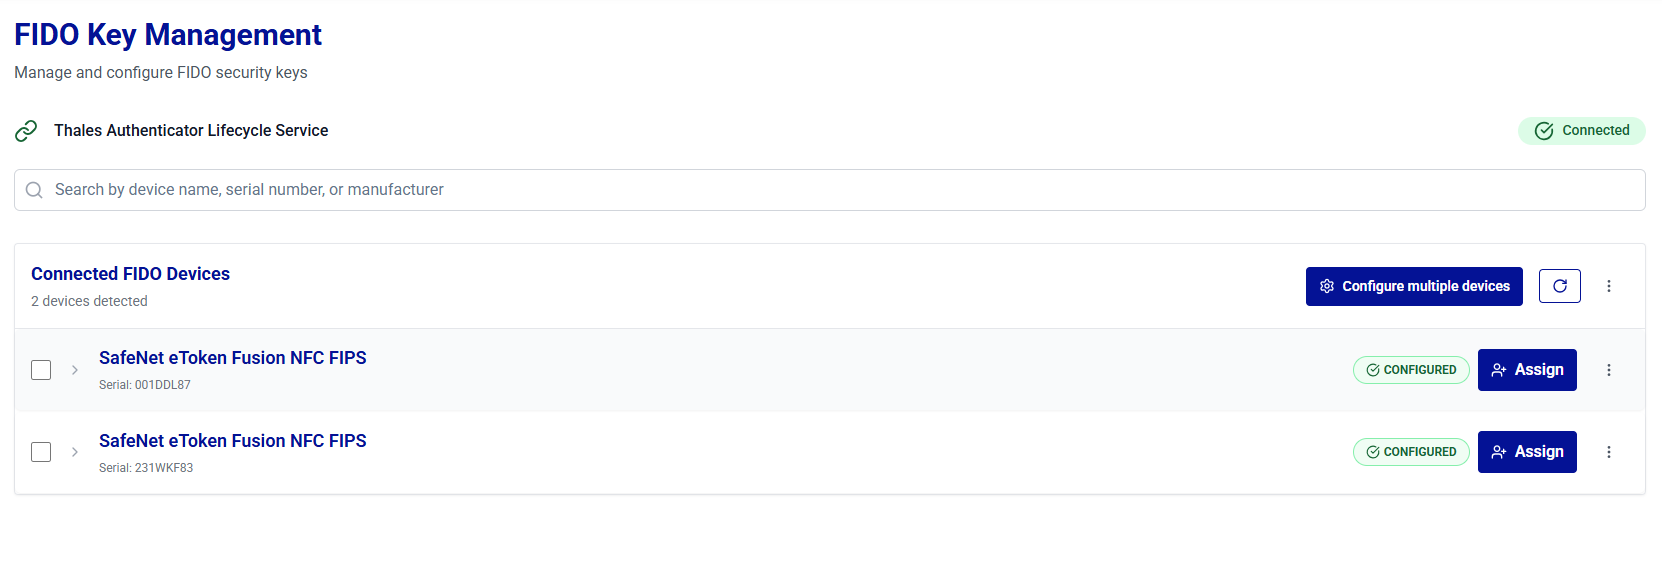
After you click Close, Thales Authenticator Lifecycle Service automatically begins scanning for the connected FIDO devices. After the scanning completes, the detected devices are reloaded and displayed with their updated status under Connected FIDO Devices.
Keep configuring new devices
-
Under Policy, select a policy to be applied to the devices.
-
Under Configuration mode, select the Keep configuring new devices until I manually stop the process option.
Note
If an admin initiates the device configuration process when no devices are connected, the Keep configuring new devices until I manually stop the process option is selected by default.
-
Click Continue.
-
Under Confirm configuration settings, select Start Configuration.
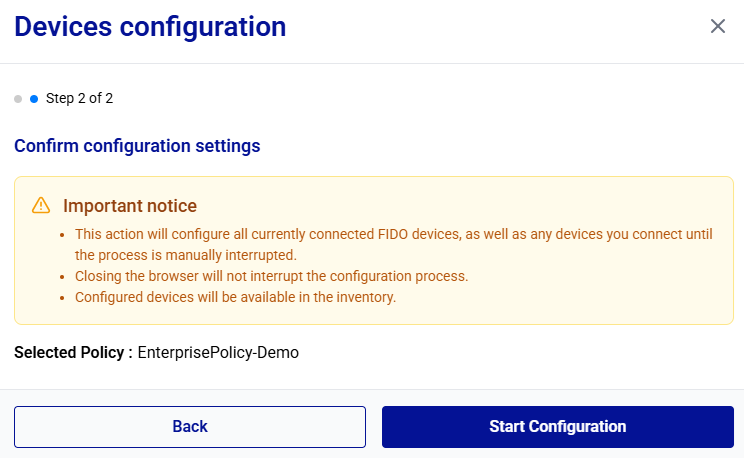
-
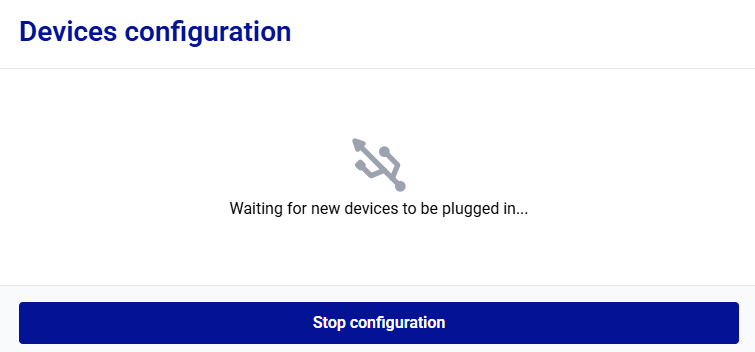
Thales Authenticator Life Cycle Manager waits for you to connect devices for configuration. Start connecting the devices to be configured.
After you begin connecting the devices, Thales Authenticator Lifecycle Manager automatically starts configuring them. Each device is displayed in green as soon as its configuration is completed.
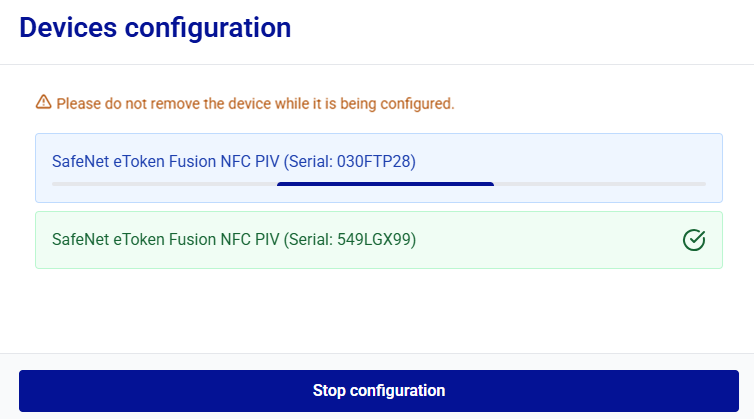
Warning
Removing a device during assignment may result in an inconsistent device state.
-
Click Stop configuration if you want to stop configuring additional FIDO devices.
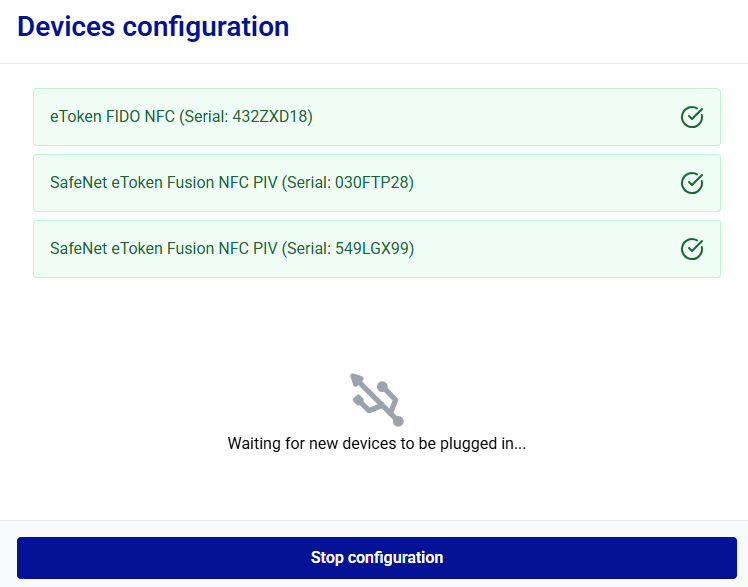
The Configuration Completed message is displayed. Click Close.
Note
You can export the configuration logs by clicking the Download report button to save a report (CSV) of the configuration session.
After you click Close, Thales Authenticator Lifecycle Service automatically begins scanning for the connected FIDO devices. After the scanning completes, the detected devices are reloaded and displayed with their updated status under Connected FIDO Devices.
Configure Selected FIDO Devices
-
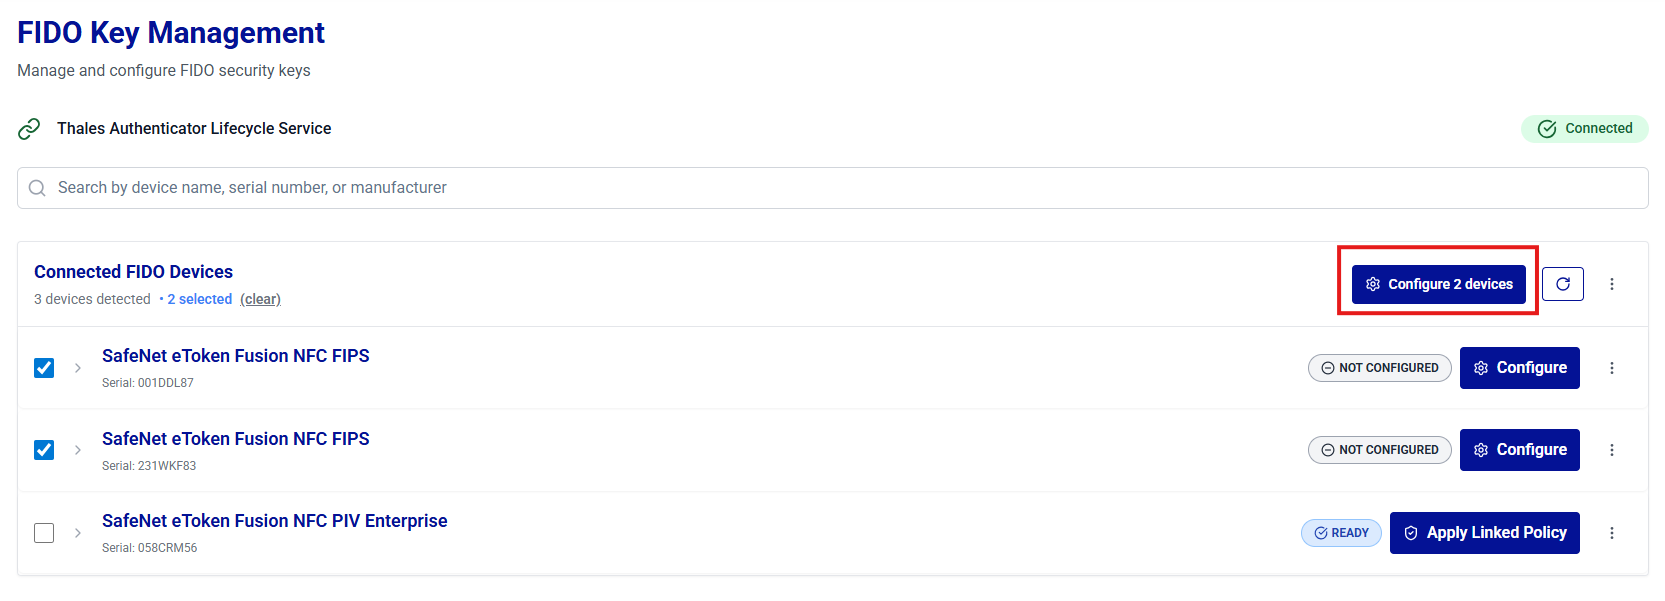
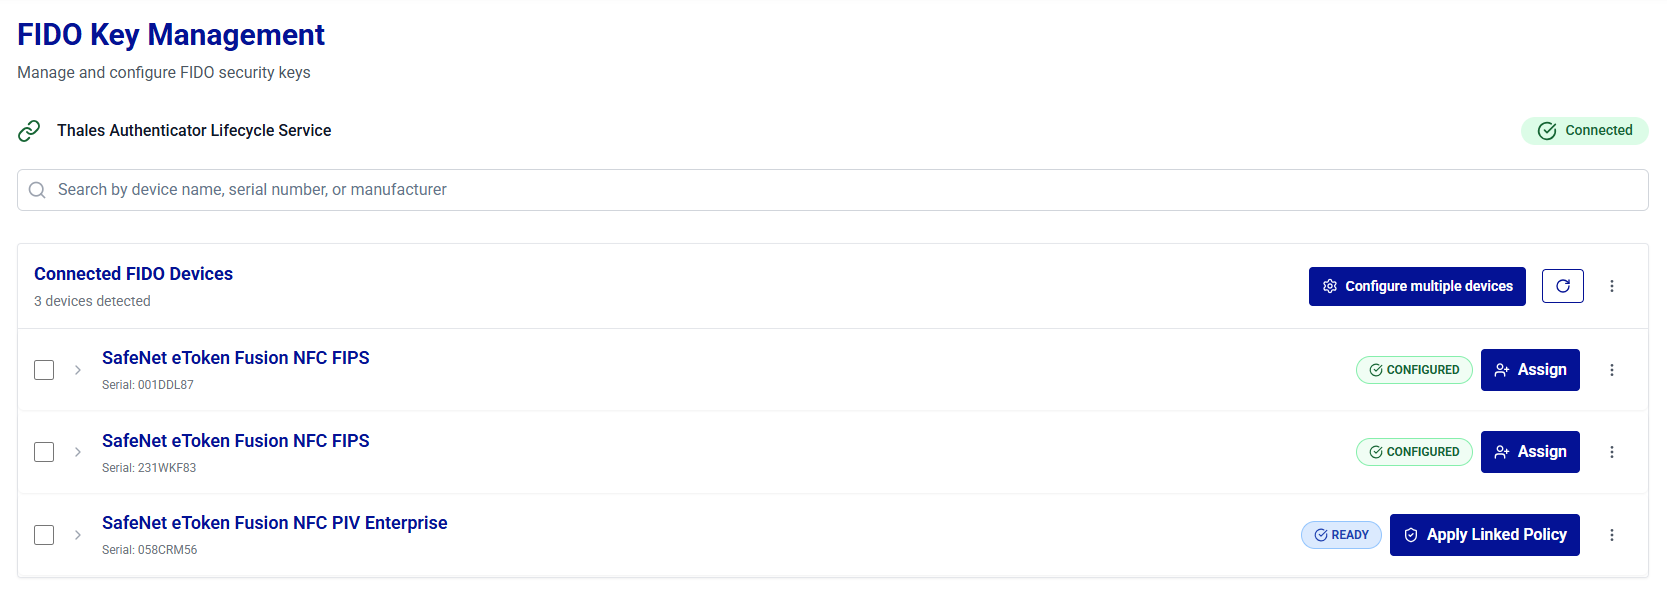
Under Connected FIDO Devices, select the FIDO devices to be configured, and click Configure devices.
-
Under Device configuration, select a policy to be applied to the selected devices, and click Continue anyway.
-
Under Confirm configuration settings, select Start Configuration.
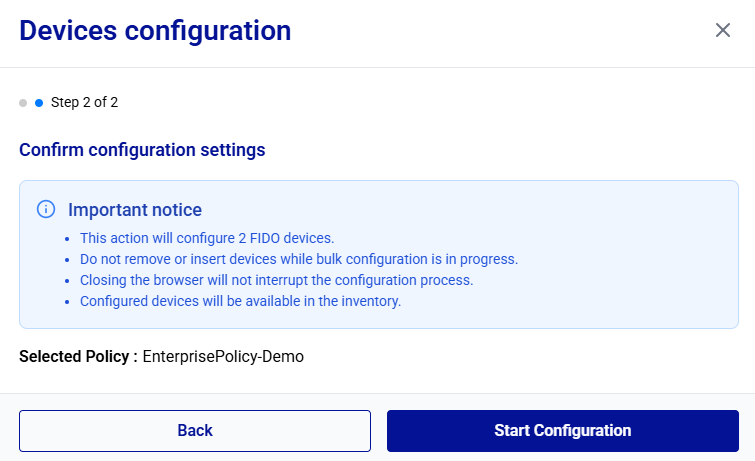
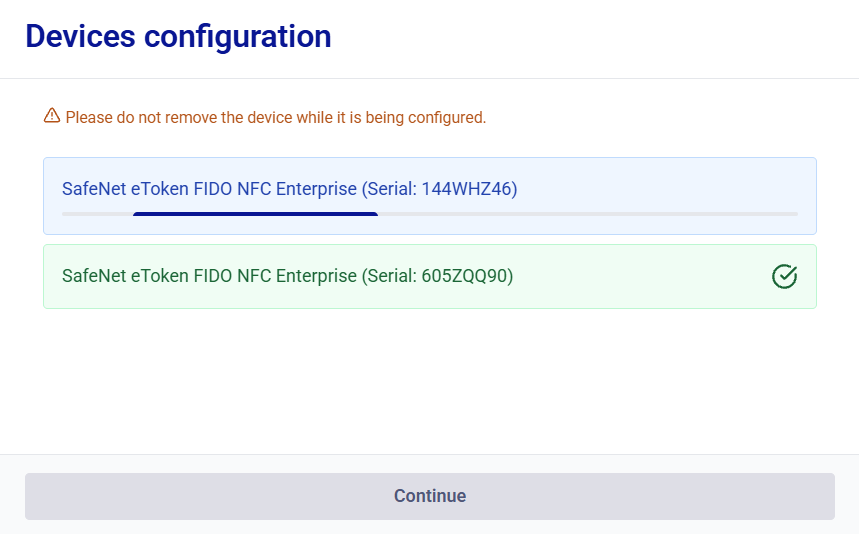
The device configuration is started. It may take some time to complete.
During device configuration, each device appears in green as soon as its configuration is completed.
Warning
Removing a device during configuration may result in an inconsistent device state.
-
After all devices are configured, the Continue button is enabled. Click Continue to proceed.
-
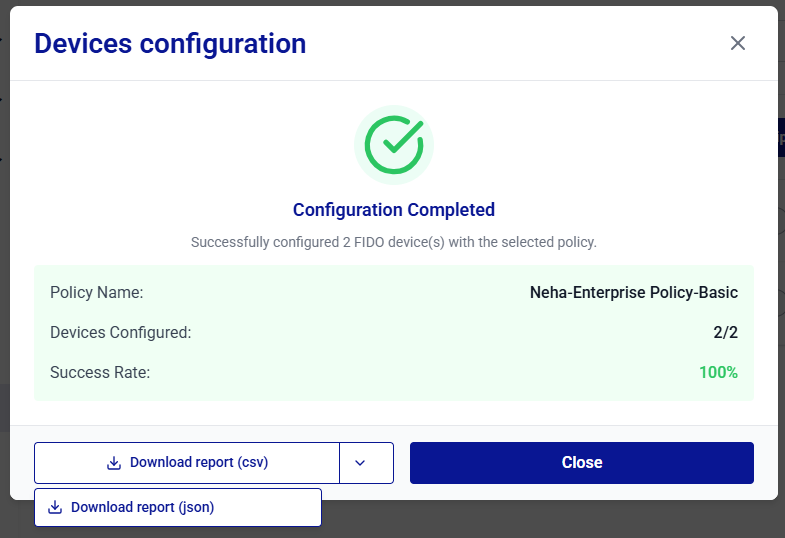
After you click Continue, the Configuration Completed message is displayed. Click Close.
Note
You can export the configuration logs by clicking the Download report button to save a report (CSV or JSON) of the configuration session.
After you click Close, Thales Authenticator Lifecycle Service automatically begins scanning for the connected FIDO devices. After the scanning completes, the detected devices are reloaded and displayed with their updated status under Connected FIDO Devices.
Configure Specific FIDO Devices
-
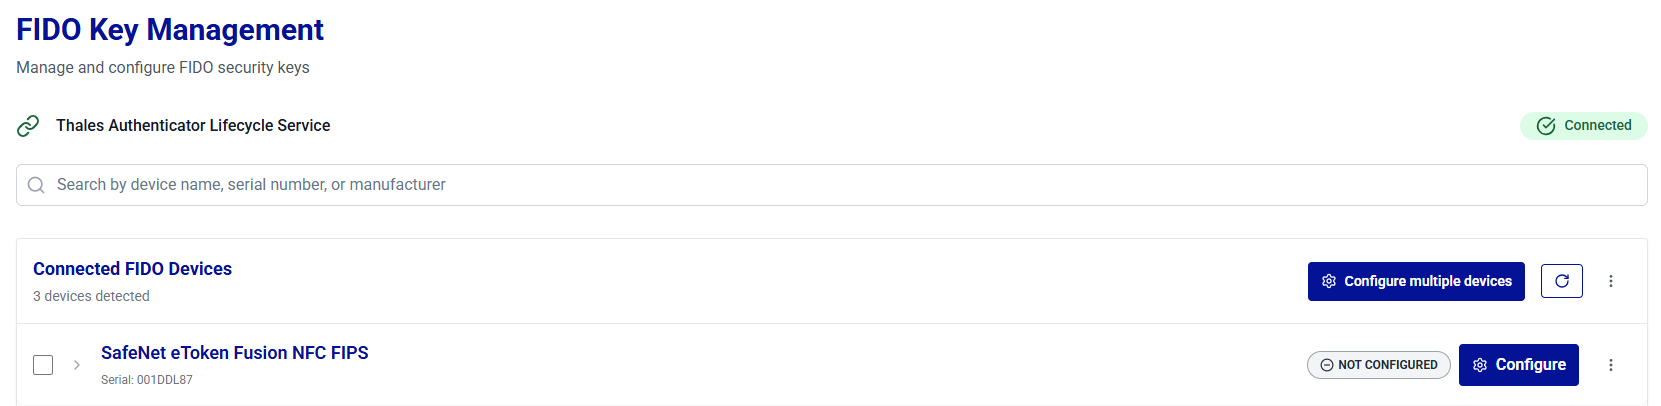
Under Connected FIDO Devices, select the target device, and click Configure.
-
On the Configure Device window, select a policy to be applied to the device, and click Continue anyway.
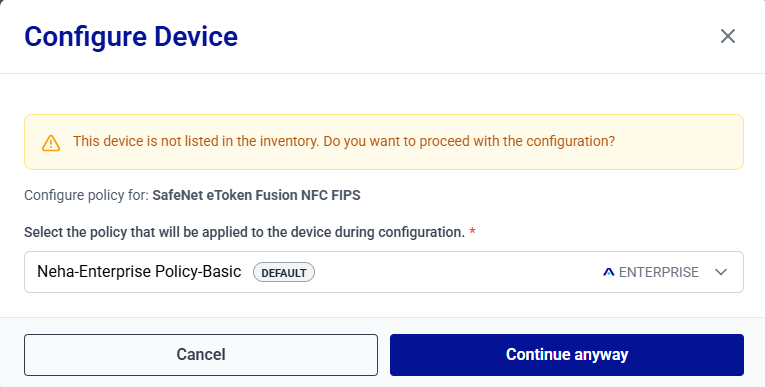
The configuration is started. It may take some time to complete.
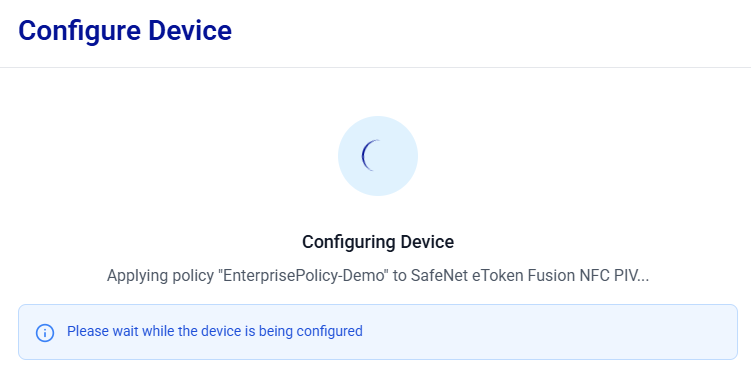
-
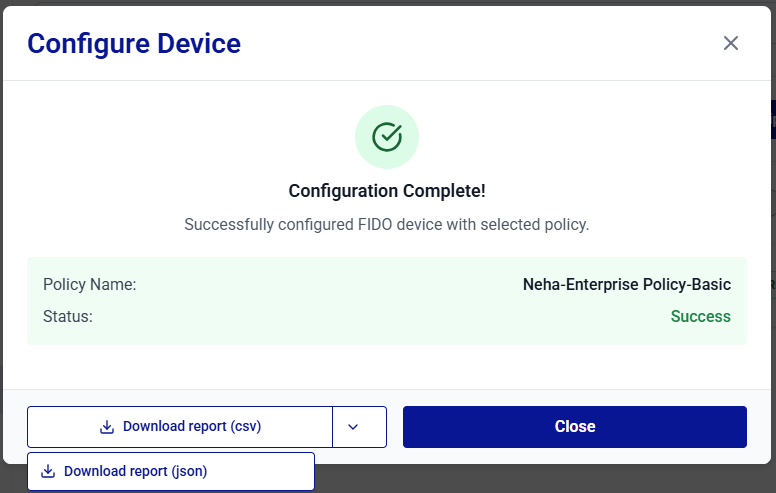
After the policy is successfully applied to the device, the Configuration Complete! message is displayed. Click Close.
Note
You can export the configuration logs by clicking the Download report button to save a report (CSV or JSON) of the configuration session.
Apply Linked Policy
Use the Apply Linked Policy action to quickly configure connected devices by applying their associated policies.
You can,
Apply Linked Policy to a Ready Device (Single Device)
-
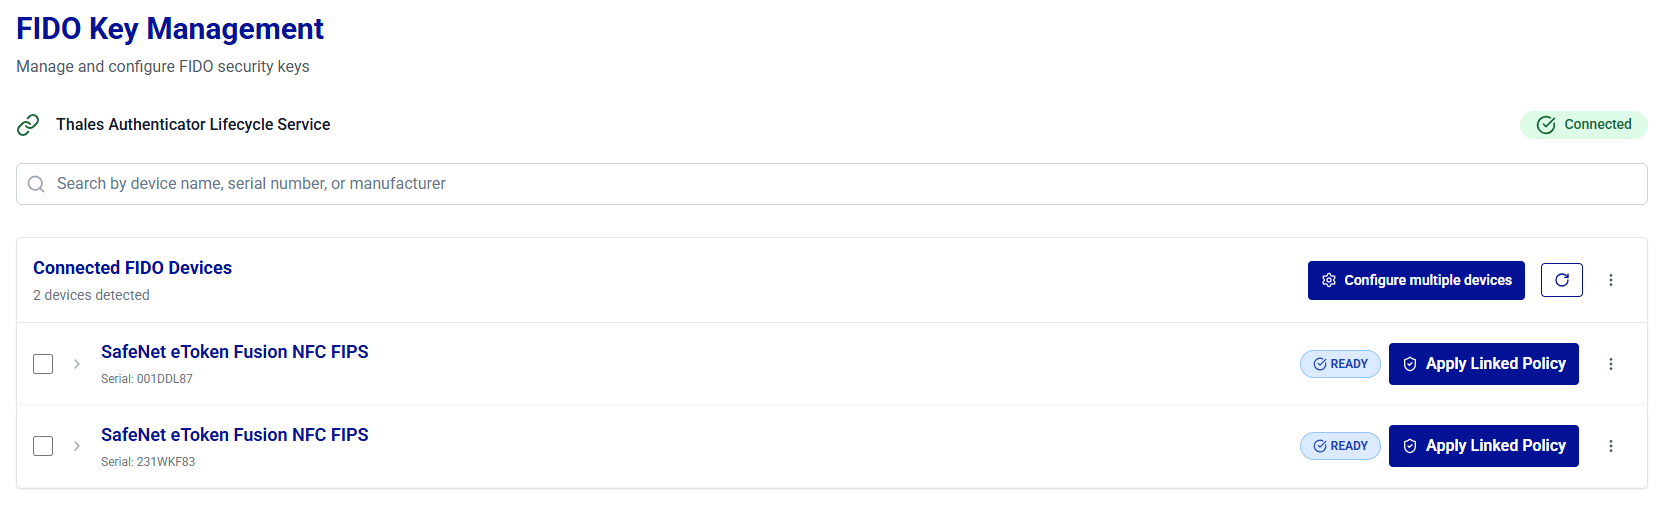
Under Connected FIDO Devices, locate the target device with the Ready status, and click Apply Linked Policy for the device.
-
On the Configure Device window, select the policy to be applied to the device, and click Apply Policy.
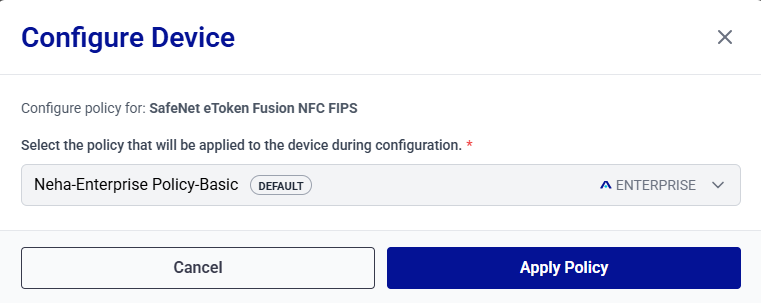
-
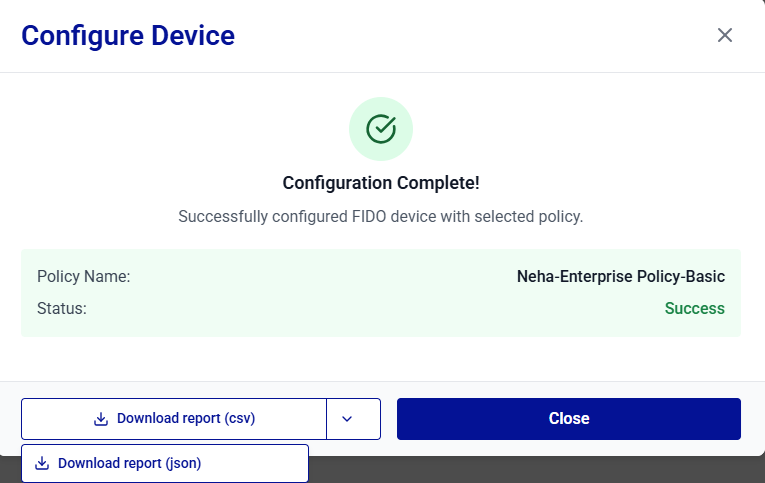
After the policy is successfully applied to the device, the Configuration Complete! message is displayed. Click Close.
Note
You can export the configuration logs by clicking the Download report button to save a report (CSV or JSON) of the configuration session.
Apply Linked Policy to Ready Devices (Bulk)
-
Under Connected FIDO Devices, next to the Configure multiple device button, click the three-dots
 , and select Apply Linked Policy to Ready Devices.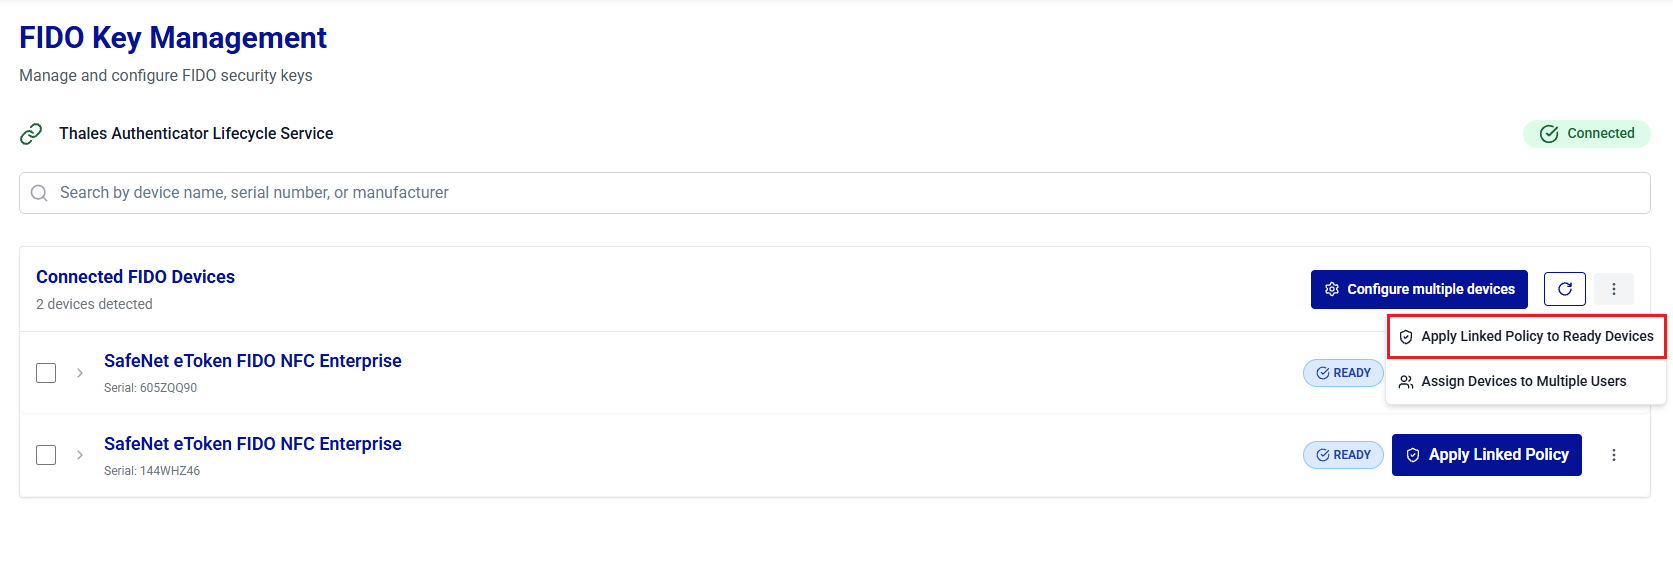
-
Review the list of the detected devices and click Start Configuration to configure the devices.
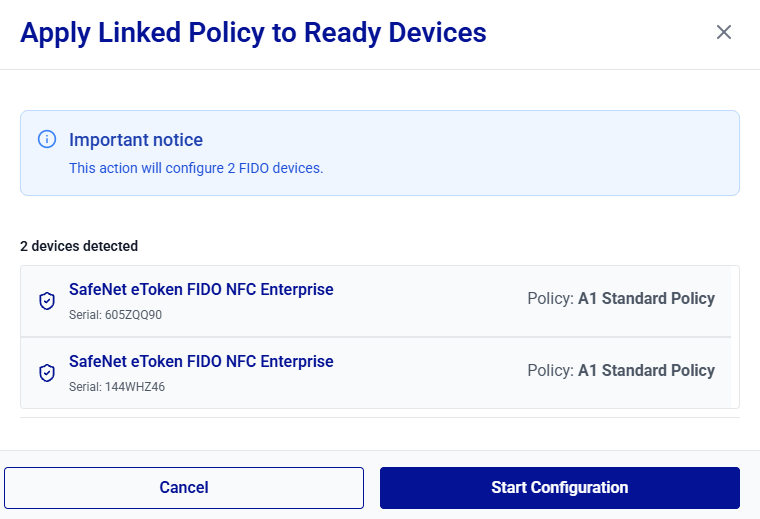
The device configuration is started. It may take some time to complete.
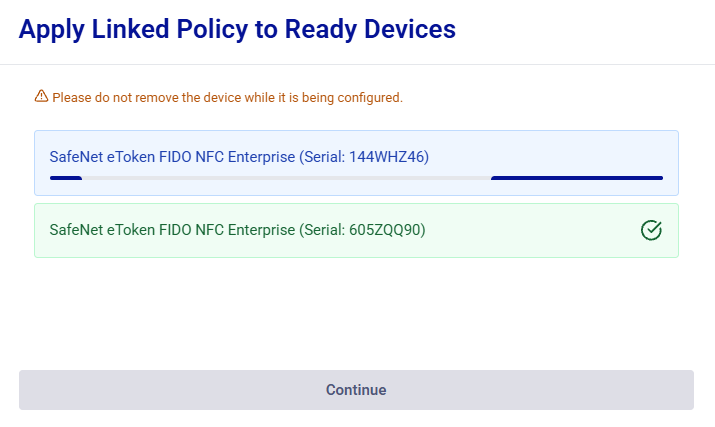
During device configuration, each device appears in green as soon as its configuration is completed.
Warning
Removing a device during assignment may result in an inconsistent device state.
-
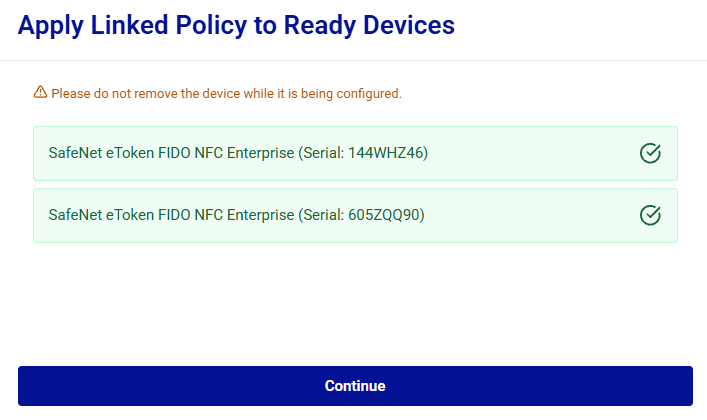
After all devices are configured, the Continue button is enabled. Click Continue to proceed.
-
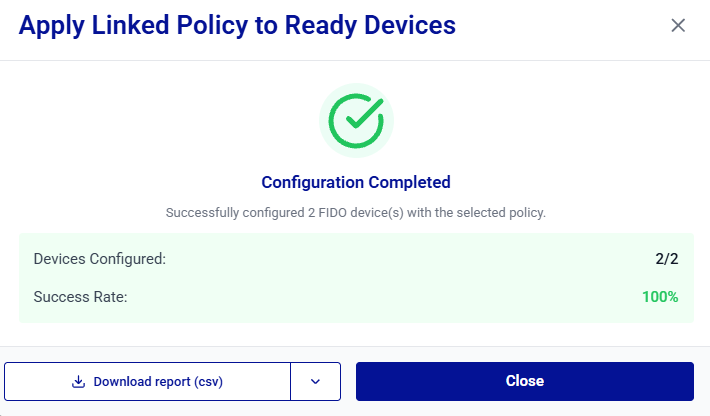
After you click Continue, the Configuration Completed message is displayed. Click Close.
Note
You can export the configuration logs by clicking the Download report button to save a report (CSV or JSON) of the configuration session.
Assign FIDO Devices to Users
Once FIDO devices are configured, administrators can assign them to users for authentication — individually, across multiple identity providers, or in bulk:
- Assign a FIDO Device to a User
- Assign a FIDO Device to Additional Identity Providers
- Assign FIDO Devices to Multiple Users
Assign a FIDO Device to a User
-
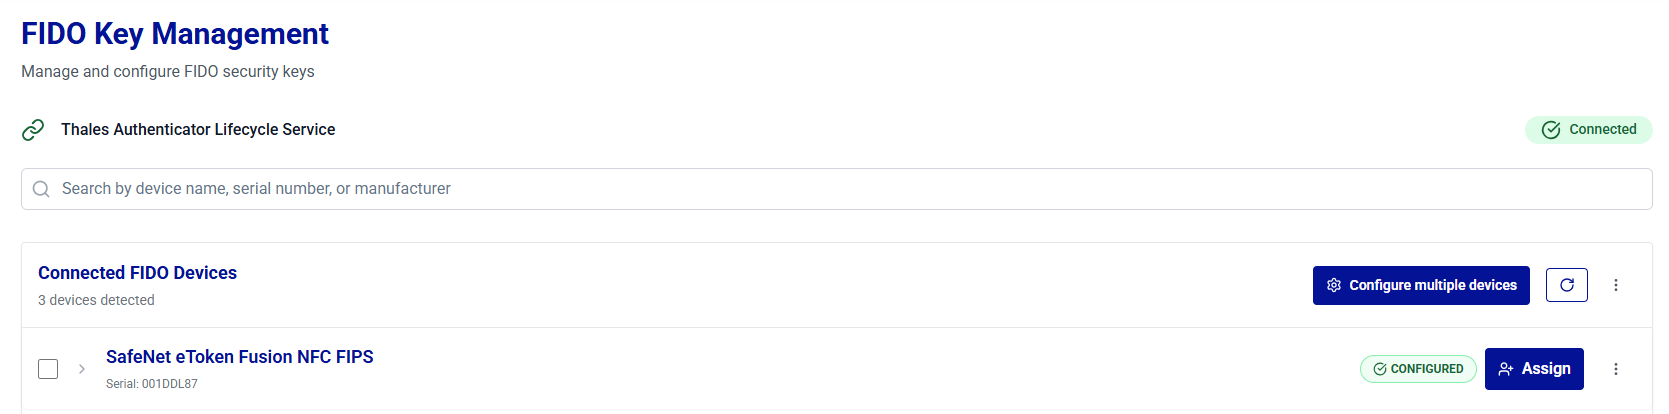
Under Connected FIDO Devices, search for and locate the device to be assigned to a user, and click Assign.
-
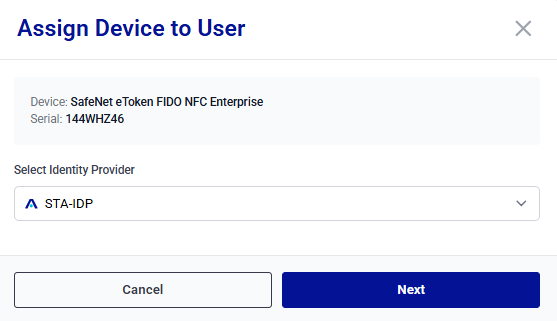
On the Assign Device to User window, in the Select Identity Provider field, select an identity provider, and click Next.
-
Search for the user to whom a device needs to be assigned, select the user, and click Next.
Note
Use the following criteria to search for users across supported identity providers:
Identity Provider Search Users By Partial Search (minimum 3 characters required) Microsoft Entra ID User Principal Name (UPN) or Email address Supported Okta Person name or Username Supported SafeNet Trusted Access Complete User ID Not supported (exact match required) Ping Identity Username Supported 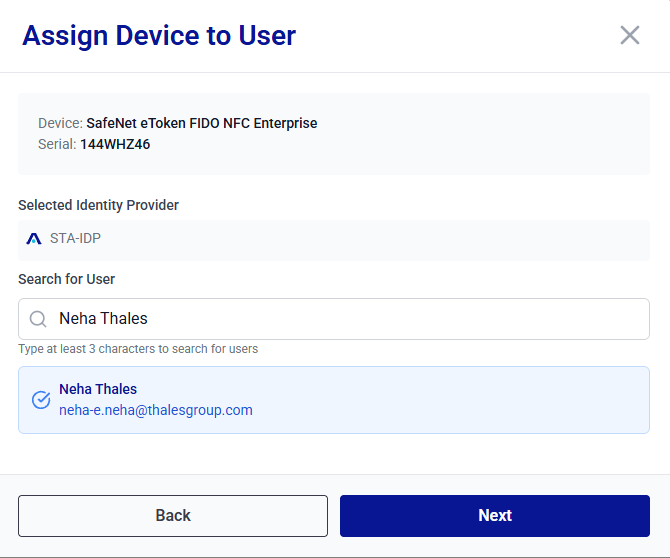
-
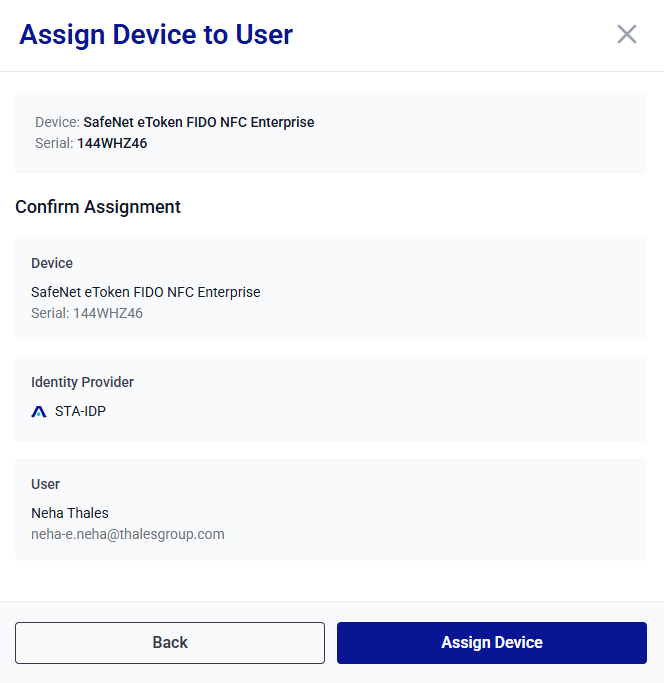
Review the device assignment details and click Assign Device.
Note
Email notifications to users are configured centrally in Preferences, under Notification settings. The tenant administrator defines which enrollment events (for example, Device assignment) trigger notifications, and through which channels. For more information, see Preferences.
-
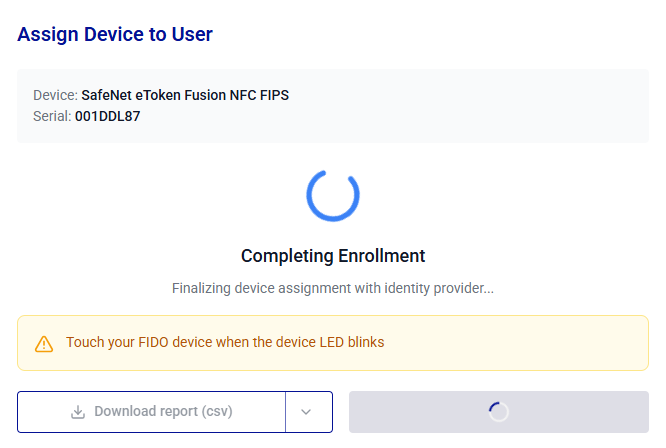
The Assign Device to User window is opened to verify the administrator’s presence. Touch the device when prompted (most devices blink).
-
After the device enrollment is complete, the Enrollment Successful message is displayed. Click Done.
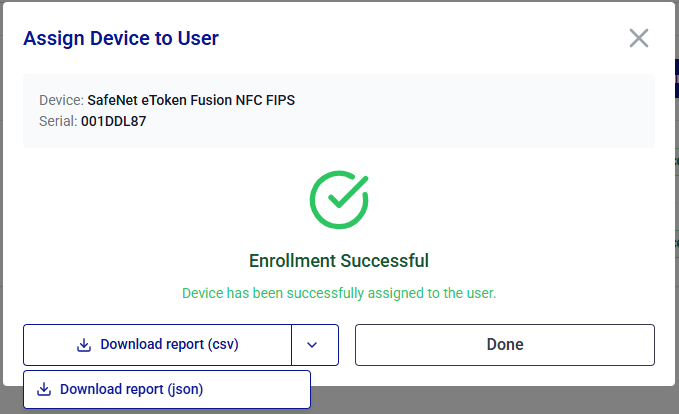
Note
You can export the enrollment logs by clicking the Download report button to save a report (CSV or JSON) of the enrollment session.
Tip
You can verify the device status by clicking the Refresh Devices button on the Connected FIDO Device window or by navigating to the Device Inventory window.
Assign a FIDO Device to Additional Identity Providers
When the Allow assigning multiple credentials to the same device setting is enabled in Preferences, you can assign a single FIDO device to multiple identity providers. Each identity provider creates a separate credential assignment on the device, allowing different users to authenticate with the same device through their respective identity providers.
A device can have up to five credential assignments, with a maximum of one assignment per identity provider. This limit is fixed and cannot be configured.
Before you begin, ensure the following:
- The Allow assigning multiple credentials to the same device setting is enabled in Preferences. For more information, see Preferences.
- The device is in the Ready, Configured, or Revoked state and is not locked.
- The device has fewer than 5 assignments. When the device reaches the maximum of five assignments, the Assign button is disabled.
- At least one identity provider that is not already assigned to the device is available. Each assignment must use a different identity provider.
Perform the following steps to assign a device that already has one or more assignments to an additional identity provider:
-
Under Connected FIDO Devices, locate the device that already has one or more assignments, and click Assign.
Note
If the Assign button is disabled, the device has reached the maximum limit of five assignments. Hover over the Assign button to view the message, This device has reached the maximum number of assignments and cannot accept additional assignments.
To assign another identity provider, revoke an existing assignment to free an available slot. For more information, see Revoke Devices.
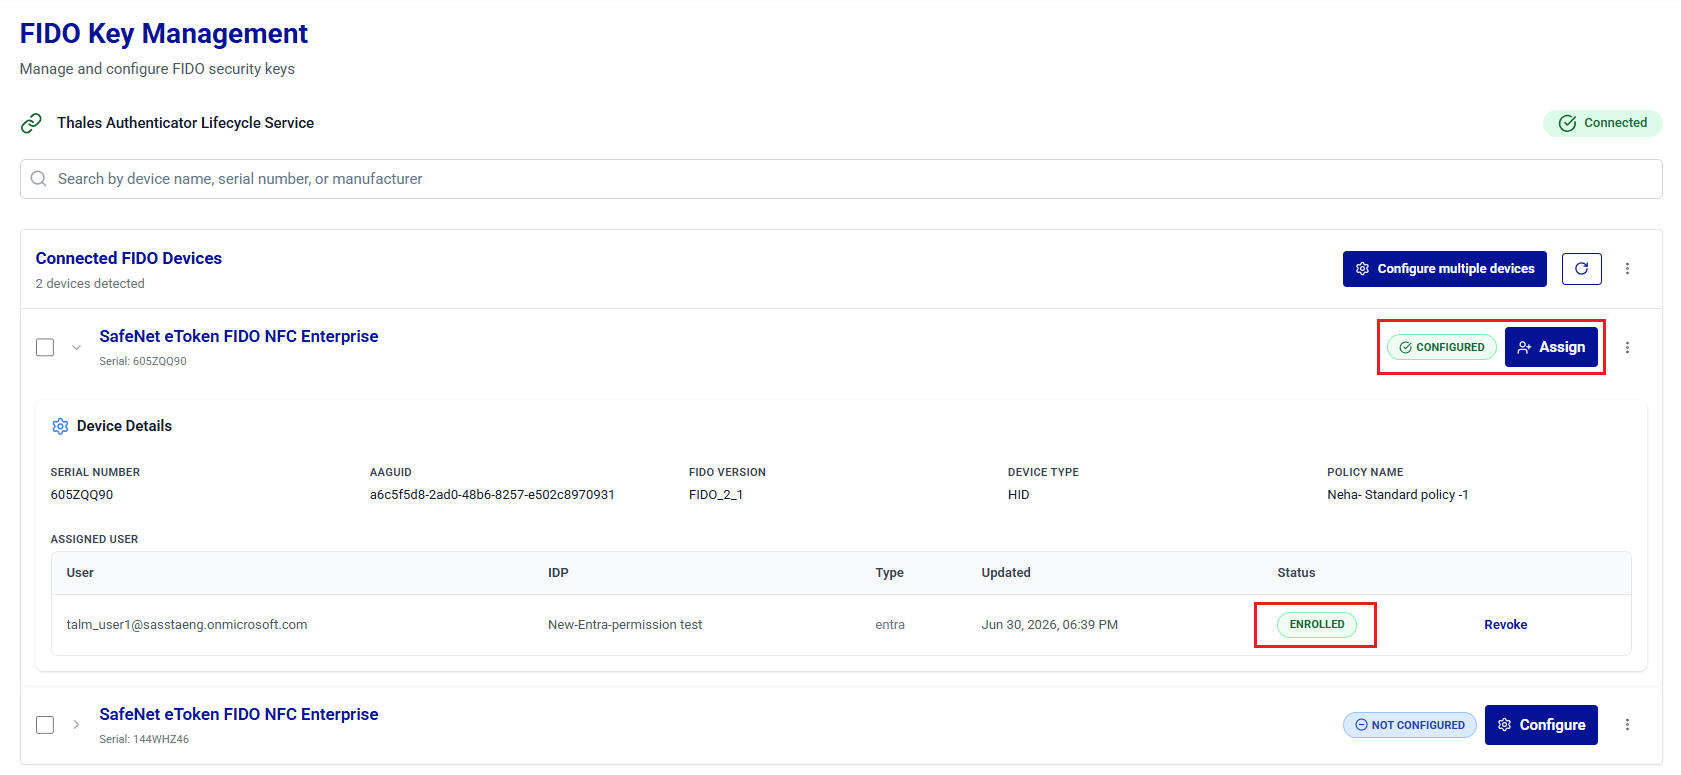
-
On the Assign Device to User window, in the Select Identity Provider field, select an identity provider that is not listed under the Already assigned group, and click Next.
Note
Identity providers already assigned to this device appear under the Already assigned group and are disabled, so you cannot assign the same identity provider to the device more than once.
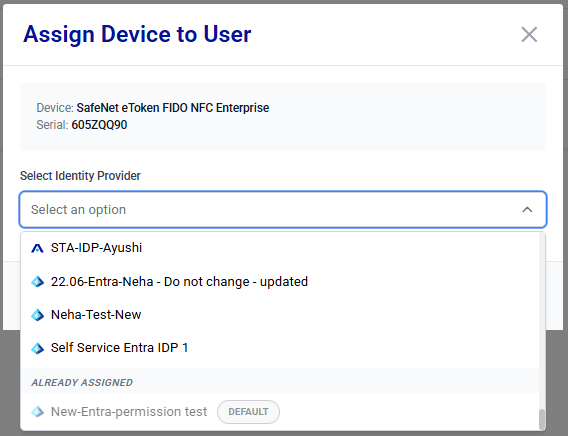
-
Search for and select the user to assign to the selected identity provider, and then click Next.
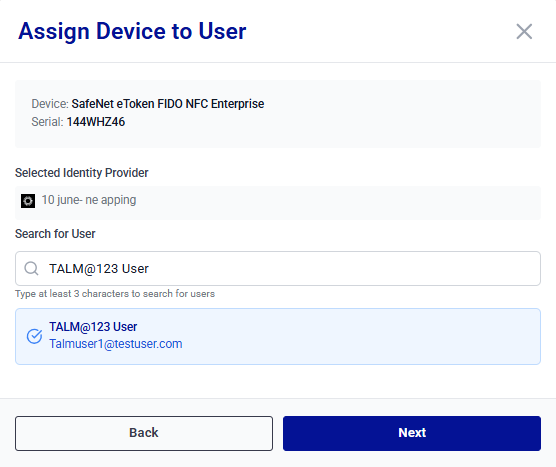
-
Review the device assignment details, and click Assign Device.
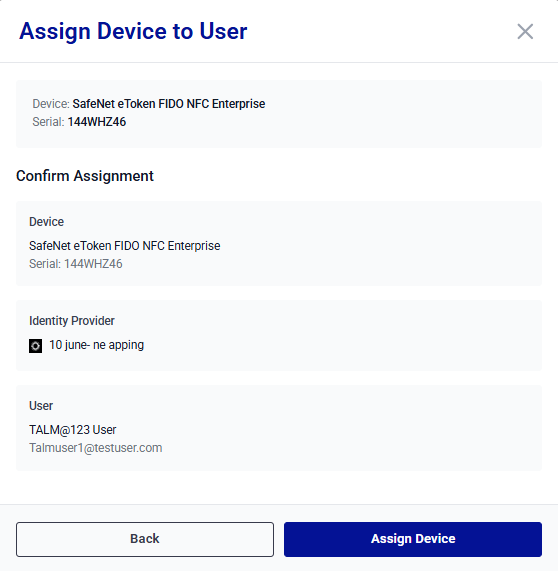
-
When prompted, touch the device to verify the administrator's presence (most devices blink).
-
After enrollment is complete, the Enrollment Successful message is displayed. Click Done. A new credential assignment is added to the credential assignments table alongside the device's existing assignments.
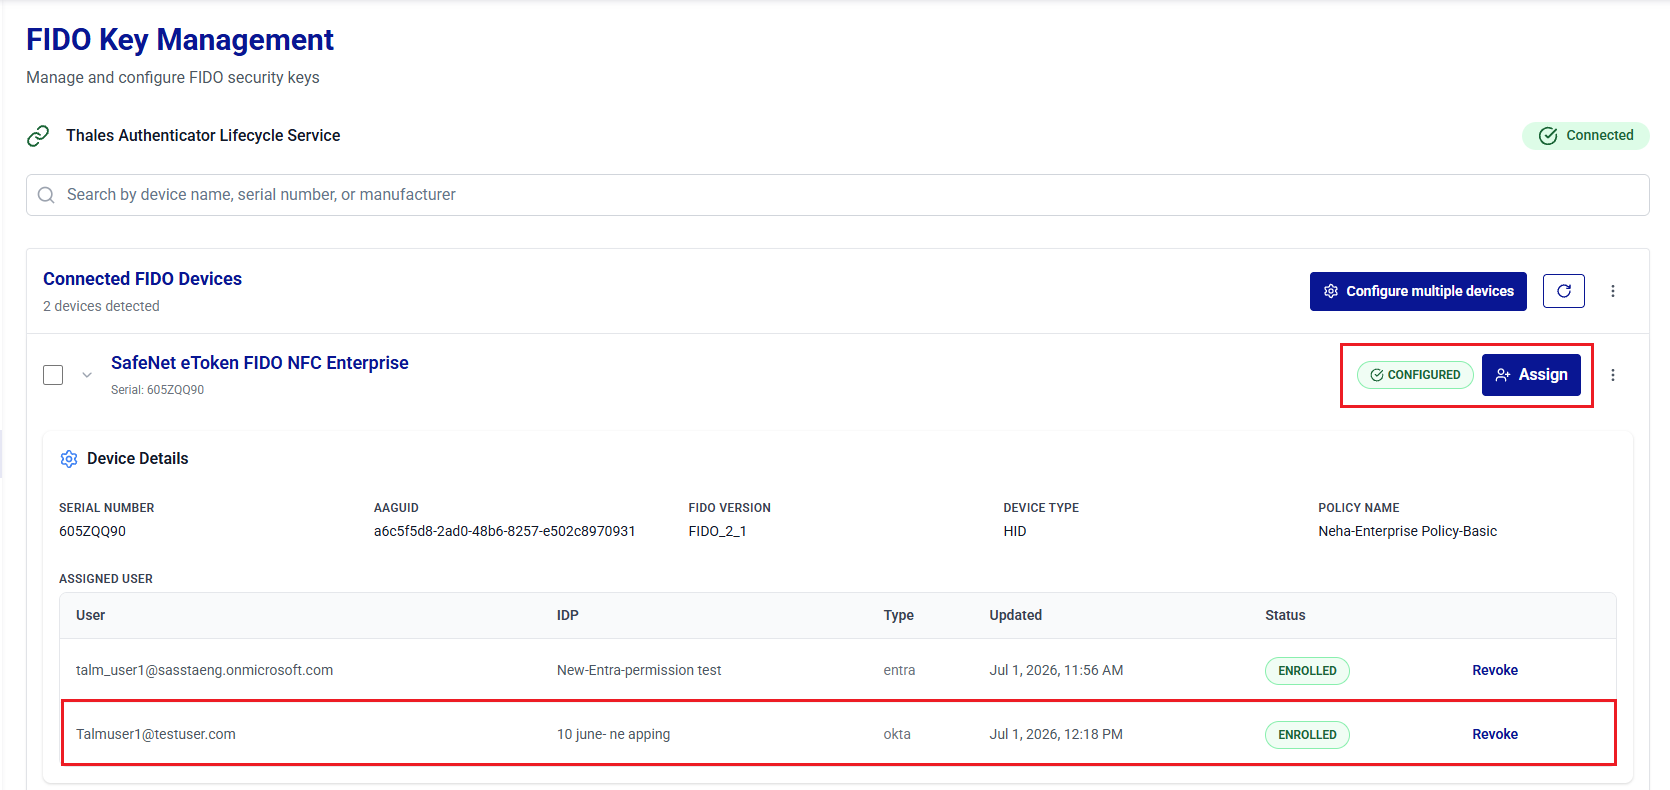
To assign the device to another identity provider, repeat these steps and select a different identity provider each time, until the device reaches the maximum of 5 assignments.
Tip
To review all assignments on a device, expand the device and view the Assigned User table, which lists each assignment with its User, IDP, Type, Updated, and Status. You can also review assignments in the Device Inventory. For more information, see Device Inventory.
Assign FIDO Devices to Multiple Users
You can assign devices to multiple users in a single operation. During this operation, connected devices in the Ready, Configured, or Revoked state are assigned sequentially to the selected users.
The following conditions apply for this operation:
- Only devices in the Ready, Configured, or Revoked state can be assigned.
- Up to 10 users per operation can be selected.
- The number of users cannot exceed the number of connected devices.
Perform the following steps to assign FIDO devices to multiple users:
-
Under Connected FIDO Devices, next to the Configure multiple devices button, click the three-dots
icon, and then select Assign Devices to Multiple Users.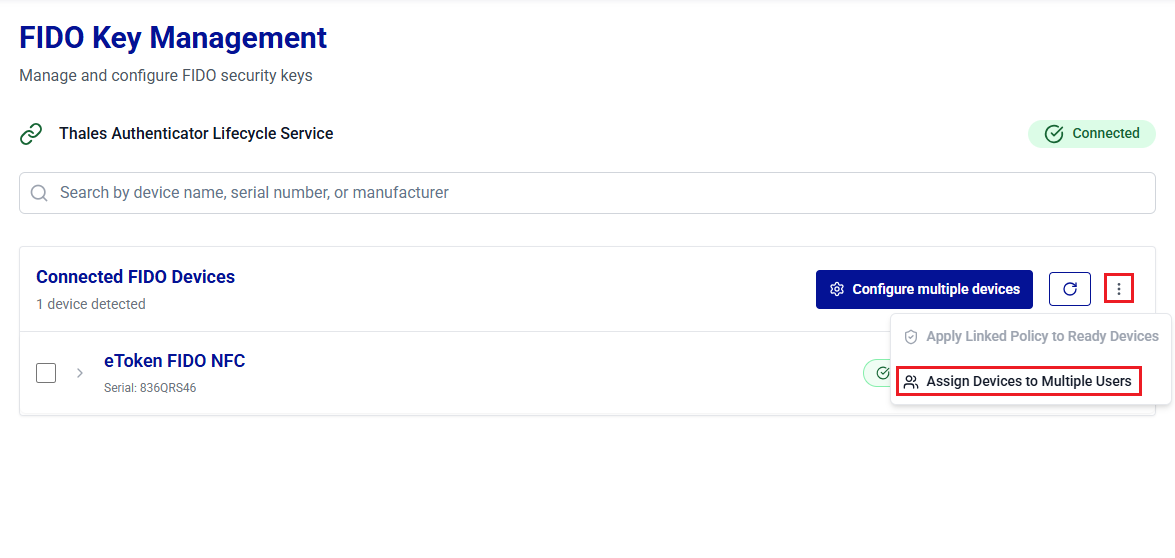
-
On the Assign Devices to Multiple Users window, the Device Assignment Information banner displays the number of available devices and the corresponding maximum number of users that can be selected.
Under Select Identity Provider, select the identity provider associated with users to whom devices will be assigned.
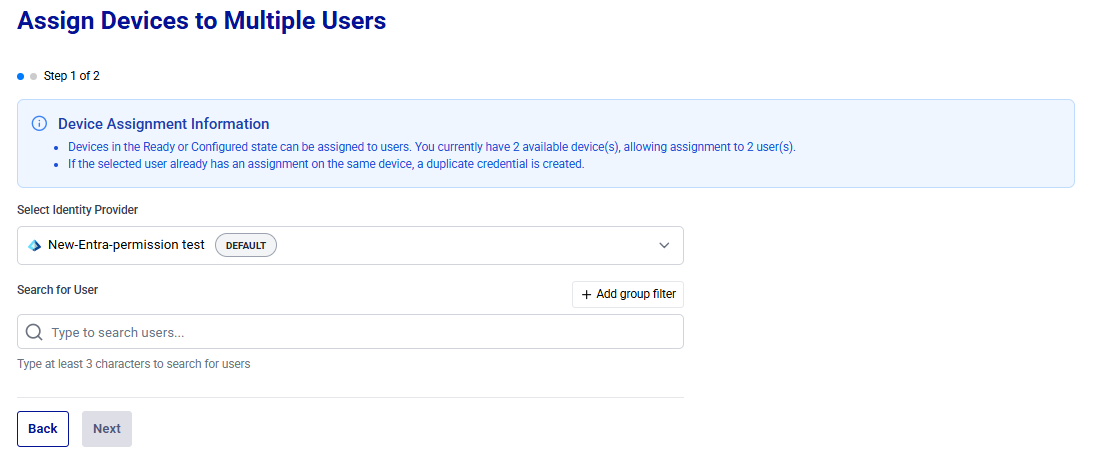
-
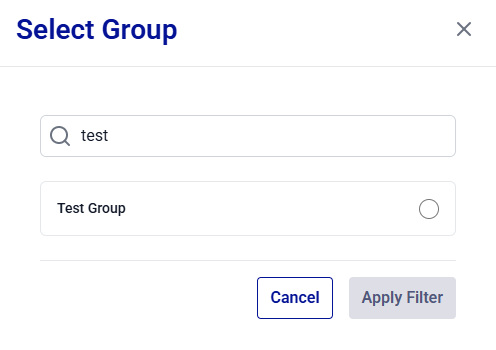
(Optional) To narrow the user search to a specific group, click Add group filter. In the Select Group dialog, search for and select the target group, and then click Apply Filter.
Note
Enter at least three characters to search for groups. For the STA identity provider, only exact matches are supported, and you must enter the complete group name.
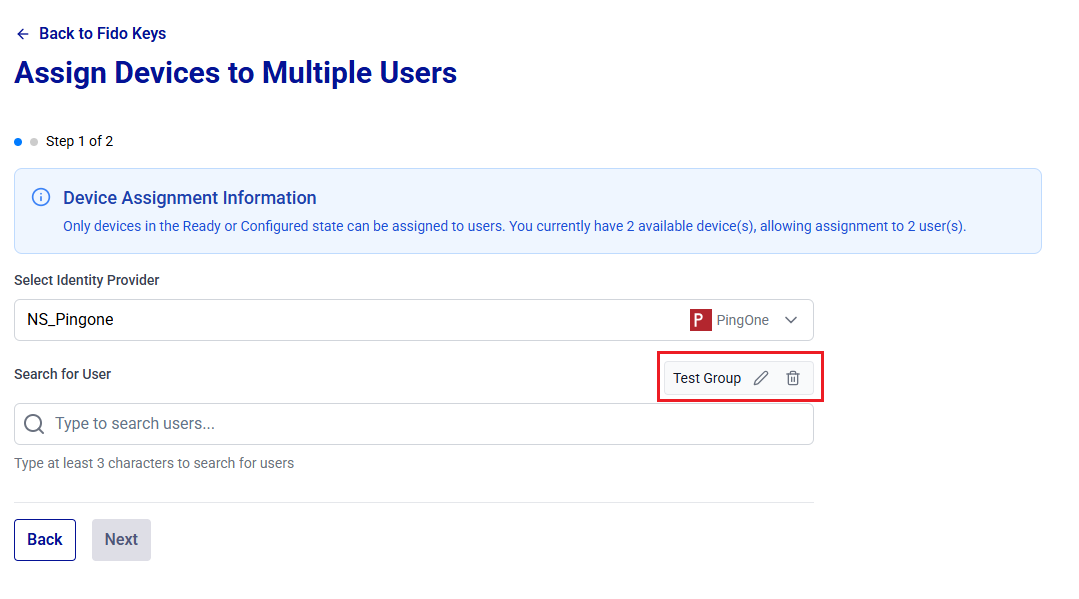
The selected group is displayed next to the Search for User label. You can use the Edit or Delete icon to change or remove the group filter.
-
Search for the users (filtered by the group, if applied) to whom a device needs to be assigned. Matching users are listed below the search box.
Note
Use the following criteria to search for users across supported identity providers:
Identity Provider Search Users By Partial Search (minimum 3 characters required) Microsoft Entra ID User Principal Name (UPN) or Email address Supported Okta Person name or Username Supported SafeNet Trusted Access Complete User ID Not supported (exact match required) Ping Identity Username Supported 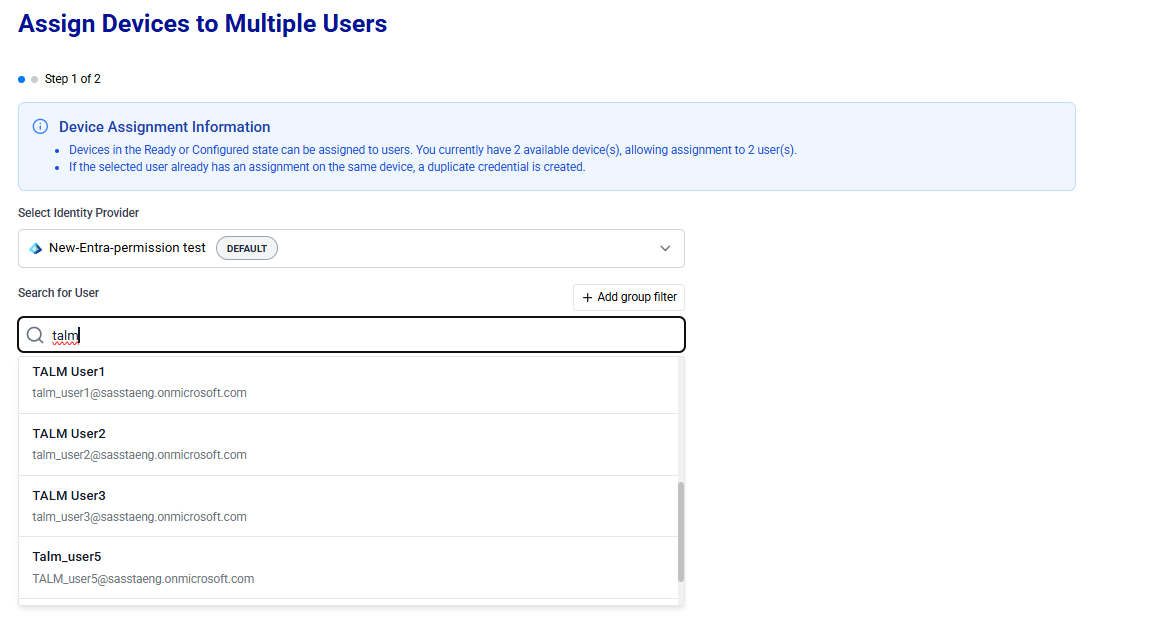
-
Select users to assign devices. To deselect a user, click the deselect icon
 next to the user.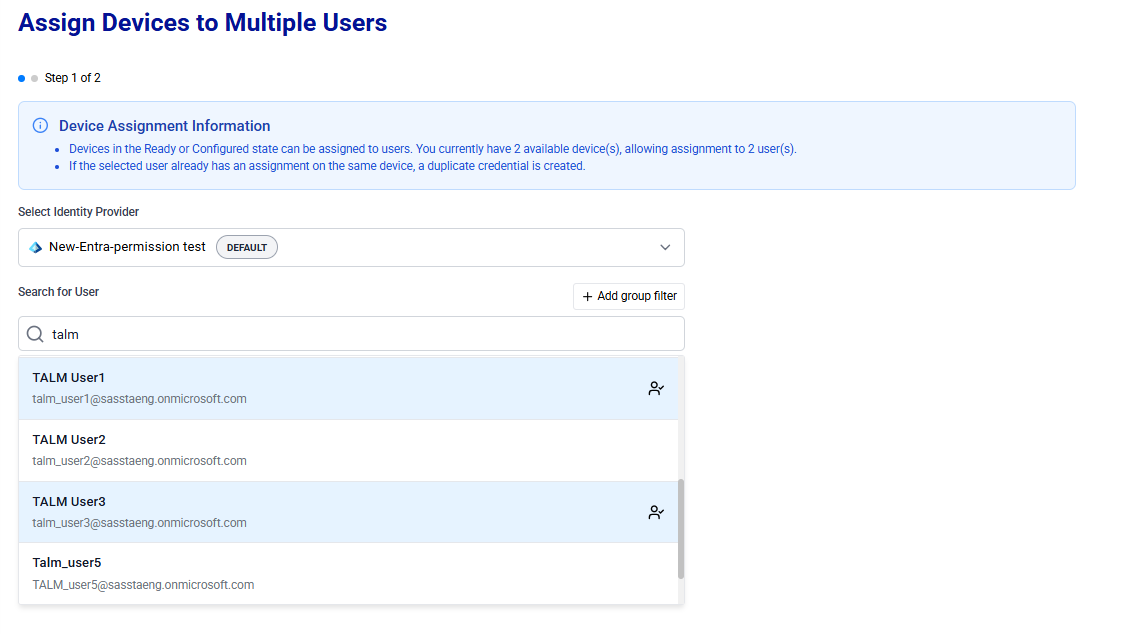
Under Selected Users, user selection count (for example, 2/10) is displayed with the list of selected users. To deselect a user, click
 for the respective user.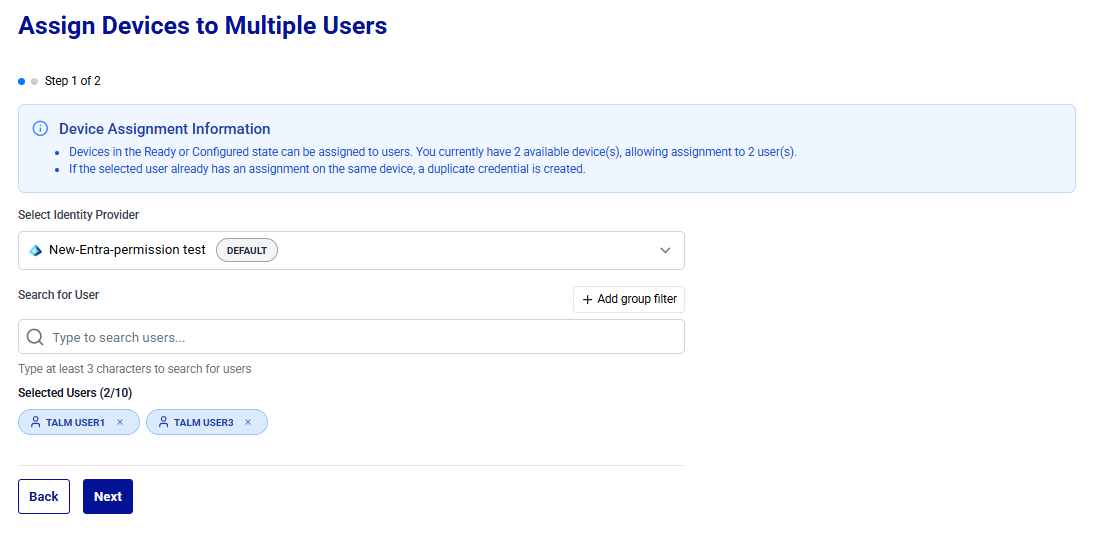
-
Click Next.
-
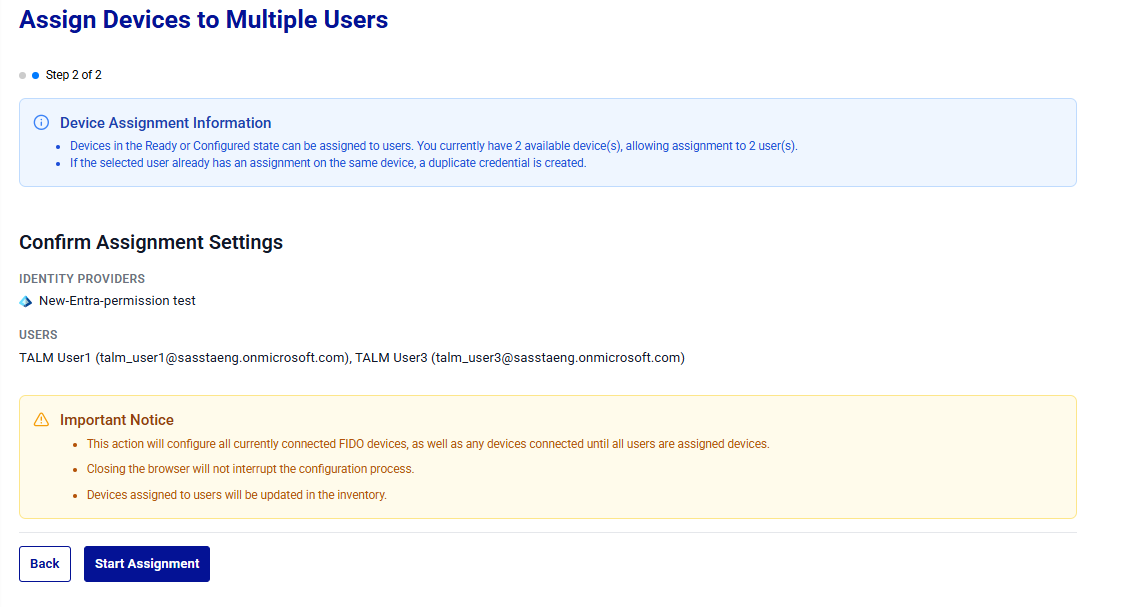
Under Confirm Assignment Settings, review the assignment settings, and click Start Assignment.
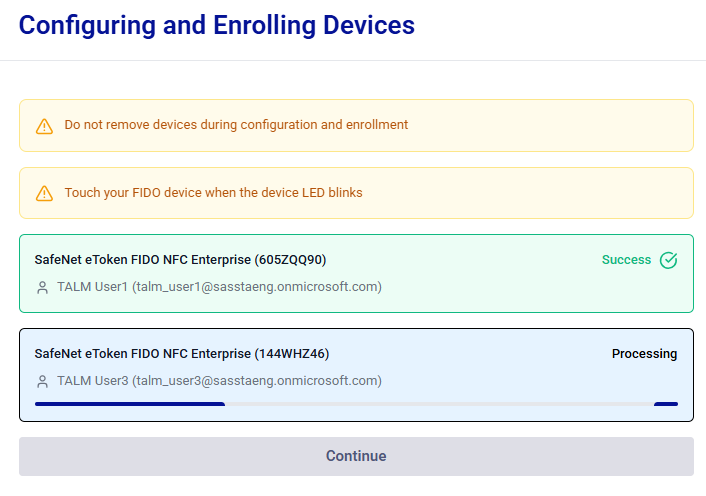
Each connected device is enrolled sequentially. When prompted, touch the device to assign it to the next user.
Note
Email notifications to users are configured centrally in Preferences, under Notification settings. For more information, see Preferences.
Warning
Removing a device during assignment may result in an inconsistent device state.
-
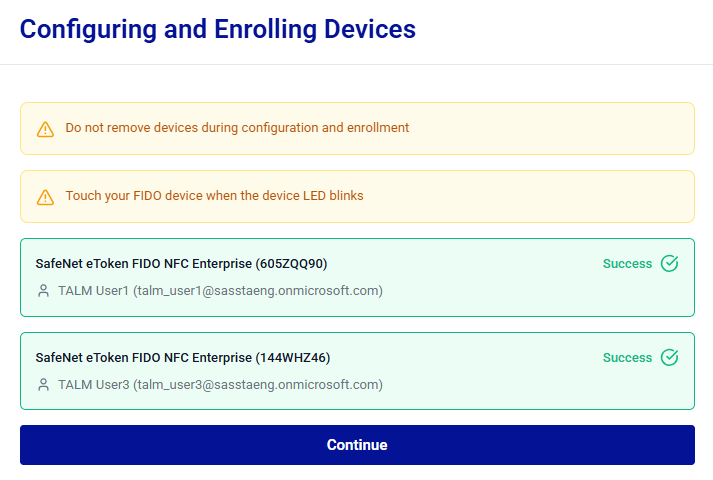
After all enrollments are completed, the Continue button becomes enabled. Click Continue to proceed.
-
After you click Continue, the Assignment Completed message is displayed with the Devices Enrolled, Failed Devices, and Success Rate statistics. Click Close.
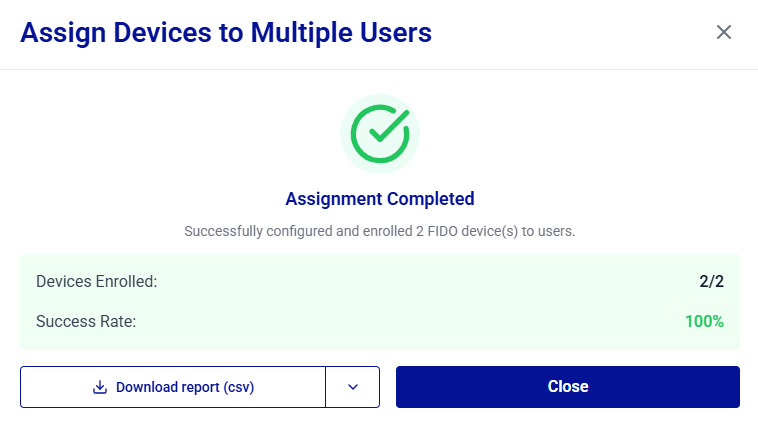
Note
You can export the enrollment logs by clicking the Download report button to save a report (CSV or JSON) of the assignment session.
The report includes a Failed Operation column that identifies the operation that failed for each device. For devices with a Failed status, this column indicates whether the failure occurred during Configuration or Enrollment, helping you troubleshoot the issue.
The Policy Name column identifies the policy associated with each device.
After you click Close, the assigned devices appear with the Enrolled status under Connected FIDO Devices, and the assignments are reflected in the Device Inventory.
View Initial PIN
Administrators can view a device user PIN and Admin PIN for administrative verification.
Caution
Use this option only in secure environments to prevent unauthorized PIN exposure.
Permission-based visibility
The ability to view PIN values depends on the following permissions assigned to the administrator:
talm_device_userpin_read– Allows viewing the User PIN.talm_device_adminpin_read– Allows viewing the Admin PIN (applicable to enterprise devices that support administrator mode).
PIN Visibility by Permission and Device Type
User PIN Permission talm_device_userpin_read |
Admin PIN Permission talm_device_adminpin_read |
Standard device | Enterprise device |
|---|---|---|---|
| Enabled | Enabled | User PIN | User PIN and Admin PIN |
| Disabled | Enabled | No Initial PIN option | Admin PIN |
| Enabled | Disabled | User PIN | User PIN |
| Disabled | Disabled | No Initial PIN option | No Initial PIN option |
Perform the following steps to view a device user PIN and/or Admin PIN:
-
Under Connected FIDO Devices, search for and locate the device for which you want to view the PIN, click the three-dots
icon for the device, and then select Initial PIN.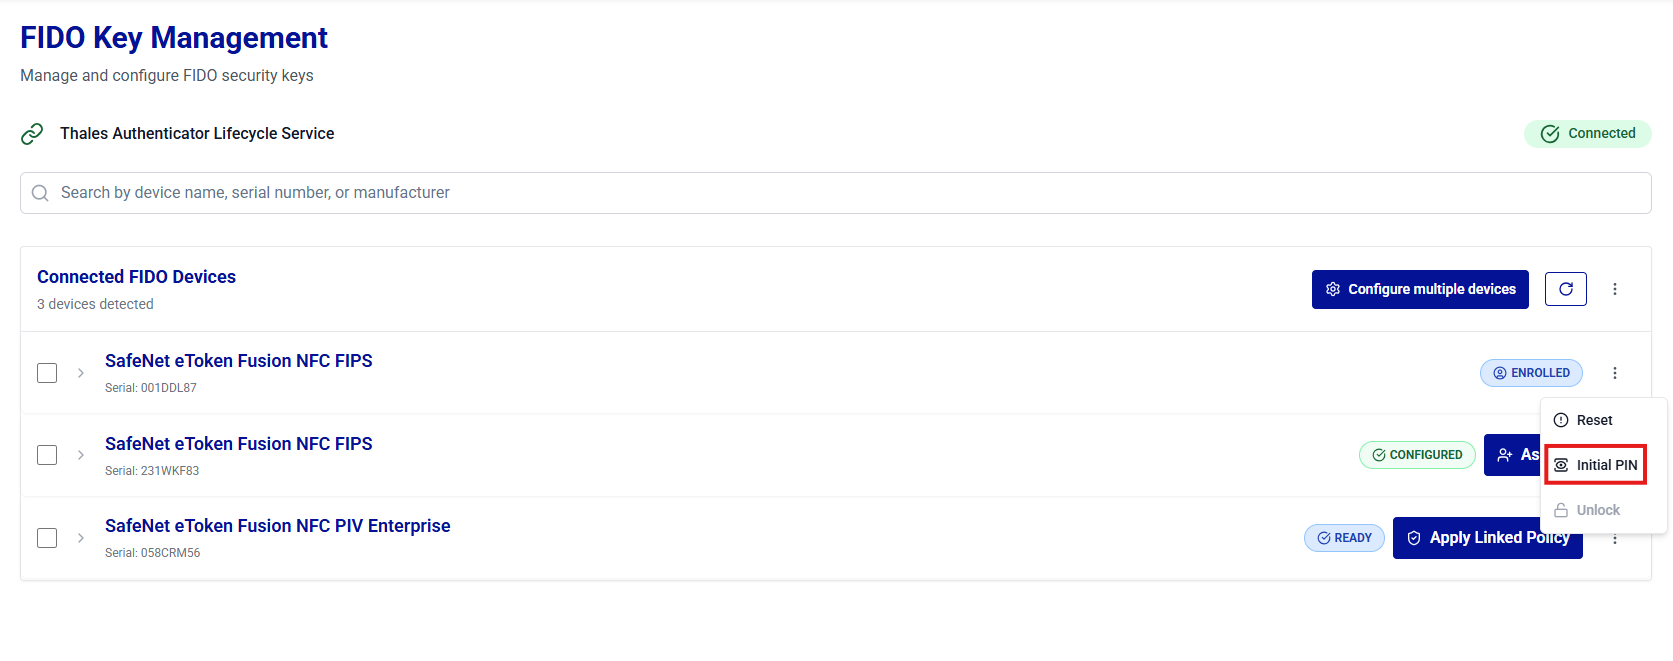
-
On the Device PIN window, click on the Show Password
 icon to view a device user PIN and Admin PIN.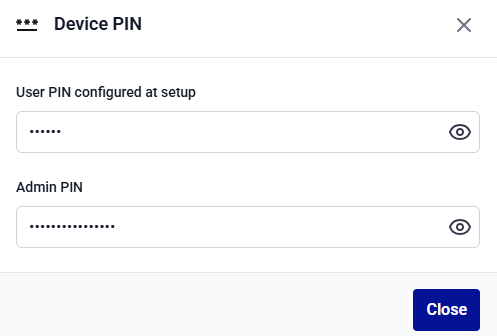
-
Click Close to close the window.
Reset FIDO Devices
The Reset operation restores a FIDO device to its factory state and removes all device configurations, credentials, and the user PIN. To prevent identity provider (IDP) credentials from remaining active after the device is reset, the system first revokes the device's IDP credentials and then performs the factory reset.
Caution
Resetting a device is an irreversible operation. It permanently deletes all previously enrolled credentials. Ensure that alternative access mechanisms are in place before initiating this operation.
Perform the following steps to reset a FIDO device:
-
Under Connected FIDO Devices, locate the device to reset, click the three-dots
icon for the device, and select Reset.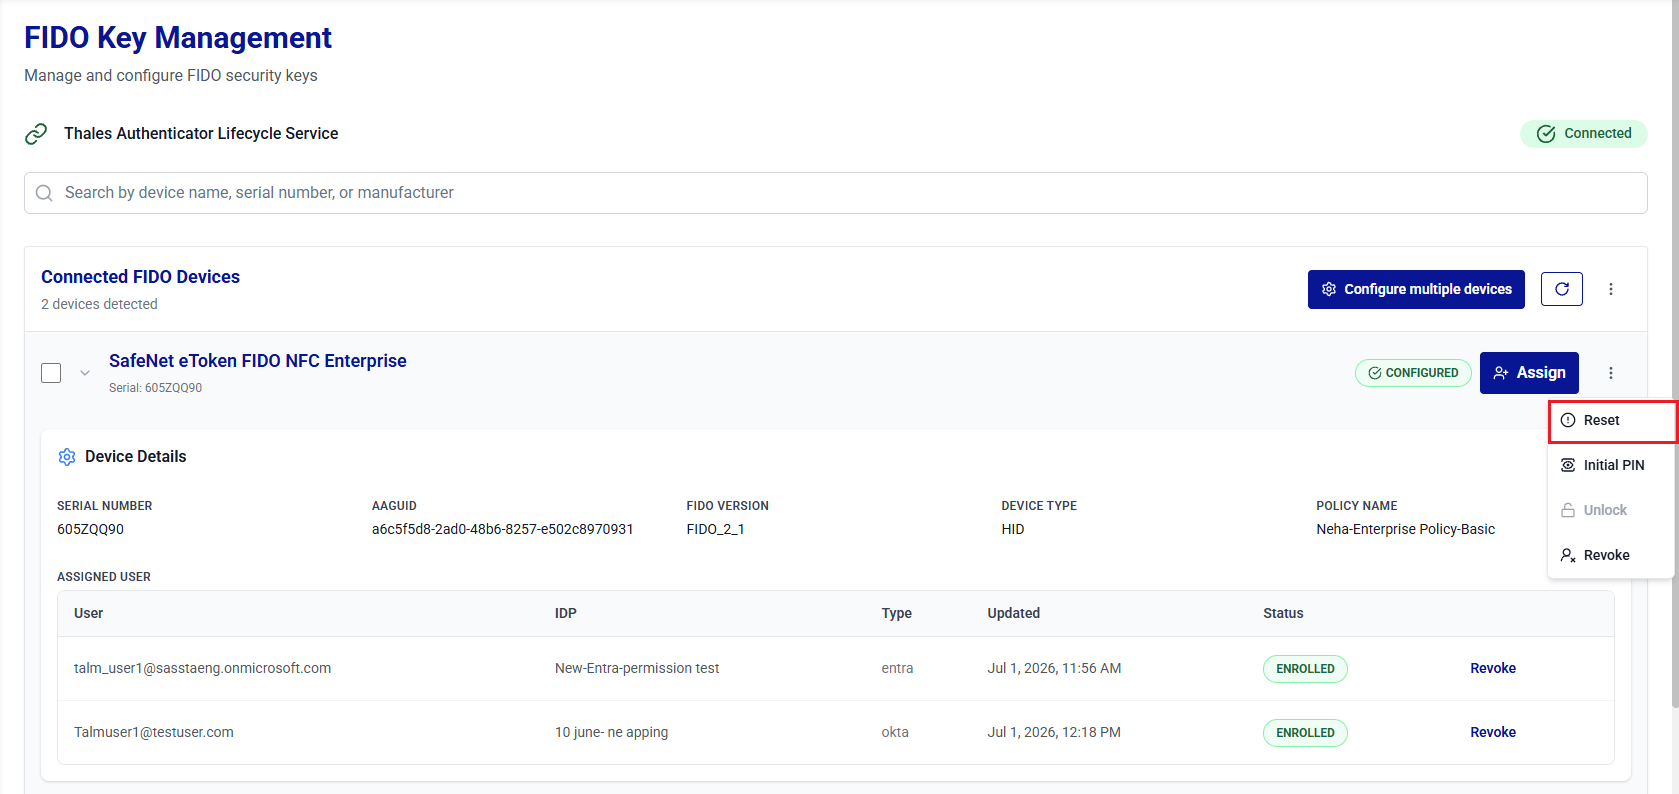
-
On the Revoke and Reset Device window, under Confirm, click Continue.
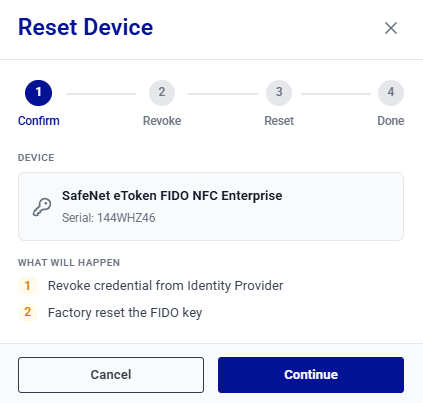
-
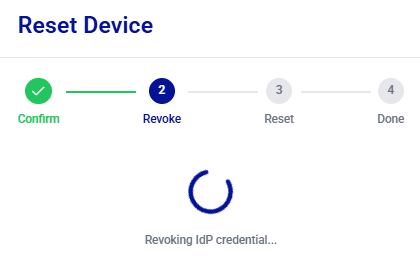
Under Revoke, the wizard revokes the credential for each assigned identity provider and displays the message, Revoking IDP credential....
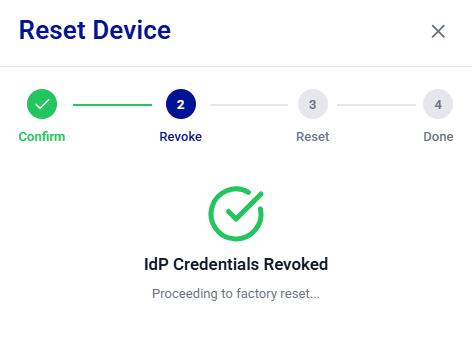
When all credentials have been revoked, the wizard displays the IDP Credentials Revoked message and automatically starts the factory reset process.
Note
-
If credential revocation fails, click Retry Revocation to try again or Skip & Continue to Reset to continue. Credentials that are not revoked may remain active and must be revoked manually from the identity provider's administration console.
-
If the device does not have any credential assignments, the reset process skips the credential revocation step and proceeds directly to the factory reset.
-
-
Under Reset, perform the following steps:
-
For managed (admin-supported) devices, enter the Admin PIN when prompted, and then click Continue.
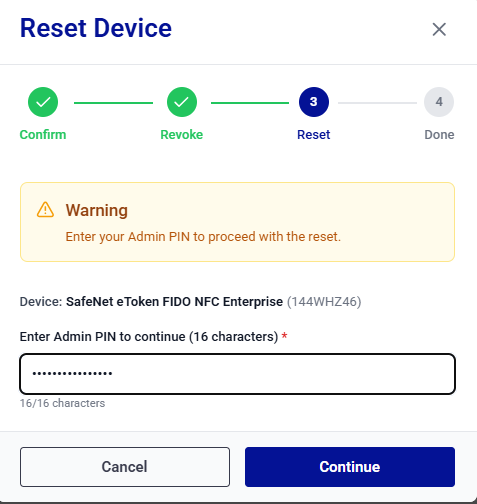
-
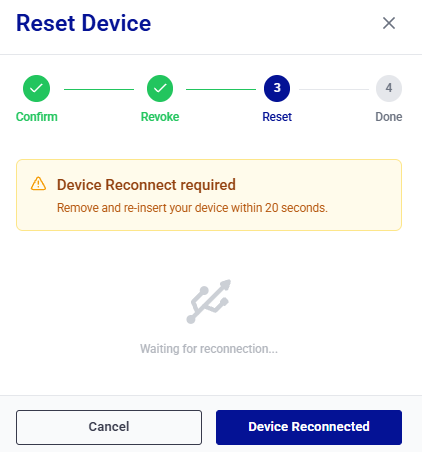
When the Device Reconnect required message is displayed, remove and re-insert the device within 20 seconds, and then click Device Reconnected.
-
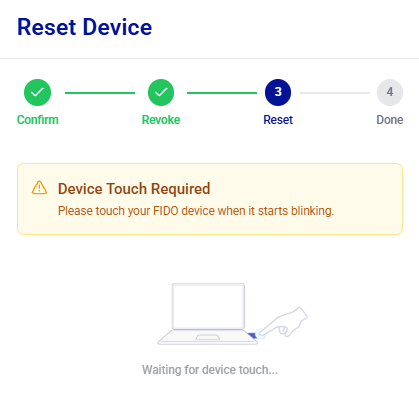
When the Device Touch Required message is displayed, touch the device to verify the administrator's presence (most devices blink).
-
-
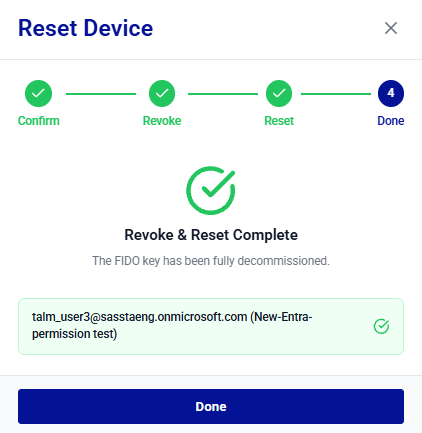
The reset operation is complete, and the Revoke & Reset Complete message is displayed. Review the revocation status for each user and identity provider, and then click Done.
Note
If the device is reset but one or more credentials cannot be revoked, the Reset Complete (with issues) message is displayed. Review the results to identify the users and identity providers associated with the failed revocations.
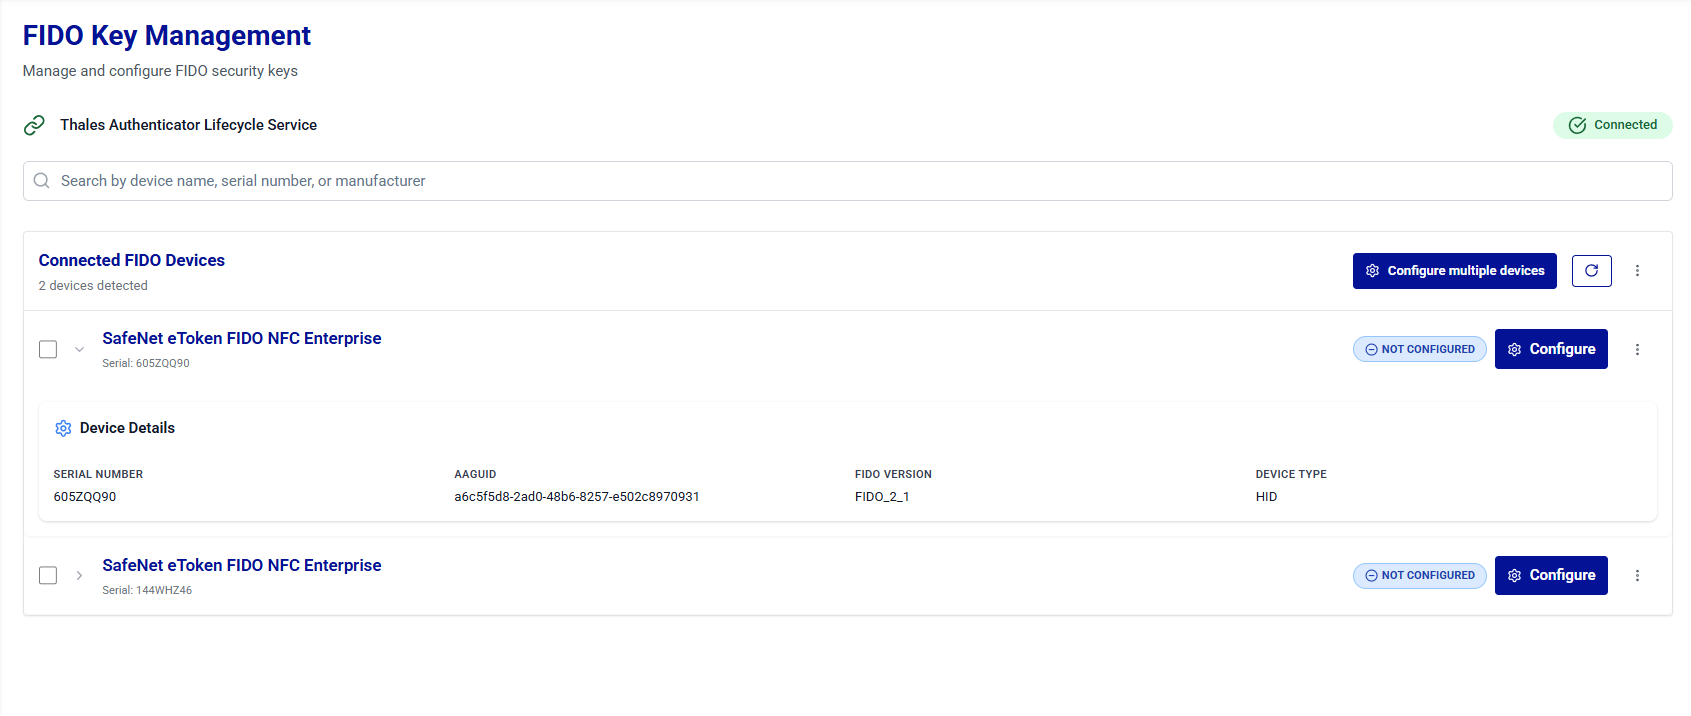
After the reset is complete, the device status changes to NOT CONFIGURED. The device can then be configured and assigned again.
Unlock Devices
A FIDO device is locked after repeated incorrect PIN attempts. When the device is locked, the user cannot authenticate until it is successfully unlocked. Thales Authenticator Lifecycle Manager provides two secure options to unlock a device:
- Physical Unlock (Admin Mode): The administrator has physical access to the device and performs the unlock operation directly in Thales Authenticator Lifecycle Manager.
- Remote Unlock (Challenge–Response Method): The locked device stays with the end user, while the administrator assists remotely using Thales Authenticator Lifecycle Manager. This operation can be performed under Device Inventory.
Note
The Unlock option is available only for managed devices (Thales FIDO 2.1 devices). It does not appear for unmanaged devices.
Physical Unlock
The physical unlock option is used when the administrator has direct access to the locked FIDO device. This method does not require interaction with the end user during the unlock process and is performed entirely within Thales Authenticator Lifecycle Manager.
Before starting the physical unlock process, ensure to complete the following prerequisites:
- An administrator account or admin role is required to perform the operation.
- The locked FIDO device is physically available and can be connected to the administrator’s workstation.
Perform the following steps to unlock the FIDO device:
-
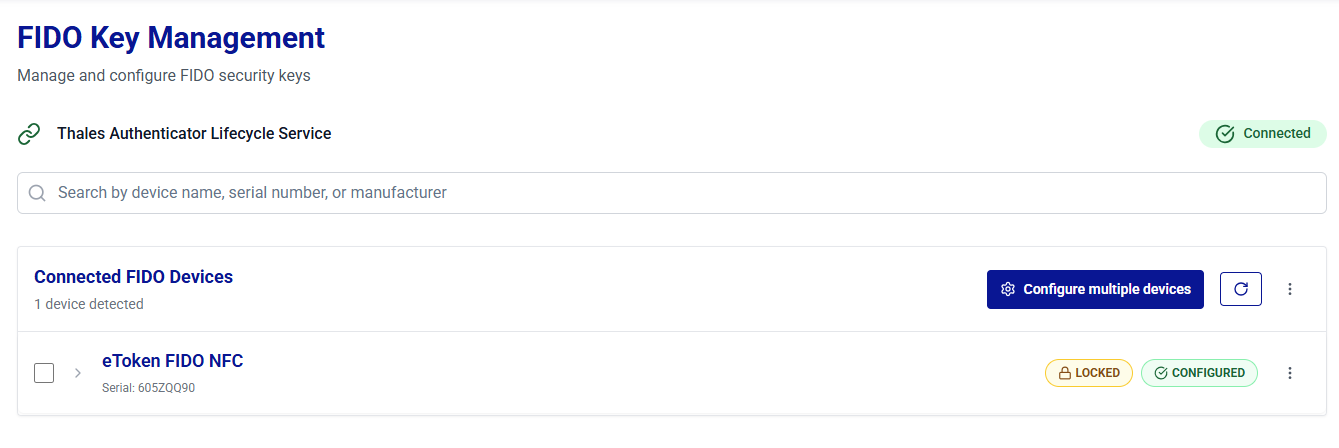
Log in to Thales Authenticator Lifecycle Manager as an administrator, go to the FIDO Keys menu, and connect the locked FIDO device to the administrator workstation.
-
The locked device is listed under Connected FIDO Devices. Click the three-dots
icon for the device and select Unlock.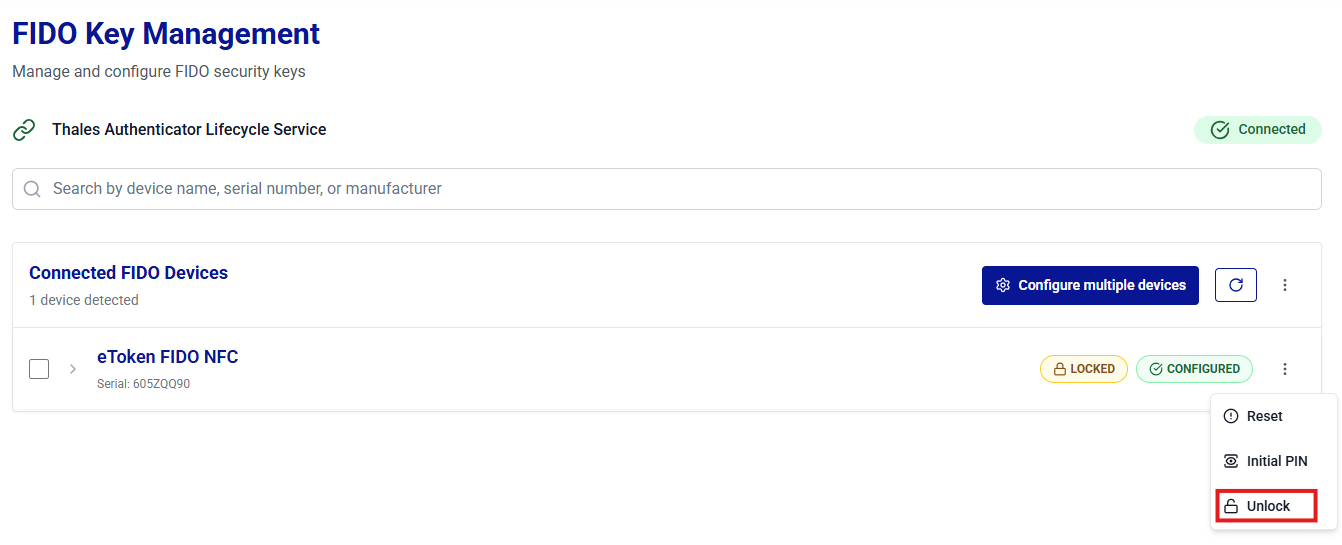
-
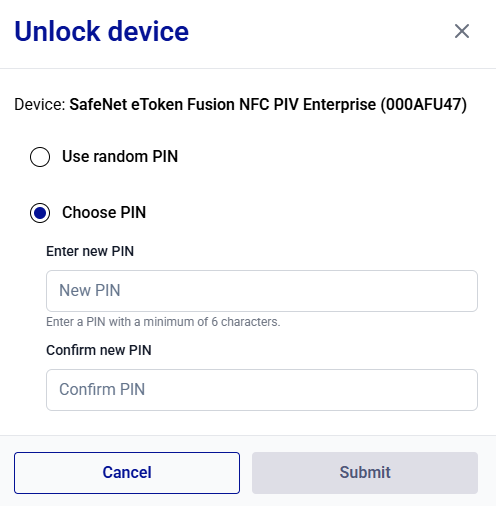
Under Unlock device, select one of the following options to generate a new PIN:
-
Use random PIN: Thales Authenticator Lifecycle Manager generates a new PIN automatically for the device.
-
Choose PIN: Manually set a new PIN for the device.
-
-
Click Submit to complete the operation.
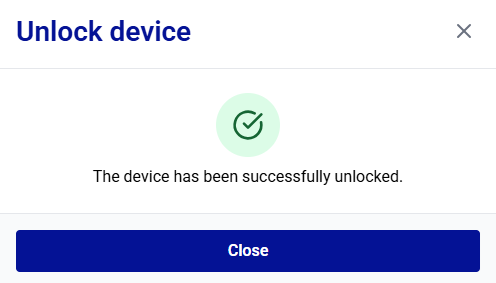
After the device is successfully unlocked, the success message is displayed.
-
Click Close.
Revoke Devices
The Revoke operation revokes a device for one or more users by permanently disabling the associated credential assignments. Use this operation when user access must be removed or when the device is lost, stolen, compromised, or no longer authorized. Revocation changes the affected user assignment status to REVOKED.
In addition to Device Inventory, administrators can revoke devices directly from the FIDO Key Management window without leaving the connected-devices view.
The following revocation options are available:
-
Revoke Device for a Single User – Revokes the device for a single user. All other users' assignments on the device remain ENROLLED and unaffected.
-
Revoke Device for All Users – Revokes the device for all assigned users in a single operation.
Warning
Revocation is a permanent action. Once a device is revoked for a user(s), it cannot be used for authentication again by the user. To restore access, re-enroll the device for the user.
Revoke Device for a Single User
When a device is assigned to multiple users, you can revoke the device for an individual user without affecting other users. Only the selected user's assignment is revoked, and all remaining assignments on the device remain ENROLLED.
Note
Revoking a device for a single user removes the assignment from both the device and the selected identity provider.
Perform the following steps:
-
Under Connected FIDO Devices, search and locate the target device, and click the expand arrow
icon to display the Device Details. -
In the ASSIGNED USER table, locate the user for whom you want to revoke the device, and then click Revoke.
-
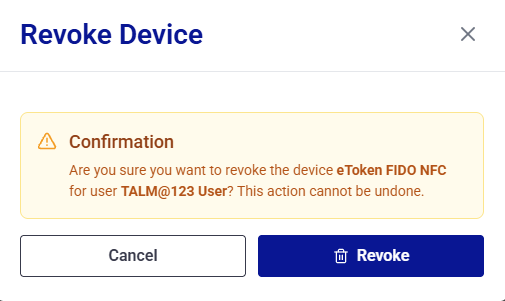
The Revoke Device window is displayed, showing the device name and the user name. Click Revoke to confirm the operation.
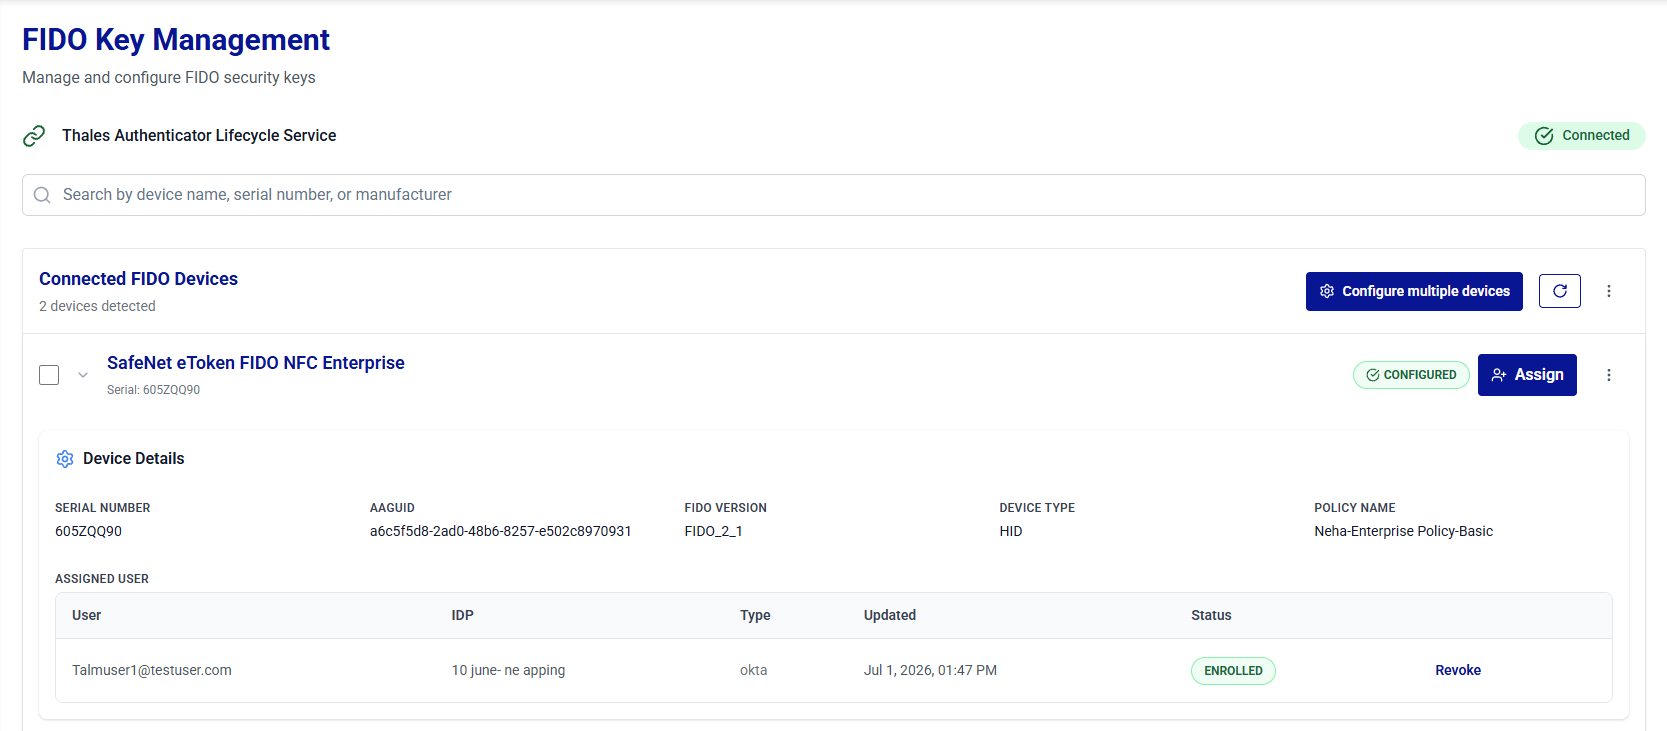
After revocation, the user assignment is removed from the device and no longer appears in the ASSIGNED USER table. Remaining assignments stay ENROLLED on the device. For assignment history, see Device Inventory.
Revoke Device for All Users
Use this option to revoke the device for all assigned users in a single operation. Revoking all assignments does not affect the device status, and the device remains CONFIGURED.
Perform the following steps:
-
Under Connected FIDO Devices, search for and locate the target device. Click the three-dots
icon for the device, and then select Revoke.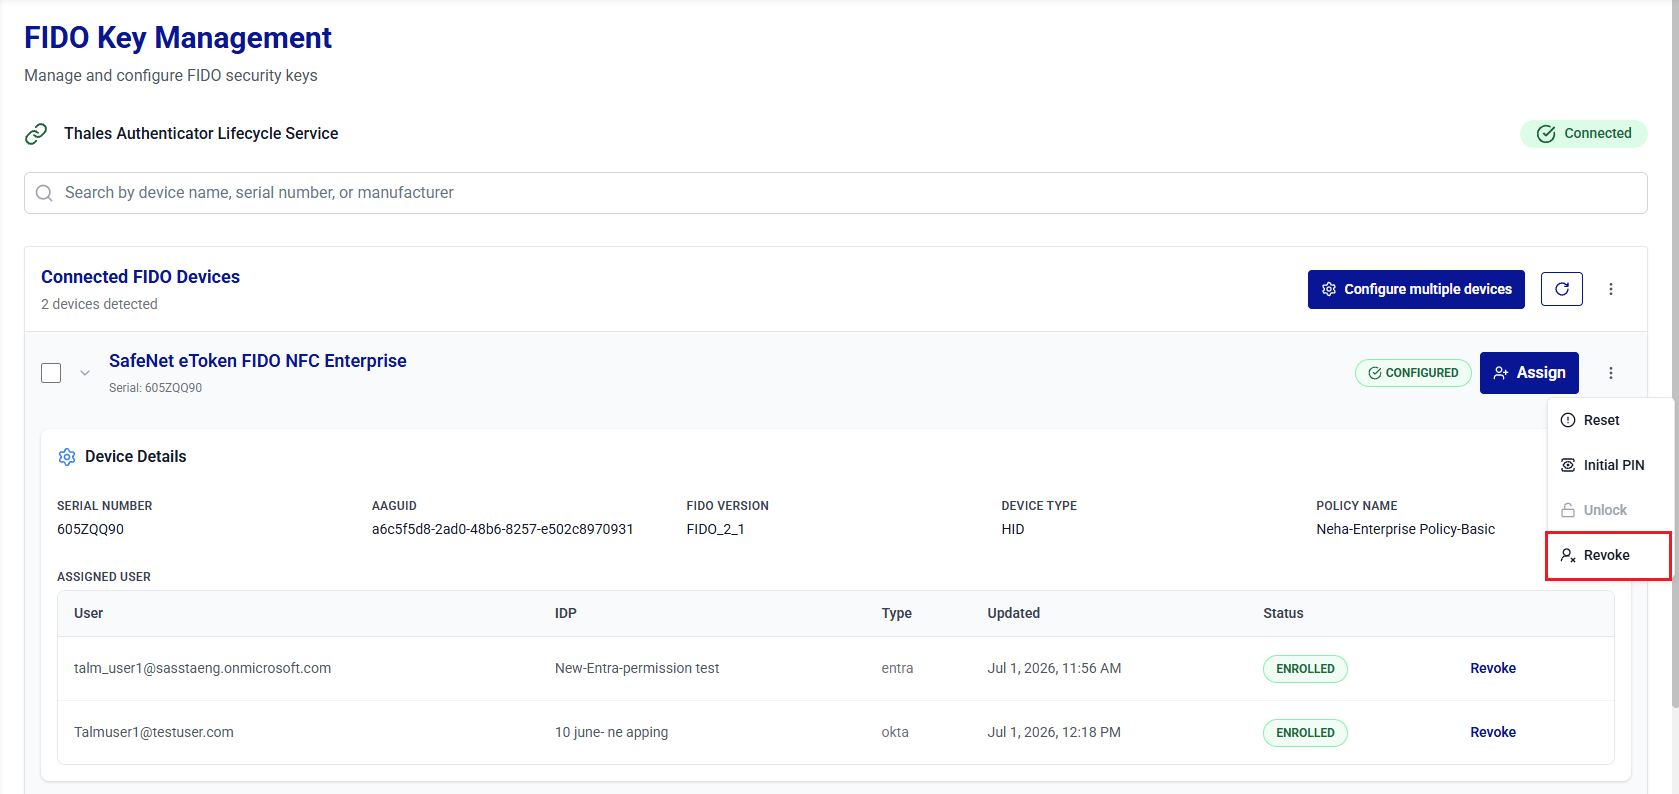
-
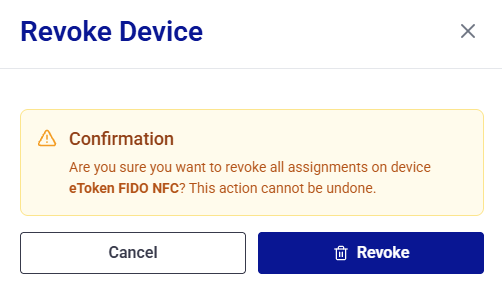
On the Revoke Device window, review the confirmation message, and then click Revoke to confirm the operation.
For a device with multiple assignments, the message confirms that the operation will revoke all assignments on the device across every identity provider.
After revocation, all assignments on the device are set to REVOKED, and the ASSIGNED USER table is no longer displayed for the device. For assignment history, see Device Inventory.