



FIDO Provisioning
To access this page, navigate to Settings > FIDO Provisioning.
FIDO Provisioning enables integration between the Thales Authenticator Lifecycle Manager and enterprise identity systems, allowing seamless user authentication and access management. This integration involves configuring endpoints and parameters required for secure communication with identity providers (IDPs). After the integration is complete, administrators can search for IDP users and enroll or revoke FIDO devices for those users.
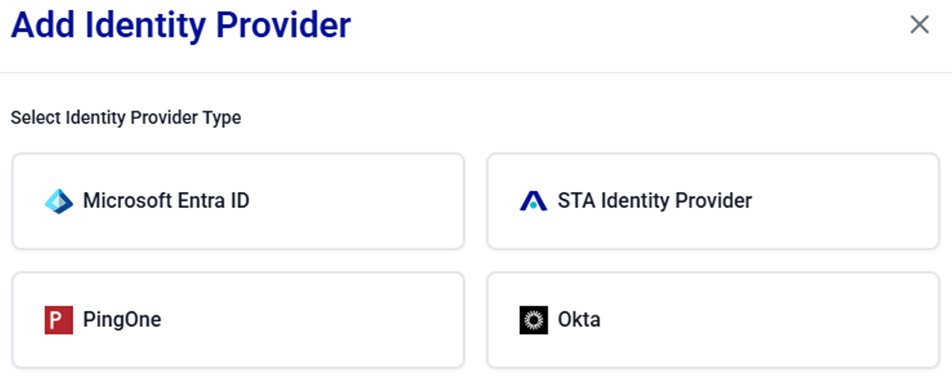
The following identity providers are supported:
- Microsoft Entra ID (Azure AD)
- SafeNet Trusted Access (STA)
- PingOne
- Okta
FIDO Provisioning Table
The FIDO Provisioning table displays all configured identity providers along with their current status and available actions.
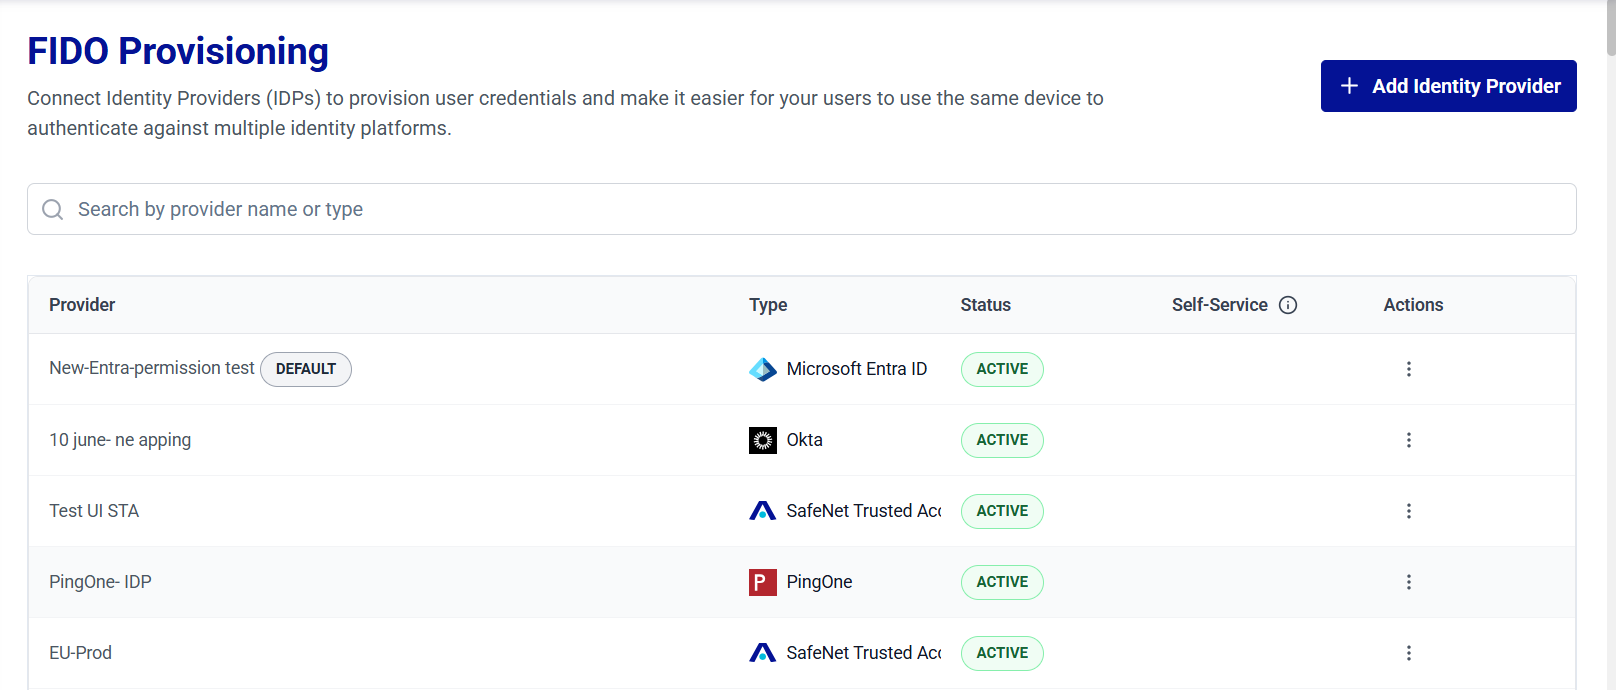
The following table explains each column in the FIDO Provisioning table.
| Column | Description |
|---|---|
| Provider | Name of the identity provider. |
| Type | Identity provider type. |
| Status | Indicates the current status of the identity provider: - ACTIVE: Configured, connection successfully tested, and available for user search and enrollment operations. - INACTIVE: Configured but connection not yet tested. |
| Self-Service | Indicates whether self-service enrollment is enabled or disabled. Self-service enrollment is available only for Microsoft Entra ID identity provider. For configuration steps, see Configure Microsoft Entra ID. |
| Actions | Available actions: - Edit an identity provider  - Delete an identity provider  - Set a default identity provider  . . |
Manage IDP Integrations
Administrators can perform the following operations to manage IDP integrations:
- Search Identity Providers
- Add an Identity Provider
- Edit an Identity Provider
- Delete an Identity Provider
- Set a Default Identity Provider
Search Identity Providers
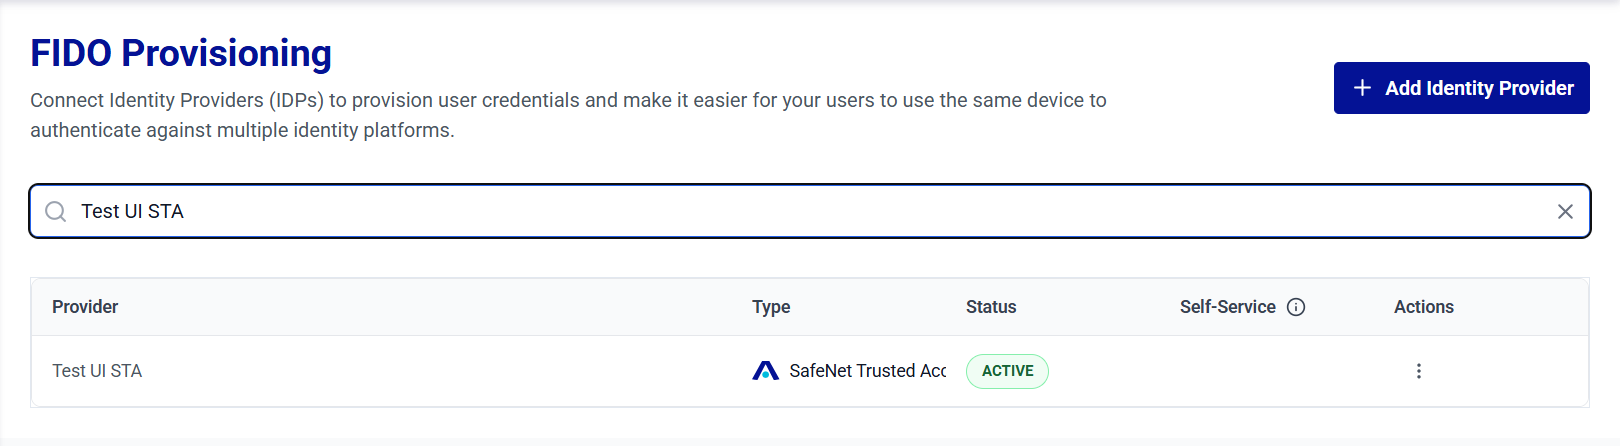
The Search feature allows administrators to quickly locate identity providers. Use the search bar to filter identity providers and view their details based on either the identity provider name or type.
Add an Identity Provider
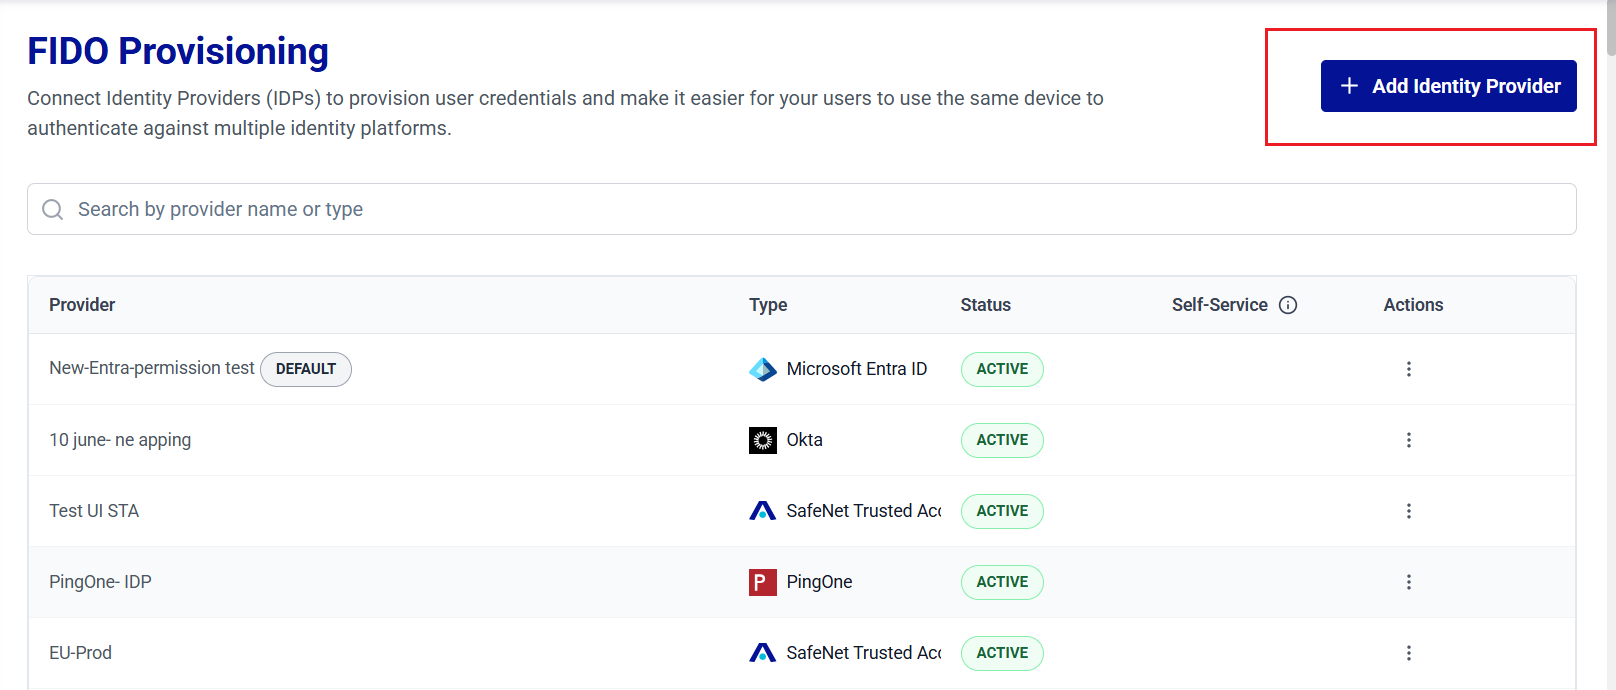
The Add Identity Provider button, located in the top-right corner of the FIDO Provisioning window, allows you to select and configure an identity provider.
Caution
- IDP credentials are case sensitive (for example, Client Secret for Entra ID, API Key for STA).
- Ensure that Console access is restricted to authorized administrators and credentials are stored securely in accordance with your organization’s security policies.
-
On the FIDO Provisioning window, click Add Identity Provider.
-
On the Add Identity Provider window, select the IDP you want to configure.
-
Perform the IDP configuration steps:
Configure Microsoft Entra ID
-
Under Microsoft Entra ID, complete the following fields:
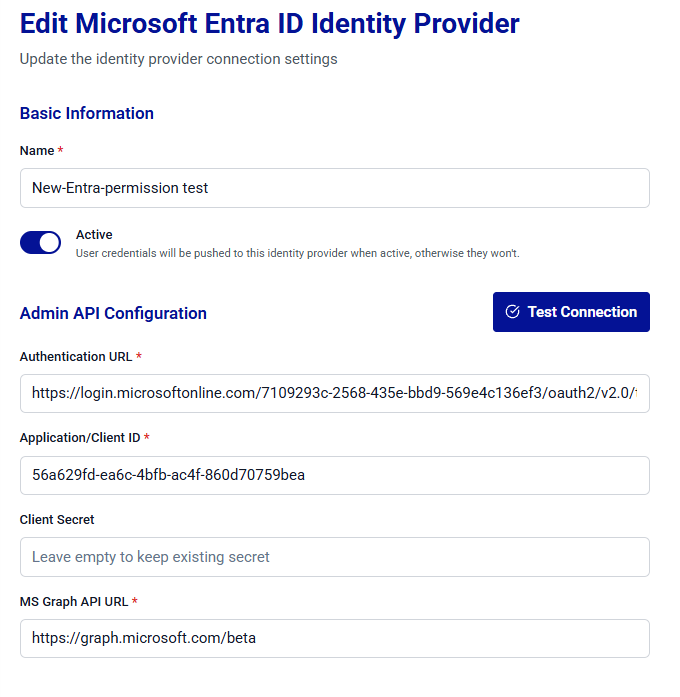
Field Description Name A unique name for the IDP. Active Turn on the Active toggle to activate the IDP. Authentication URL The endpoint URL is provided by the IDP support to handle authentication requests. This URL allows Thales Authenticator Lifecycle Manager to securely communicate with the IDP to validate user credentials and issue authentication tokens. Application/Client ID The client ID of the registered application or service that will use FIDO devices for user authentication. Client Secret A valid client secret generated for the registered application or service. Thales Authenticator Lifecycle Manager uses the client secret along with the Application/client ID to authenticate securely with the IDP. MS Graph API URL The URL (https://graph.microsoft.com/beta) used by Thales Authenticator Lifecycle Manager to connect with the Microsoft Graph API for operations such as user search, device assignment, and device revocation. 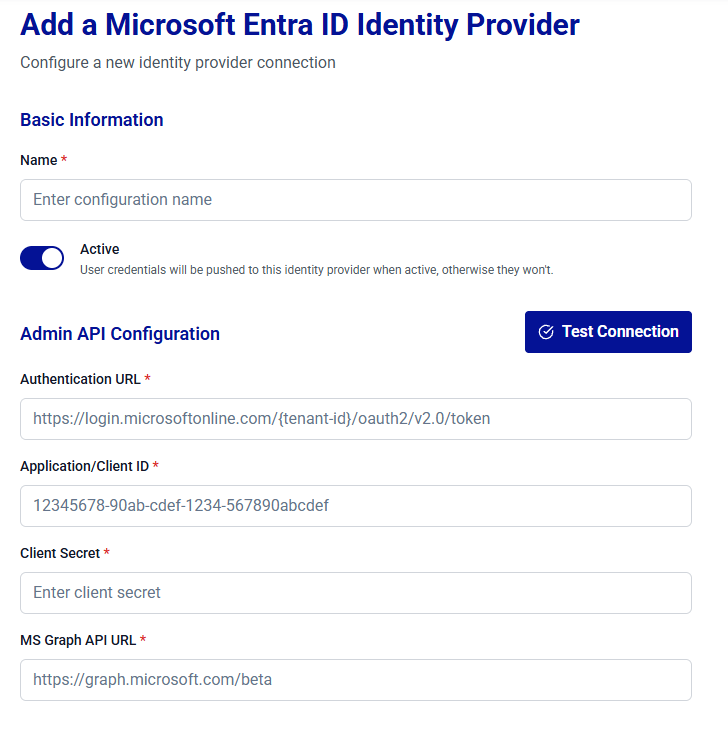
-
Click Test Connection.
Caution
- Ensure that the Microsoft Entra ID application registration is correctly configured, and that the client secret is valid and not expired.
- Verify that both the authentication URL and the Microsoft Graph API URL are correct and aligned with your tenant and environment requirements.
- Confirm that all required Microsoft Graph API permissions are granted and that admin consent is provided for the application registration. For more infomration, refer to Thales Authenticator Lifecycle Manager integration with Microsoft Entra ID
Note
Changes made at the application level, such as updating the client secret, enabling or disabling the application, or modifying Graph API permissions, may take up to 60 minutes to reflect due to token caching.
-
(Optional) After a successful connection, scroll down to configure FIDO settings for the identity provider. This configuration allows administrators to control how FIDO authenticators are validated and to define which authenticators are permitted or blocked based on their Authenticator Attestation GUID (AAGUID).
Complete the following fields.
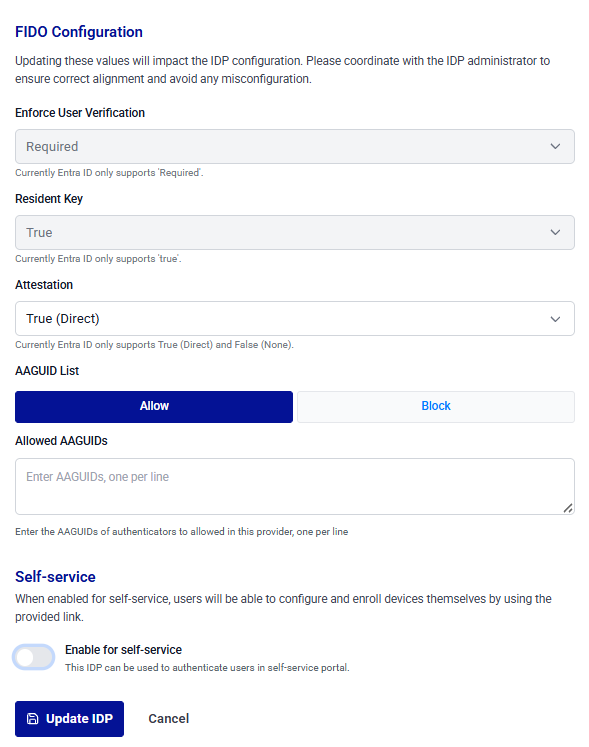
Field Description Enforce User Verification Specify whether user verification (such as a PIN or biometric) is required during FIDO authentication. Currently, Microsoft Entra ID only supports Required. Resident Key Indicates whether the FIDO credential is stored on the authenticator (resident credential). Currently, Microsoft Entra ID only supports true. Attestation Select the level of authenticator attestation required during registration. Currently, Microsoft Entra ID only supports True (Direct) and False (None). AAGUID List Select one of the two options (Allow and Block) to specify allowed or blocked AAGUIDs for the IDP. Allowed AAGUIDs / Blocked AAGUIDs Enter the AAGUIDs of authenticators to be allowed or blocked. Enter one AAGUID per line. The field name changes based on the option selected under AAGUID List. 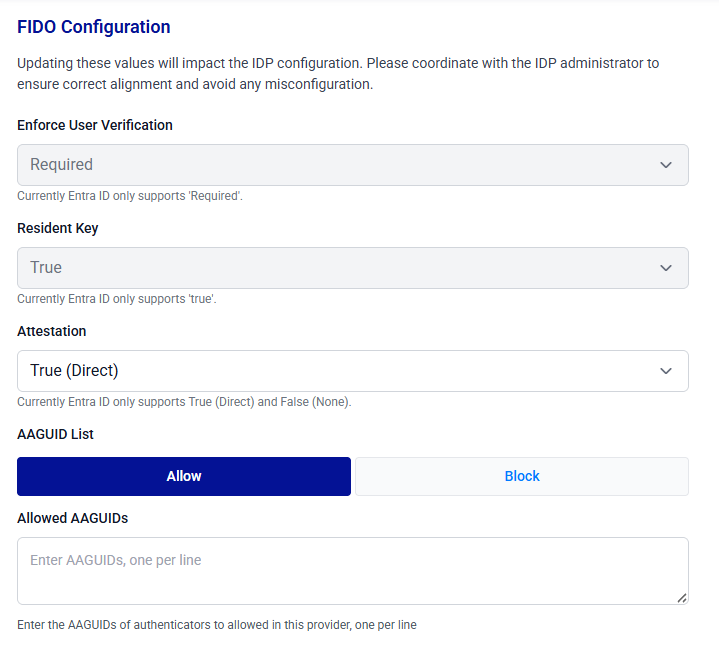
-
(Optional) Scroll down to the Self-service section to allow end users to register their FIDO devices through the self-service registration portal, without administrator assistance. For the end-user device registration steps, see Authenticator Manager.
Note
-
The external identity provider (IDP) used to authenticate users during self-service registration must be registered with the OneWelcome Identity Broker before you enable self-service registration. For more information, see External IDP Configuration for Self Service.
-
Ensure that you have access to the external IDP, which requires either the
role_broker_readorrole_broker_writepermission, before enabling self-service registration.
Perform the following steps:
-
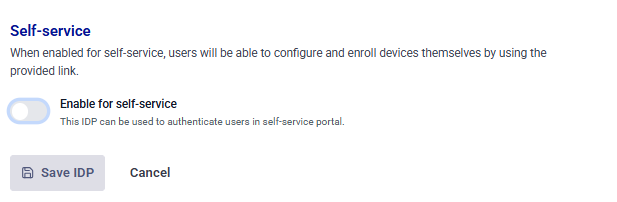
Turn on the Enable for self-service toggle.
-
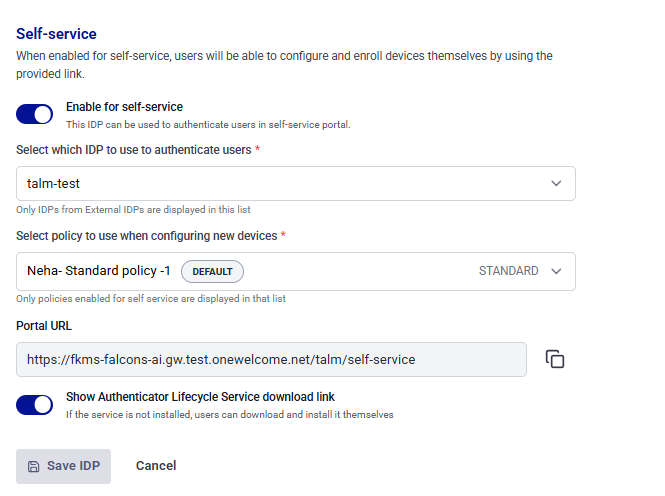
Complete the following fields.
Field Description Enable for self-service Turn on this toggle to allow this identity provider to authenticate users on the self-service portal. This toggle is available only when the identity provider is Active. Select which IDP to use to authenticate users Select the external identity provider used to authenticate users on the self-service portal. Select policy to use when configuring new devices Select the policy that is applied automatically when users configure devices through the self-service portal. Show Authenticator Lifecycle Service download link Turn on this toggle to display a download link on the portal so that users can install the Thales Authenticator Lifecycle Service if it is not already installed on their machines. Note
The Portal URL field displays the self-service portal URL that end users need to initiate the device registration. The URL is generated automatically based on the selected identity provider.
-
Click Save IDP.
-
Configure STA Identity Provider
-
Under STA Identity Provider, complete the following fields:
Field Description Name A unique name for the IDP. Active Turn on the Active toggle to activate the IDP. API URL The endpoint URL required to handle authentication requests. This URL allows Thales Authenticator Lifecycle Manager to securely communicate with the IDP to validate user credentials and issue authentication tokens. API Key A valid STA API key provided by the identity provider (IDP) used to authenticate and authorize access to the SafeNet Trusted Access (STA) API. 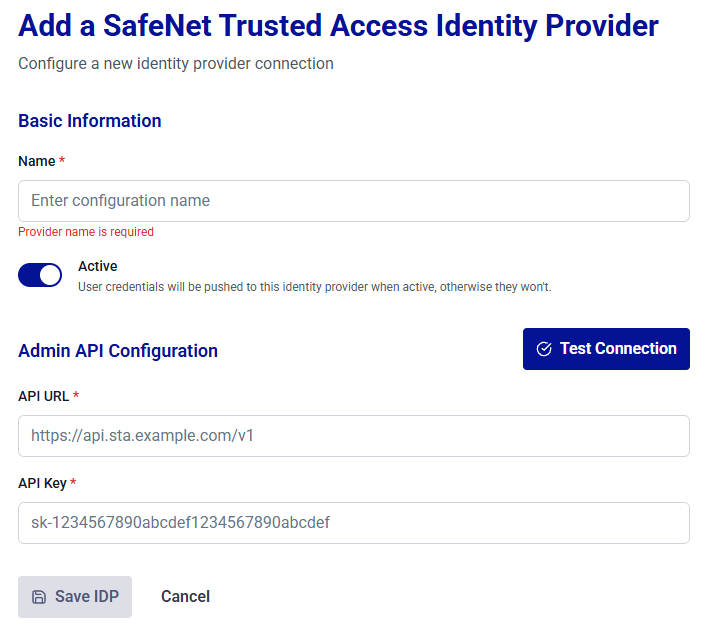
-
Click Test Connection.
-
After the connection is successful, click Save IDP.
Configure PingOne
-
Under PingOne, complete the following fields:
Field Description Name A unique name for the IDP. Active Turn on the Active toggle to activate the IDP. Application/Client ID The client ID of the registered application or service that will use FIDO devices for user authentication. Client Secret A valid client secret generated for the registered application or service. Thales Authenticator Lifecycle Manager uses the client secret along with the Application/client ID to authenticate securely with the IDP. Auth Server Base URL The endpoint URL (https://auth.pingone.sg) handles the authentication requests. This URL allows Thales Authenticator Lifecycle Manager to securely communicate with the IDP to validate user credentials and issue authentication tokens. API Server Base URL The URL (https://api.pingone.sg/v1), used by Thales Authenticator Lifecycle Manager to connect with the Microsoft Graph API for operations such as user search, device assignment, and device revocation. Environment ID The unique identifier of a PingOne environment, used by Thales Authenticator Lifecycle Manager to connect to the correct PingOne tenant for operations such as authentication, user management, and API communication. 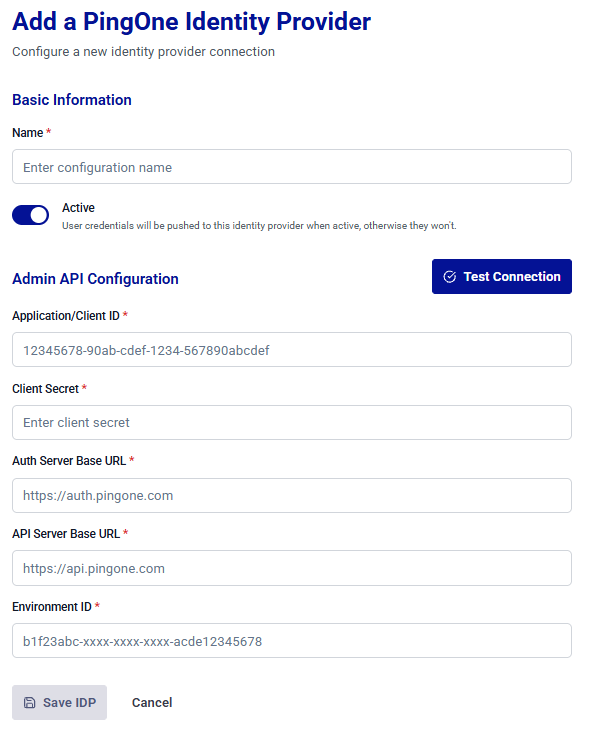
-
Click Test Connection.
-
After the connection is successful, click Save IDP.
Tip
Ensure that your PingOne application registration is correctly configured, and that the client secret is valid and has not expired. Also, verify that both the Client ID (Application ID) and the Environment ID are correct and aligned with your tenant and environment requirements.
Configure Okta
-
Under Okta, complete the following fields:
Field Description Name A unique name for the IDP. Active Turn on the Active toggle to activate the IDP. Application/Client ID The client ID of the registered application or service that will use FIDO devices for user authentication. API URL The Okta API base URL (for example, https://integrator-5476601.okta.com/api/v1) for your tenant, used to perform operations such as user search, device assignment, and device revocation. Authorization URL The endpoint URL (for example, https://integrator-5476601.okta.com/oauth2/v1/authorize) used to handle authentication requests. This URL allows Thales Authenticator Lifecycle Manager to securely communicate with the IDP to validate user credentials and issue authentication tokens. Key ID The Key ID (KID) associated with the private key used to sign authentication requests. Private Key The private key used to enable secure communication and to sign authentication requests with Okta. 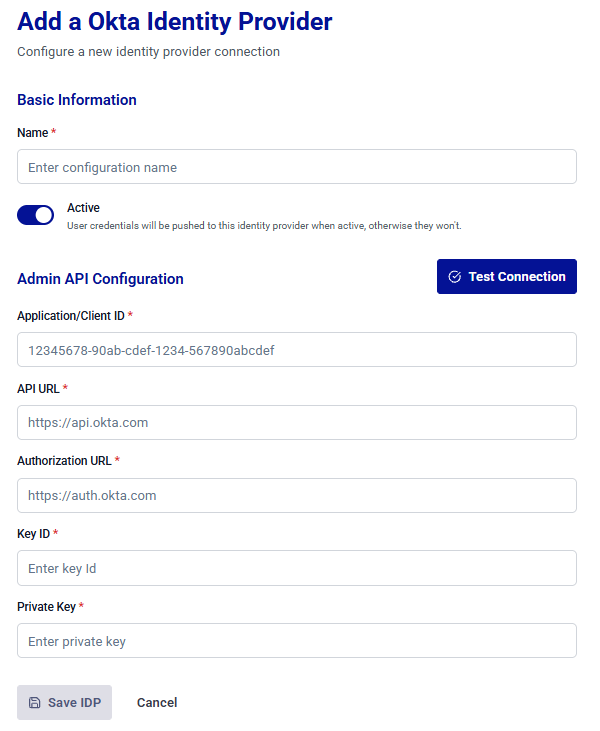
-
Click Test Connection.
-
After the connection is successful, click Save IDP.
Tip
Ensure that your Okta application registration is correctly configured, and that the private key is valid and has not expired. Also, verify that the Client ID (Application ID) and the Key ID are correct and aligned with your tenant requirements.
-
Edit an Identity Provider
-
On the FIDO Provisioning window, search for and locate the target identity provider name from the list.
-
In the Actions column, click the three-dots
 icon for the identity provider, and then select Edit.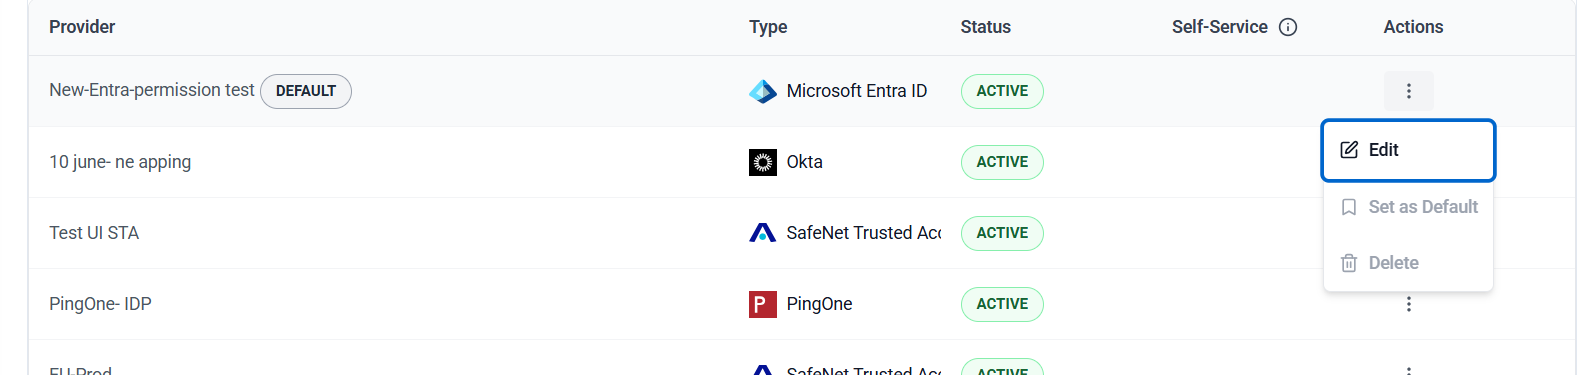
-
On the Edit Identity Provider window, update the IDP configuration as needed.
Note
For field descriptions, refer to step 3 of the Add Identity Providers section.
-
Click Test Connection to revalidate the configuration.
-
(Optional) Scroll down and update the FIDO Configuration and Self-service settings, if applicable. These sections apply to Microsoft Entra ID identity providers.
Caution
If the FIDO Configuration is updated for an existing Microsoft Entra ID IDP, the Client Secret must be entered. This value is required to save the changes.
-
Click Update to update the configuration.
Caution
When updating Client Secret for Entra ID or API Key for STA, coordinate with your identity provider support team to avoid authentication disruptions. Whenever possible, schedule these changes during a planned maintenance window.
Delete an Identity Provider
Note
You can delete only identity providers that are not in use. An identity provider that has users with FIDO devices currently assigned, that is, devices are currently enrolled to users of that identity provider, cannot be deleted. To delete such an identity provider, first revoke the device assignments associated with its users.
-
On the FIDO Provisioning window, search for and locate the target identity provider name from the list.
-
In the Actions column, click the three-dots
icon for the identity provider, and then select Delete. 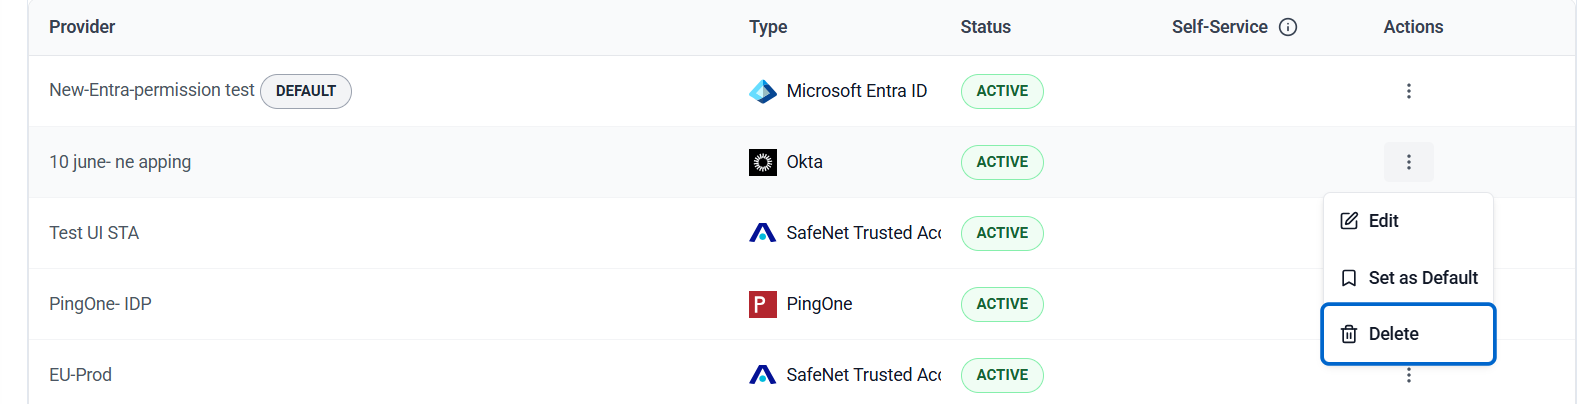
-
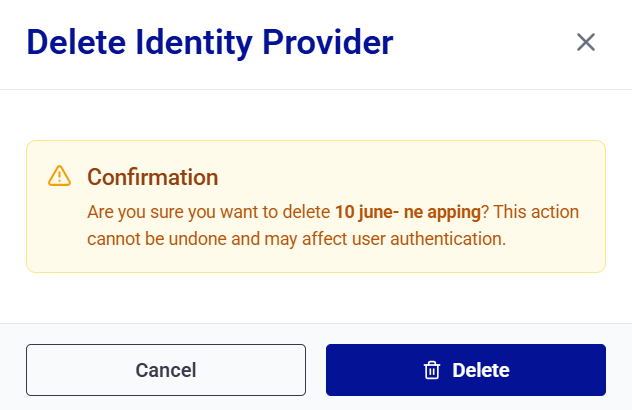
The Delete Identity Provider window is displayed. Click Delete to confirm the operation. The IDP configuration will be successfully removed.
Warning
Deleting an identity provider immediately disables user authentication via the IDP. Before proceeding, ensure that no critical workflows or dependencies rely on the IDP. After deletion, console users can no longer search for users or assign new devices through this identity provider.
Set a Default Identity Provider
Perform the following steps to set an identity provider as default:
-
On the FIDO Provisioning window, search for and locate the target identity provider name (for example, STA-IDP) from the list.
-
In the Actions column, click the three-dots
icon for the identity provider, and then select Set as Default.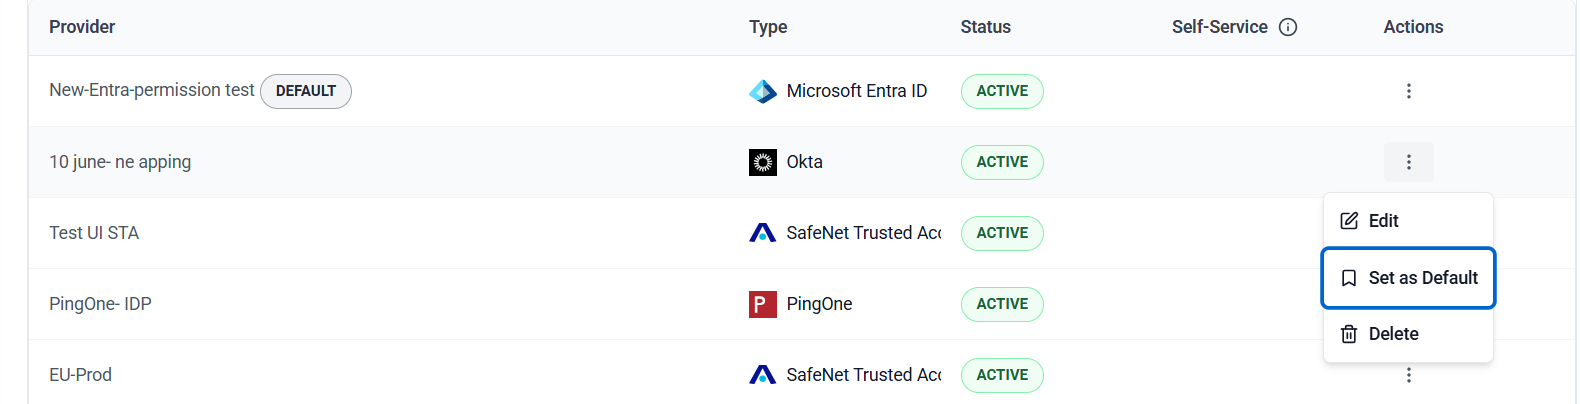
-
The Identity Provider (for example, STA-IDP) is set to default and the <IDP name> identity provider set as default. message is displayed.
The identity provider name is displayed with the DEFAULT indicator.

Note
Only one identity provider can be set as default at a time. Setting a new identity provider as default automatically clears the previous one.

