
Protecting Kubernetes Clients
This section describes how to protect Kubernetes (K8s) clients that are connected to storage groups and registration groups.
Storage Groups
To protect a K8s client attached to a storage group:
These steps are described below.
Create a Kubernetes Storage Group
First of all, you need to create a K8s storage group on the CipherTrust Manager. A storage group refers to a combination of a K8s StorageClass and a K8s Namespace. It is used to group together different K8s pods running on different nodes with the same K8s StorageClass and K8s Namespace. Different storage groups can exist for the same combination of K8s StorageClass and K8s Namespace.
While creating a K8s storage group, the Namespace and StorageClass of the K8s cluster are required. Contact your K8s administrator for these details.
Refer to Creating Kubernetes Storage Groups for details.
Apply a GuardPolicy to the Storage Group
After you have created a K8s storage group, you need to apply a GuardPolicy to it. Until a GuardPolicy is applied, a K8s client attached to the storage group cannot be registered successfully with the CipherTrust Manager.
To add a GuardPolicy to the storage group:
-
Open the Transparent Encryption application.
-
In the left pane, select Kubernetes (K8s) > Enrollment Configuration. The Persistent Volume tab on the Enrollment Configuration page appears, displaying a list of Kubernetes (K8s) storage groups.
-
Under Name, click the storage group to which you want to apply a GuardPolicy. The detail view of the K8s storage group is displayed.
-
On the GuardPolicies tab, click Create GuardPolicy. The Create GuardPolicy screen appears.
The Create GuardPolicy screen shows the list of available GuardPolicies. If no policies exist, you can create a new one. You can either select an available GuardPolicy or create a new one. This section describes how to create a new GuardPolicy to a storage group.
Click Create Policy. The General Info tab of the Create Policy wizard appears.
Step 1: General Info
-
Specify a unique Name for the policy. For example,
csi-policy.-
The name must start with a character. The maximum length can be 64 characters.
-
The name can contain alphanumeric characters, underscores (
_), and dashes (-). -
The name cannot contain the following special characters:
? : ; | ! @ # $ % ^ & * < = > + ( ) { } ~ , \ / [ ] ' "
-
-
Select CTE for Kubernetes as the Policy Type. This policy is required to protect K8s clients.
-
(Optional) Turn on the Learn Mode toggle. A warning message is displayed indicating that the policy is in Learn Mode.
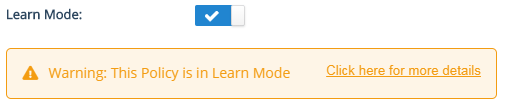
Refer to Learn Mode for details. By default, the toggle is turned off.
-
(Optional) Turn on the Restrict Update toggle. This option is used to restrict or allow any changes to the policy. By default, the toggle is turned off. This setting can be changed any time after the policy is created. Refer to Controlling Updates to Policies.
-
Click Next. The Security Rules screen is displayed.
Step 2: Security Rules
-
Click Add Security Rule. The Create Security Rule dialog box is displayed.
-
Specify the following details:
Field Description User Set User set for the rule. Process Set Process set for the rule. Resource Set Resource set for the rule. Action Actions for the rule. Refer to Actions for the complete list of supported actions. Effect Effect permission and options for the rule. This is a mandatory field. By default, deny,auditis added.Refer to Step 2: Add Security Rules for details on the fields.
-
Click Add. The newly created security rule appears in the list of security rules.
-
Click Next. The Key Rules screen is displayed.
Step 3: Add Key Rules
If you added a security rule with the Effect
ApplyKeyon the Security Rules screen, then you must add at least one key rule.To add a key rule:
-
Click Create Key Rule. The Create Key Rule dialog box is displayed.
-
Select a Key Name. This is a mandatory field.
-
Click Select next to the field. The Select Key dialog box shows the list of available keys.
Optionally, you can create a new CBC-CS1 key on this dialog box by clicking Create a New Key. Refer to Step 3: Add Key Rules for details on the fields.
-
Select the desired CBC-CS1 key. CTE for Kubernetes policies do not support XTS keys.
-
Click Select. The selected key appears in the Key Name field.
-
-
Click Add. The newly created key rule appears in the list of key rules.
-
Click Next. The Signature Rules screen is displayed.
Step 4: Add Signature Rules
-
Click Add Signature Rules. The Add Signature Rules dialog box is displayed.
-
Select a Signature Rule from the list.
Note
Ensure that you have already created a signature set for container images.
-
Click Add. The newly added signature rule appears in the list of signature rules.
-
Click Next. The Confirmation screen is displayed.
Step 5: Confirmation
-
Verify the policy details. The Confirmation screen displays general information about the policy and details of the security and key rules added to the policy.
If the details are incorrect or you want to modify them, click Back and update the details.
-
Click Save.
The newly created CTE for Kubernetes policy appears on the Create GuardPolicy dialog box. Similarly, add as many policies as required.
-
-
Select the desired policy.
-
Click Save.
The newly created GuardPolicy is displayed on the GuardPolicies tab.
Register the Kubernetes Client
Registration is the process of configuring a Kubernetes (K8s) client with a CipherTrust Manager.
This process creates SSL certificates for further communication between the CipherTrust Manager and the K8s client. Refer to Preparing a CTE for Kubernetes Volume for Deployment for details.
After registration, the K8s client can communicate with the CipherTrust Manager. All GuardPolicies applied to the K8s storage group are automatically added to the K8s client. A client configuration, identical to that of a CTE client, is then built and sent to the K8s client.
After successful registration, the K8s client appears on the K8s Clients page of the CipherTrust Manager GUI. The client status becomes Healthy.
Registration Groups
To protect a K8s client attached to a registration group:
These steps are described below.
Create a Kubernetes Registration Group
First of all, you need to create a K8s registration group on the CipherTrust Manager. A registration group refers to a combination of a K8s Registration Class and a K8s Namespace. It is used to group together different K8s pods running on different nodes with the same K8s Registration Class and K8s Namespace. Different registration groups can exist for the same combination of K8s Registration Class and K8s Namespace.
While creating a K8s registration group, the Namespace and Registration Class of the K8s cluster are required. Contact your K8s administrator for these details.
Refer to Creating Kubernetes Registration Groups for details.
Apply a GuardPoint to the Registration Group
After you have created a K8s registration group, you need to apply a GuardPoint to it. Until a GuardPoint is applied, a K8s client attached to the registration group cannot be registered successfully with the CipherTrust Manager.
To add a GuardPoint to the registration group:
-
Open the Transparent Encryption application.
-
In the left pane, select Kubernetes (K8s) > Enrollment Configuration.
-
Click the Cloud Object Storage tab. A list of K8s registration groups appears.
-
Under Name, click the registration group to which you want to apply a GuardPoint. The detail view of the K8s registration group appears.
-
On the GuardPoints tab, click Create GuardPoint. The Create GuardPoint screen appears.
-
Select a Policy. The Select Policy dialog box displays the available policies.
-
Select the desired policy.
If no policy exists, you can create one by clicking Create Policy. Refer to Creating Policies for details.
-
Click Select. The selected policy appears in the Policy field.
-
Specify the Type of the GuardPoint. Refer to Automatic and Manual GuardPoints for details on types of GuardPoints.
-
Specify the Path (or Cloud Object Storage URL for a COS GuardPoint) to be protected. You can specify the path in two ways:
-
URL: Enter the URL of the path.
-
Upload CSV: Upload a CSV file containing a list of URLs.
A maximum of 200 URLs can be specified through the URL option. A CSV file can contain a maximum of 1000 URLs.
Refer to Managing GuardPoints for details.
-
-
Click Create. The newly created GuardPoint appears in the list.
Register the Kubernetes Client
Registration is the process of configuring a Kubernetes (K8s) client with a CipherTrust Manager.
This process creates SSL certificates for further communication between the CipherTrust Manager and the K8s client. Refer to Preparing a CTE for Kubernetes Volume for Deployment for details.
After registration, the K8s client can communicate with the CipherTrust Manager. All GuardPoints applied to the K8s storage registration group are automatically added to the K8s client. A client configuration, identical to that of a CTE client, is then built and sent to the K8s client.
After successful registration, the K8s client appears on the K8s Clients page of the CipherTrust Manager GUI. The client status becomes Healthy.